Quick start guide
Getting Started with HeadLight Suite
This guide explains the onboarding workflow, the required steps, and the underlying logic for accessing the platform.
🔒 General Prerequisites
To access the various applications within the HeadLight Suite, you must meet two conditions:
- Have an active HeadLight Suite user account.
- Be assigned the appropriate role for each specific application.
Requesting Access
If you do not have an account or need your permissions updated, please contact the support team:
📨 Contact Email: fr-six-headlight@thalesgroup.com
HeadLight Admin
Preliminary
Prerequisites
The user must have one of the following roles:
- client-admin
- super-admin
- client-park-manager
- super-park-manager
Access HeadLight Admin using one of the following links:
- Sandbox - Admin - Sandbox
- Production - Admin - Production
An authentication window is displayed.
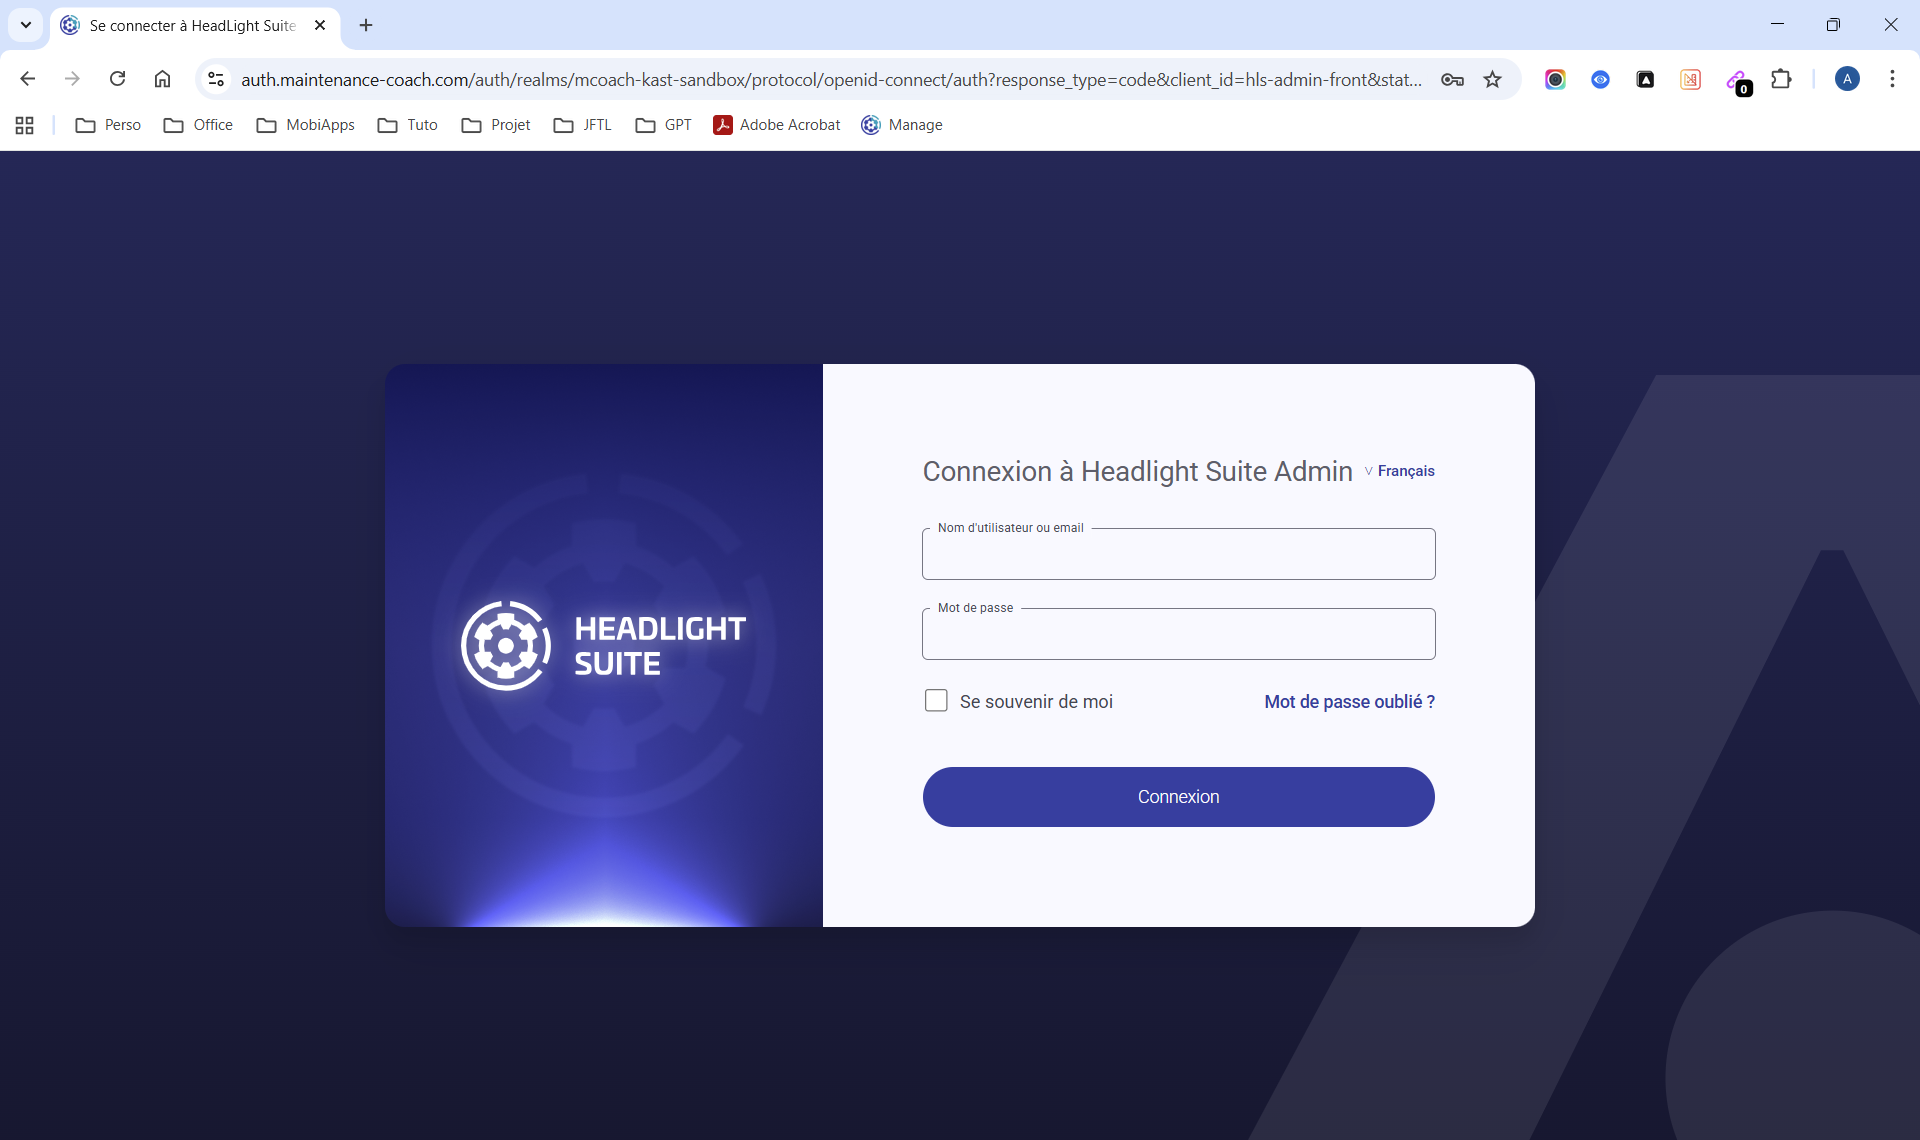
HL Admin - HeadLight Suite authentication page
Fill in the following fields:
- Username or email
- Password
The HL Admin dashboard is displayed.
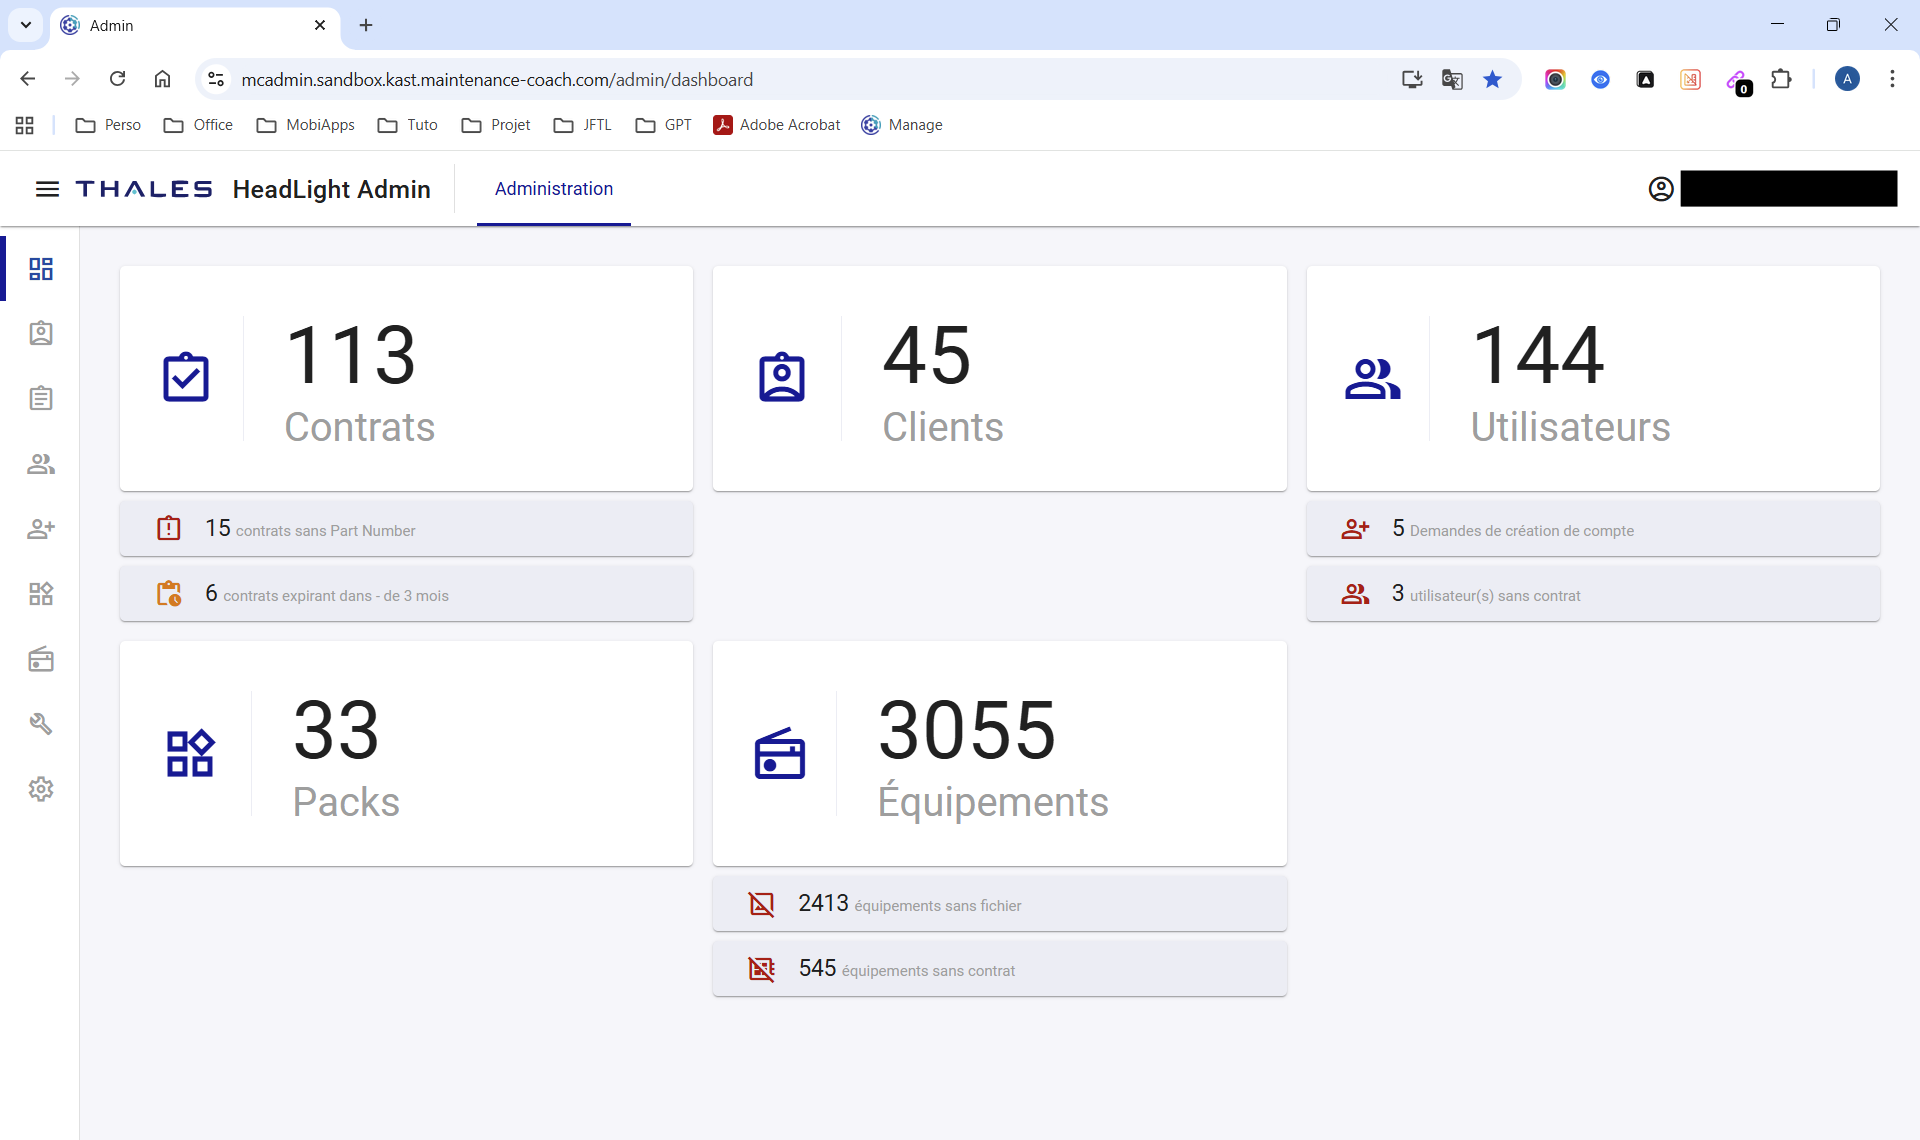
HL Admin - Dashboard page
Create a Client account
Video of demonstration
Prerequisites
The user must have the super-admin role.
A Client account is created from the Clients page.
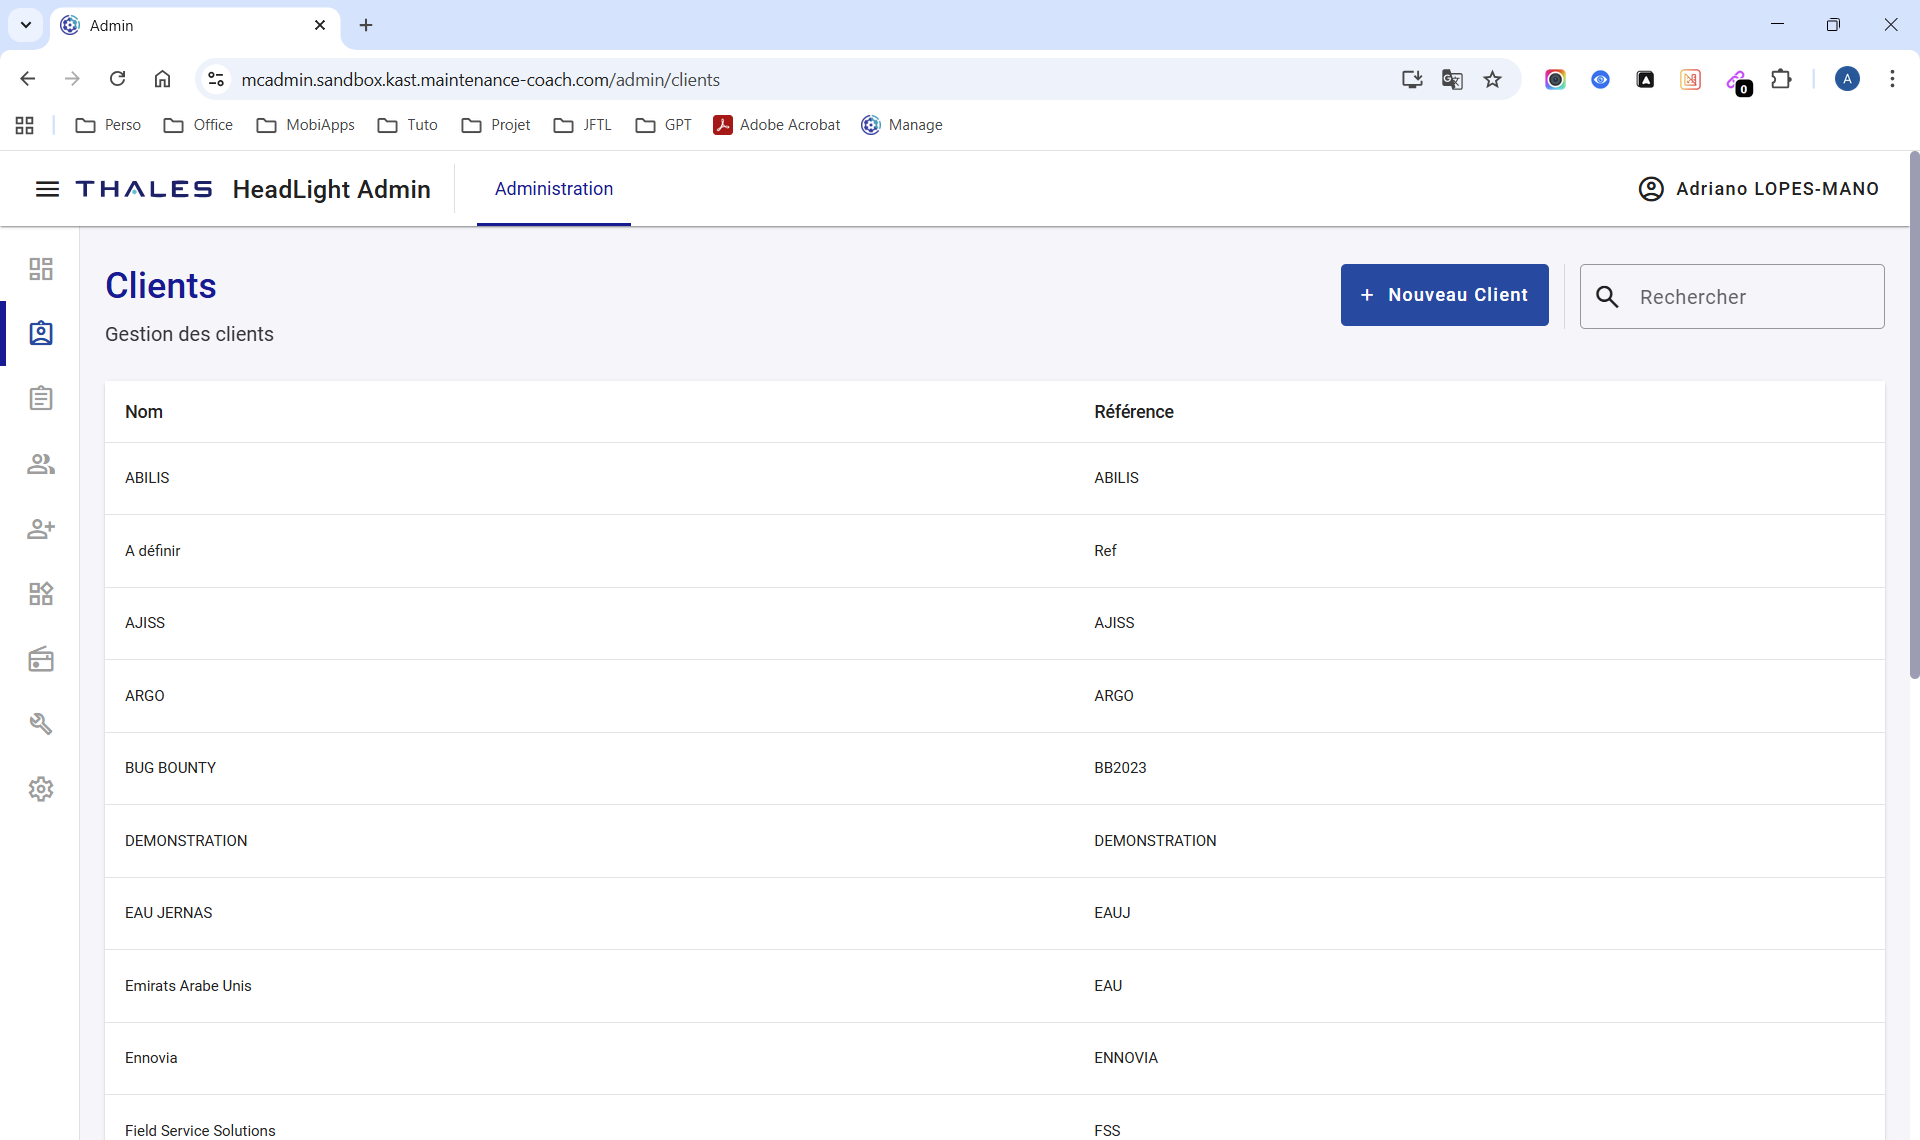
HL Admin - Clients page
From the Clients page, click + New Client. A small window appears.
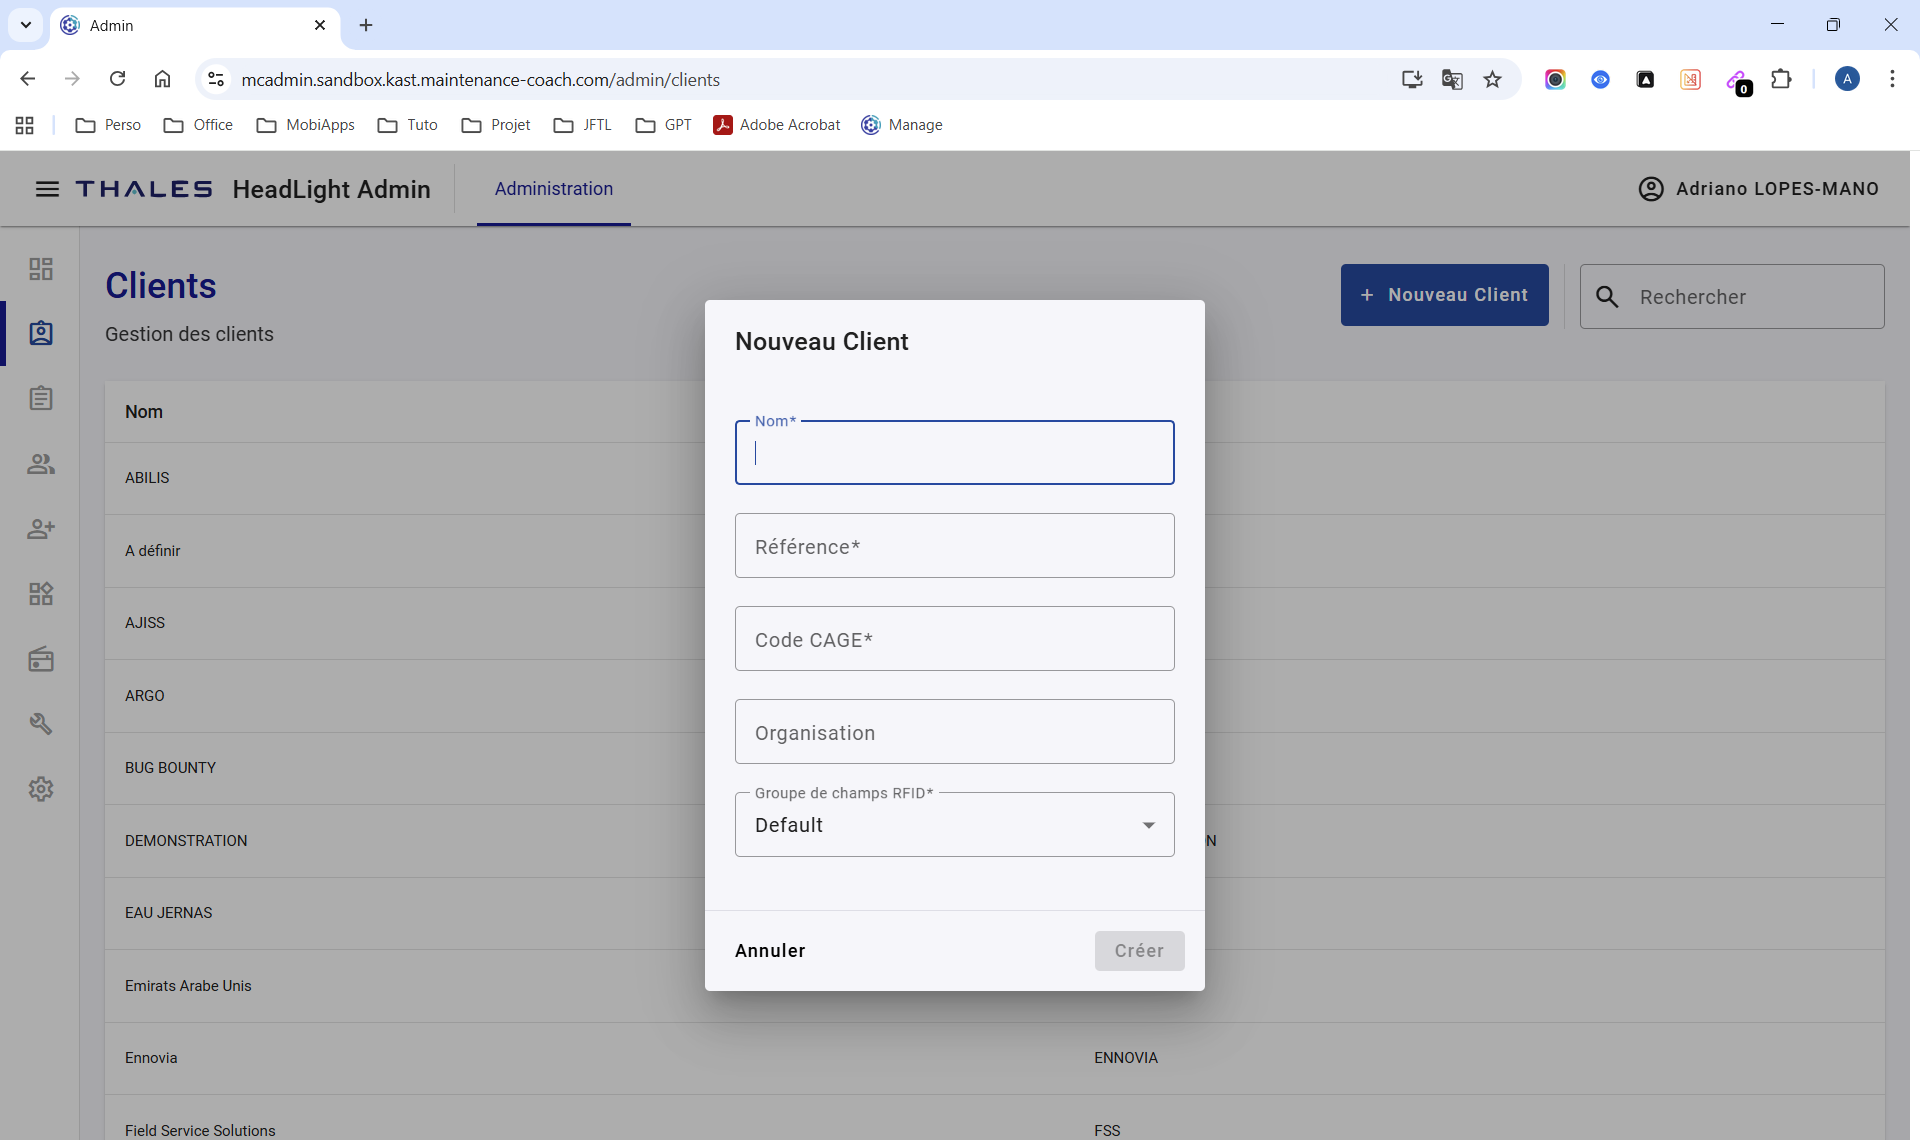
HL Admin - Clients page - New Client creation window
Fill in the following fields:
- Name* - Client name
- Reference* - Client reference
- CAGE Code* - Client identifier (5 alphanumeric characters)
- Organization - Entity to which one or more Sites belong
- RFID fields group* - Choose one of the following values:
- All fields
- Default
- SIMMT
Create a Contract
Video of demonstration
Prerequisites
The user must have the super-admin role.
A Contract is created from a Client record.
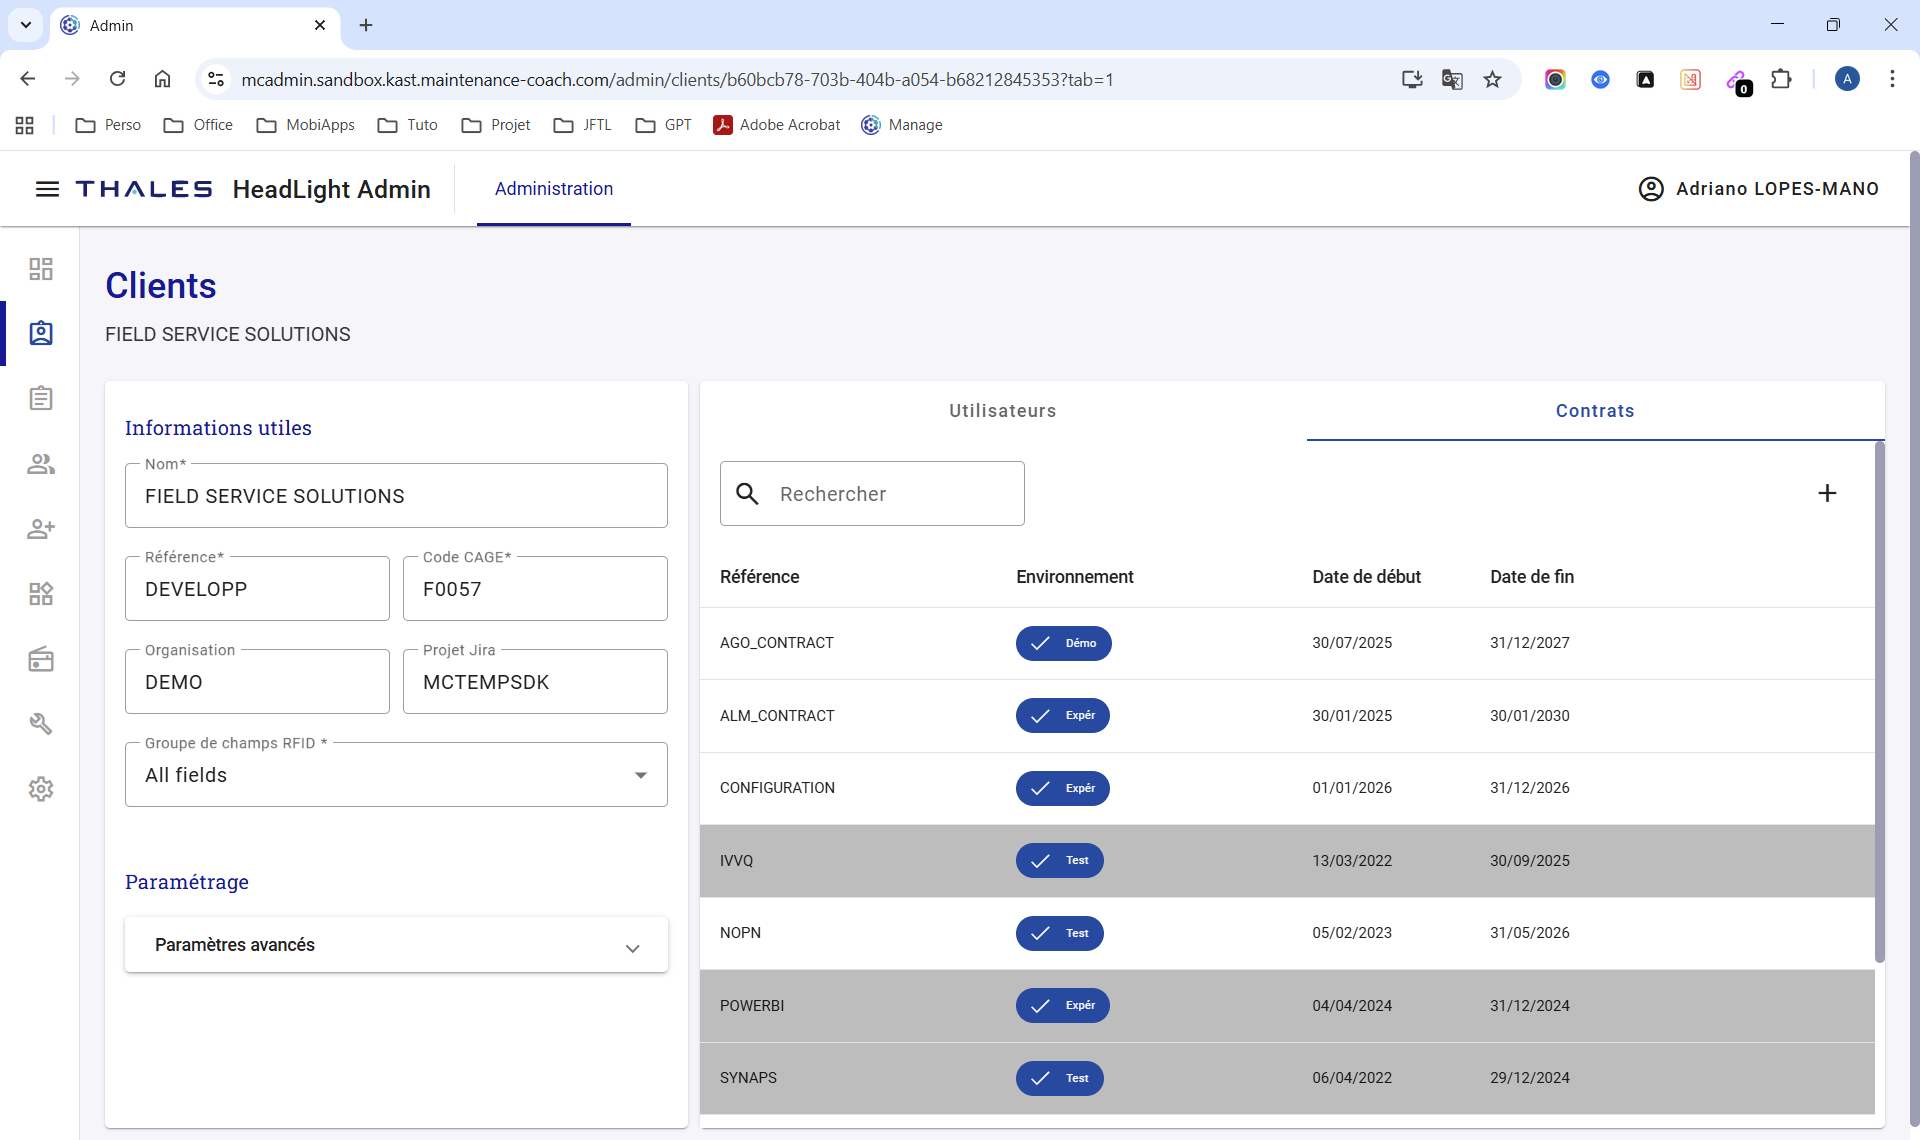
HL Admin - Clients page - Client record - Contracts tab - New Contract creation window
From the Client record, click the + button. A small window appears.
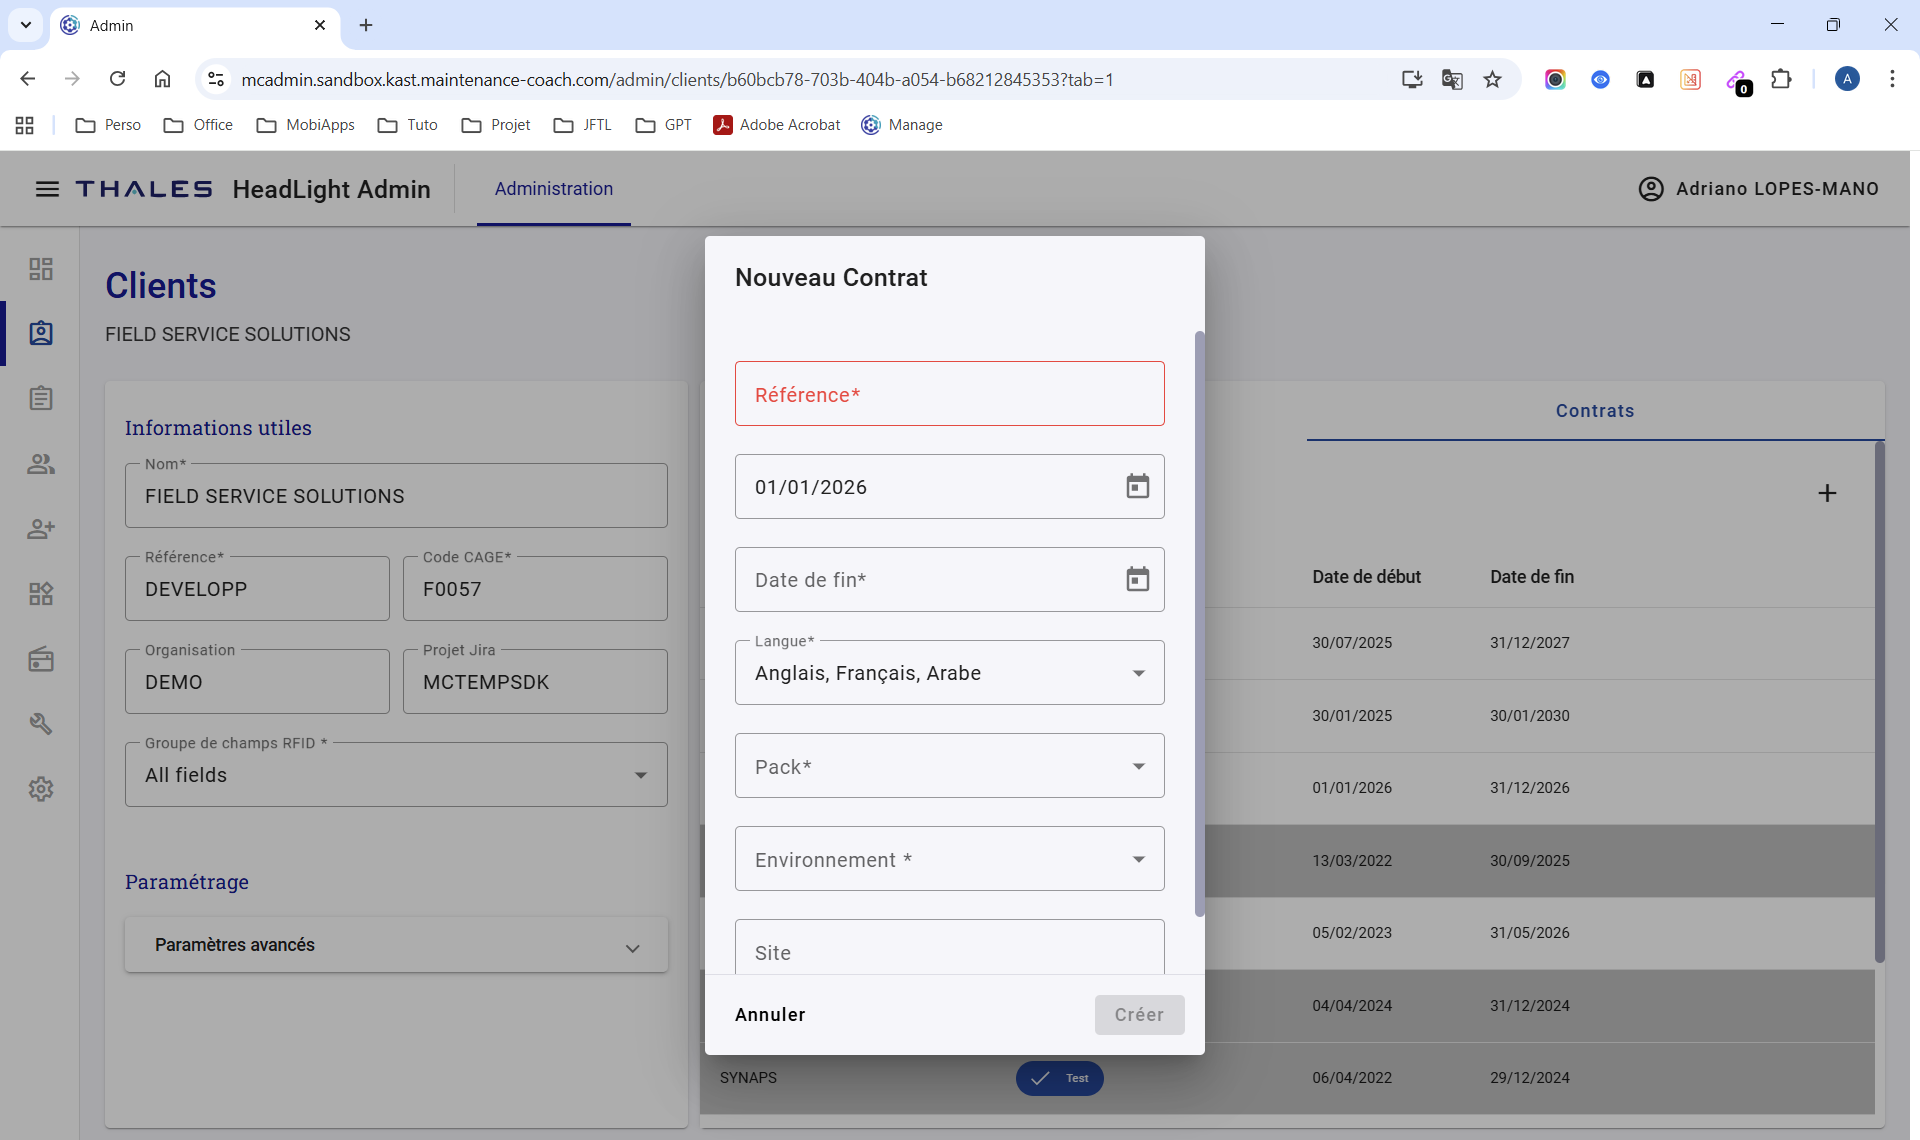
HL Admin - Clients page - Client record - New Contract creation window
Fill in the following fields:
- Reference* - Contract reference
- Start date - By default, the current date when the Contract is created. The start date can be changed.
- End date* - Contract end date
- Language* - Languages of the resources downloadable by the HL MCoach user
- Pack* - Services enabled in the HeadLight Suite applications and their related features
- Environment* - Choose one of the following values:
- Production
- Experimentation
- Demonstration
- Prospect
- Test
- Site - Maximo Site identifier where the equipment is located. This field can be selected later.
Once the Contract is created, it becomes possible to:
- add Generic Equipment (see Create/Add Generic Equipment to a Contract / HL Admin)
- add Users (see Create a User / HL Admin)
- select a service pack
Create a User
Video of demonstration
Prerequisites
The user must have the super-admin role.
A User is created from the Users page.
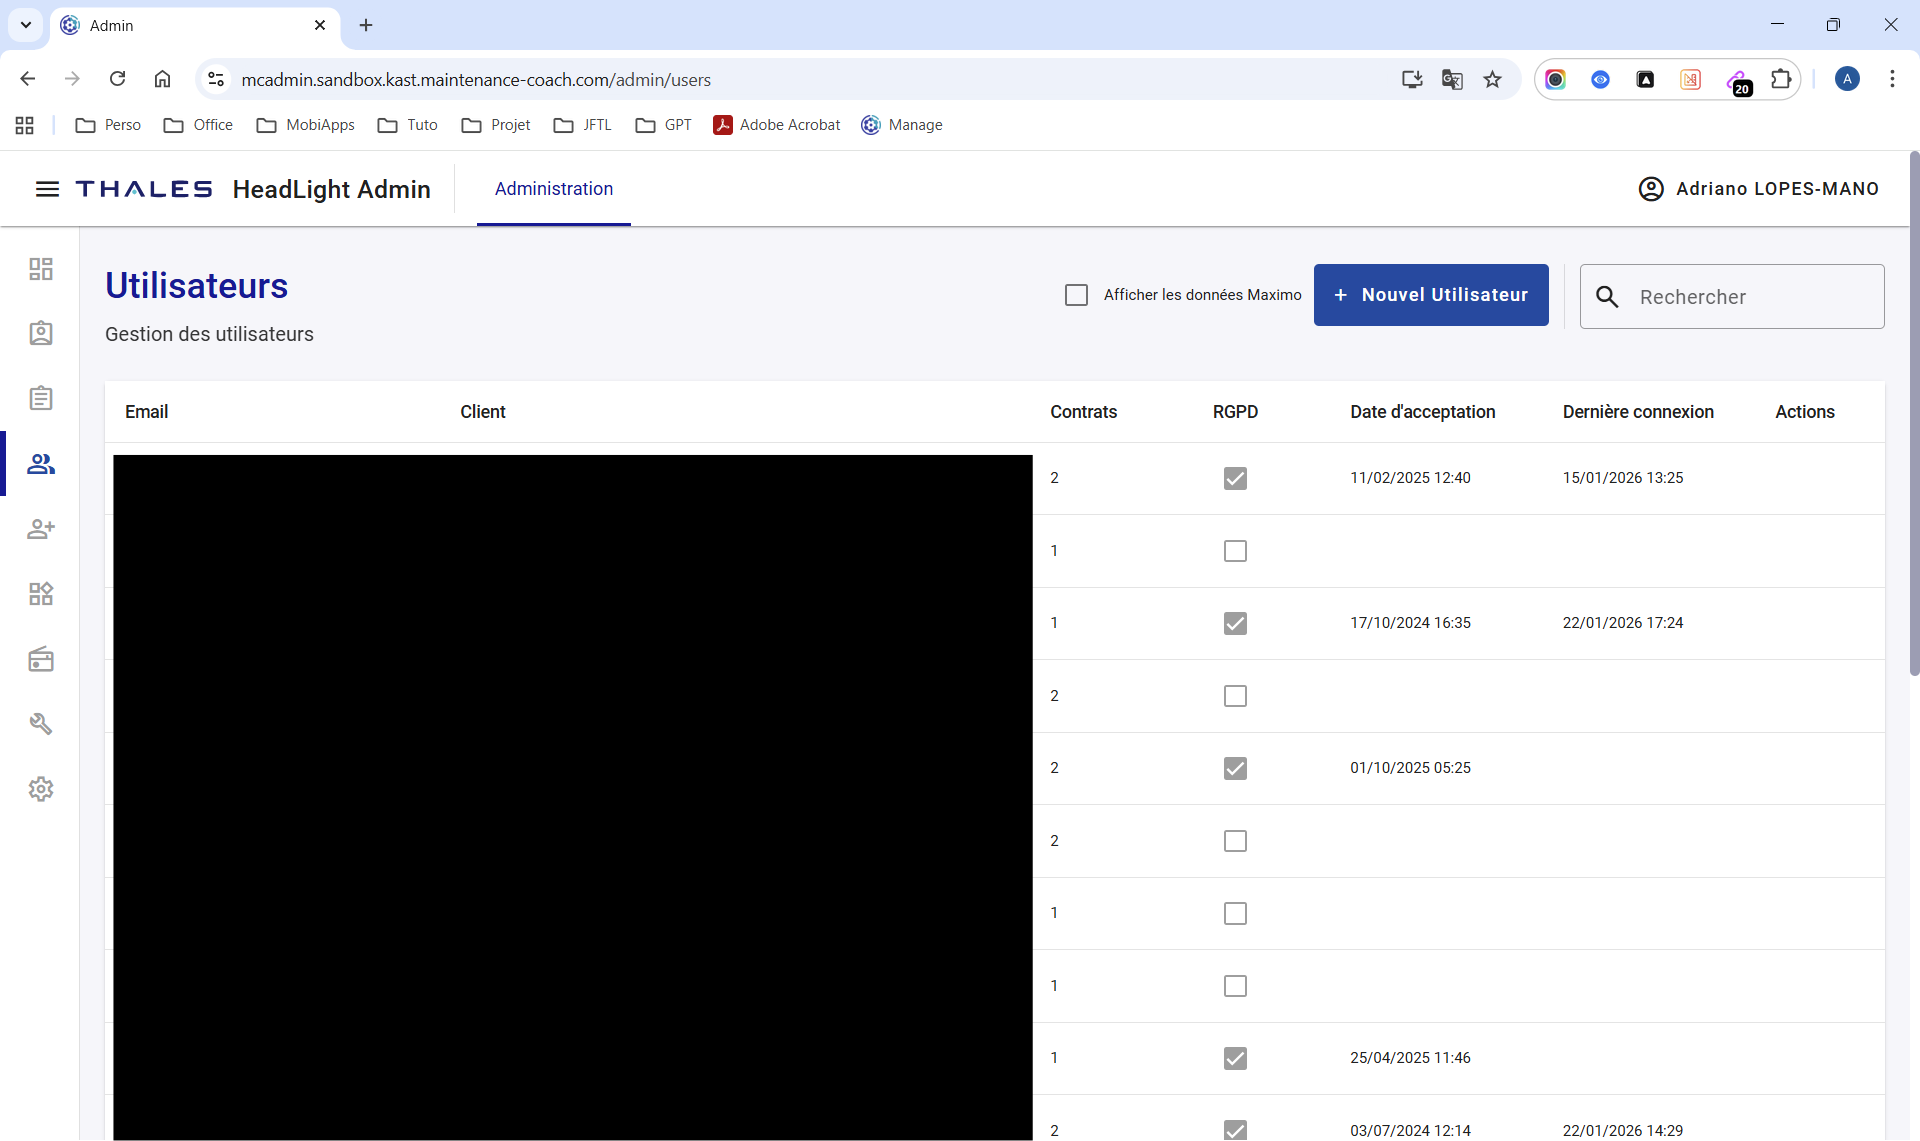
HL Admin - Users page
From the Users page, click + New User. A small window appears.
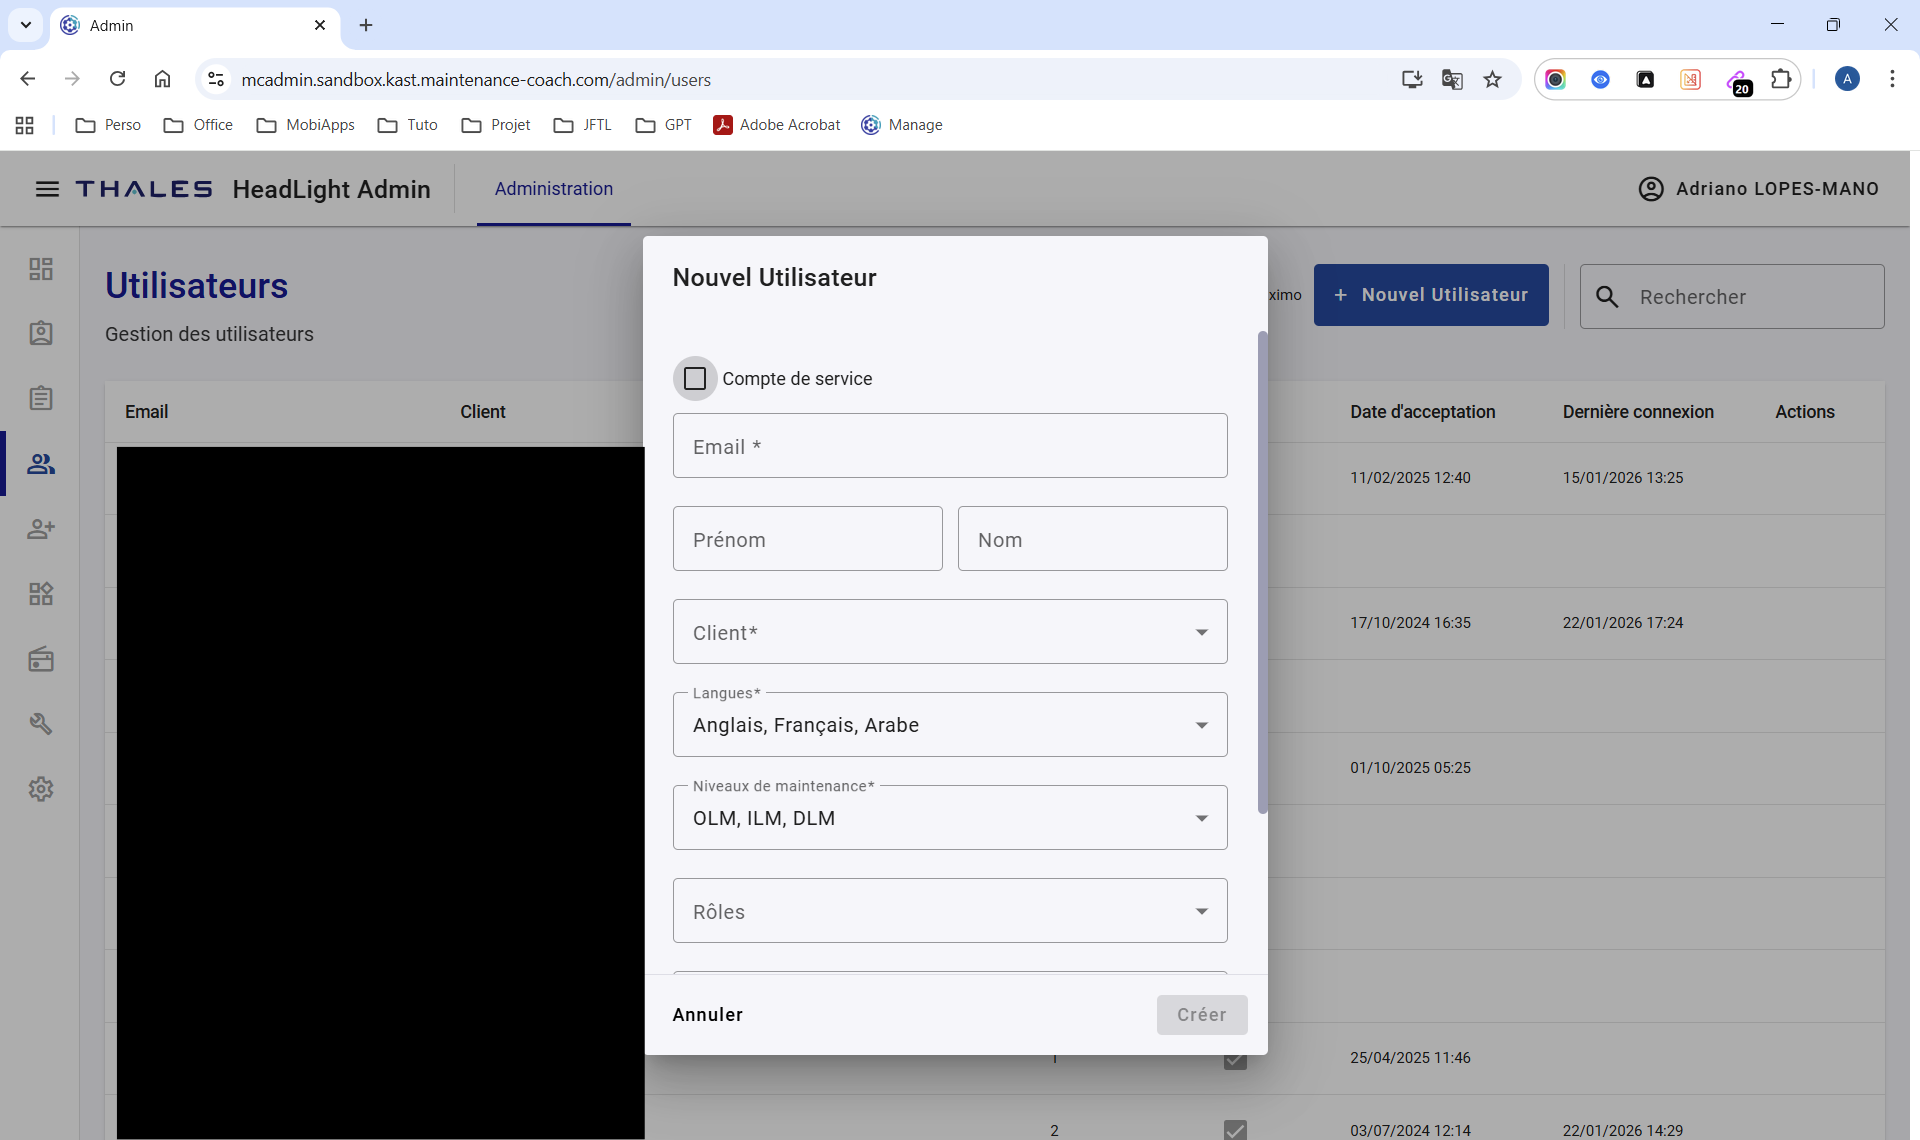
HL Admin - Users page - New User creation window
Fill in the following fields:
- Email* - User email address (login)
- First name - User first name
- Last name - User last name
- Client* - Select the Client to which the User is linked
- Languages* - Languages of the resources downloadable by the HL MCoach user
- Maintenance levels - Choose one or more of the following values:
- DLM
- ILM
- OLM
- Roles - Choose one or more of the following roles:
client-admin- Access to Admin and administration of this client’s data onlyclient-editor- Access to Studio and this client’s Knowledge Bases only, and access to HL MCoachclient-infra-manager- Contribute to infrastructure tools, including dashboard viewing and editing, logs, and related featuresclient-park-manager- Access to Admin and to the client asset fleet viewsuper-admin- Access to Admin and administration of all data for all clientssuper-editor- Access to Studio and all Knowledge Bases for all clients, with content publication rights. Access to HL MCoachsuper-infra-manager- Global administrator of all infrastructure tools, including Kubernetes, Grafana, OpenSearch, and related toolssuper-park-manager- Access to Admin and to the fleet view of all assets for all clientstechnician- Access to HL MCoachvalidator- Access to Studio with content publication rights
- Contracts* - Select the Contract
- Add to Maximo checkbox - Creates a User account in Maximo
- When the checkbox is selected, a field appears with an automatically generated username (first letter of the first name followed by the last name)
- The Maximo username can be changed
- Click Show advanced options to display:
- Set password checkbox
- When selected, a field appears to enter a password, which must be shared with the user
- User must change password checkbox
- Selected by default
- When selected, the user is prompted to change their password
- User must configure an OTP app checkbox
- Selected by default
- When selected, the user must configure an application for two-factor authentication
- OTP example: Authenticator
- Set password checkbox
Once the User is created, it becomes possible to add them to a Contract.
Add & Edit a User to a Contract
Video of demonstration
Prerequisites
The user must have one of the following roles:
- client-admin
- super-admin
A User is added from a Contract record.
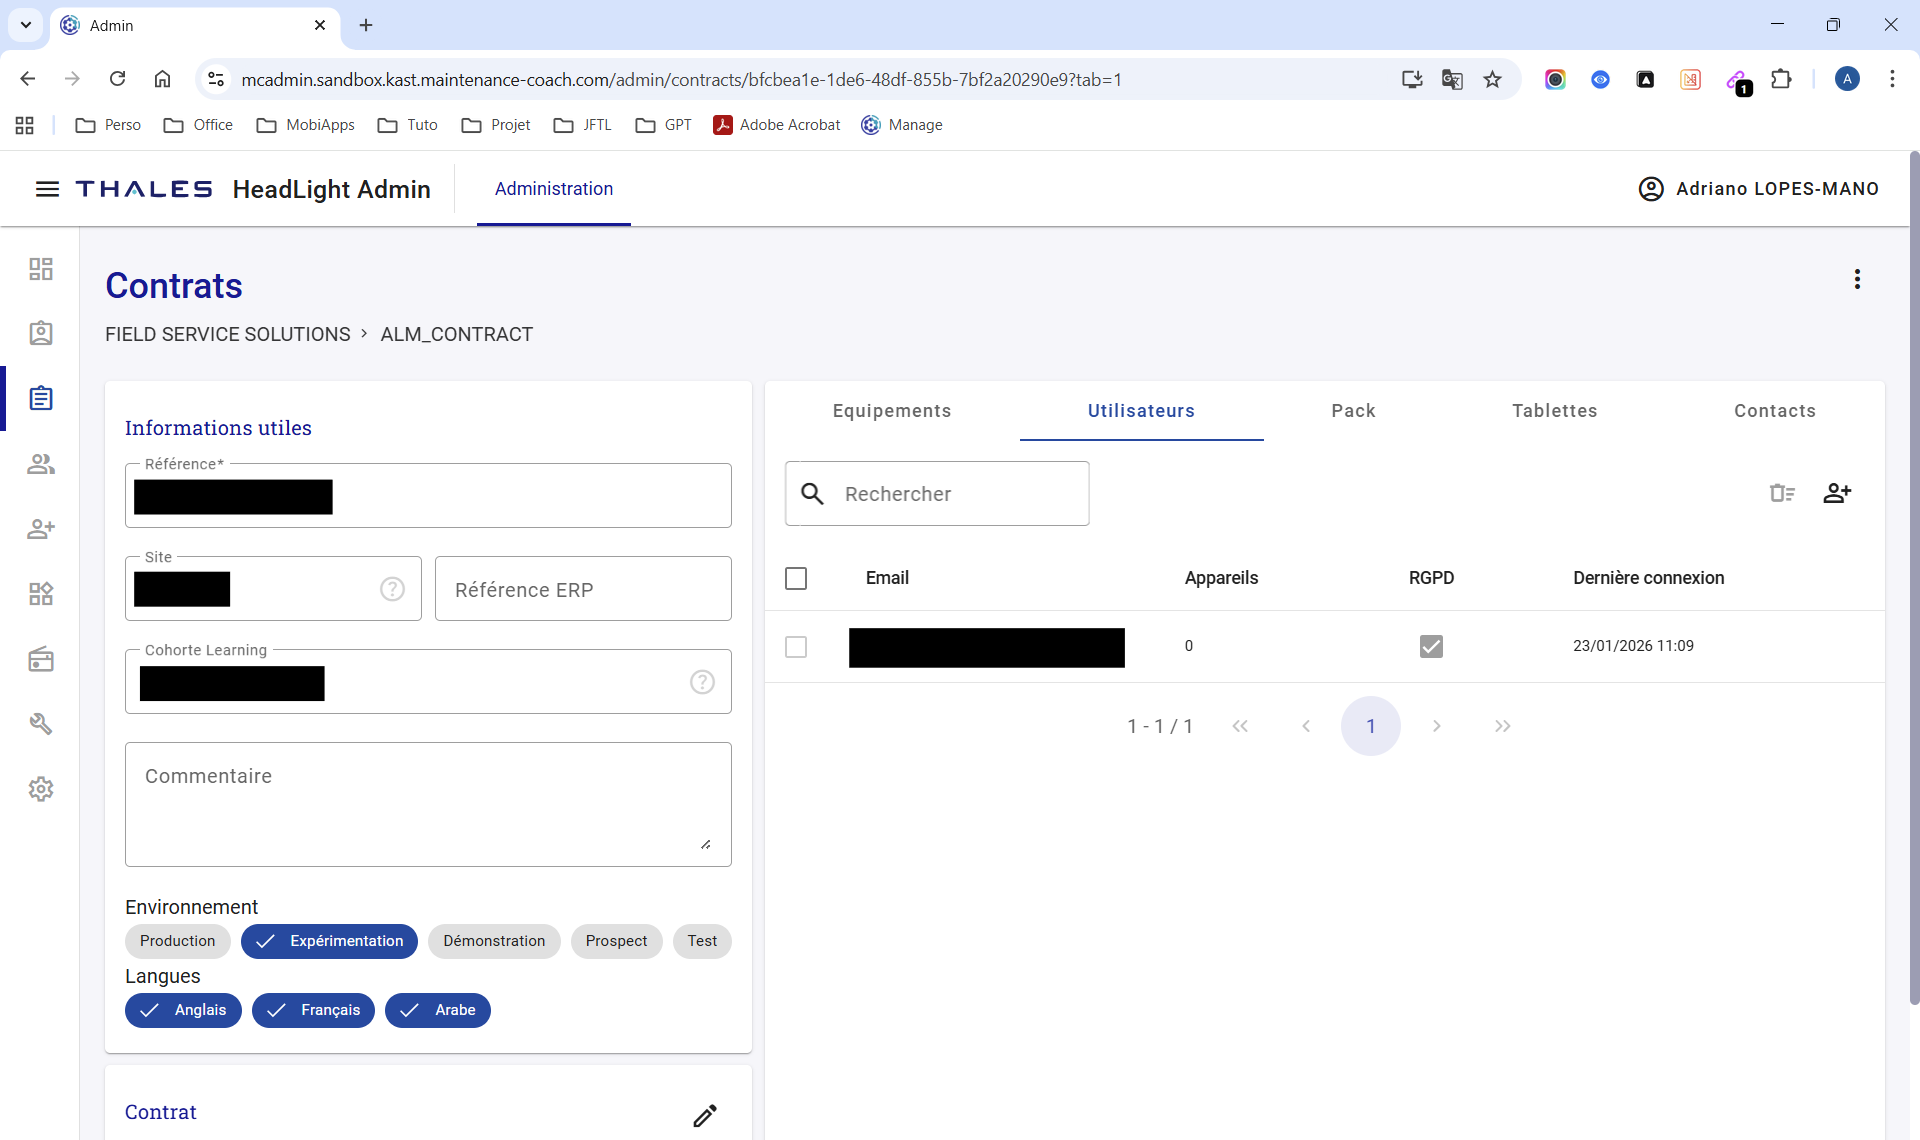
HL Admin - Contracts page - Contract record - Users tab
From the Contracts page, open the Users tab and click the + button. A small window appears.
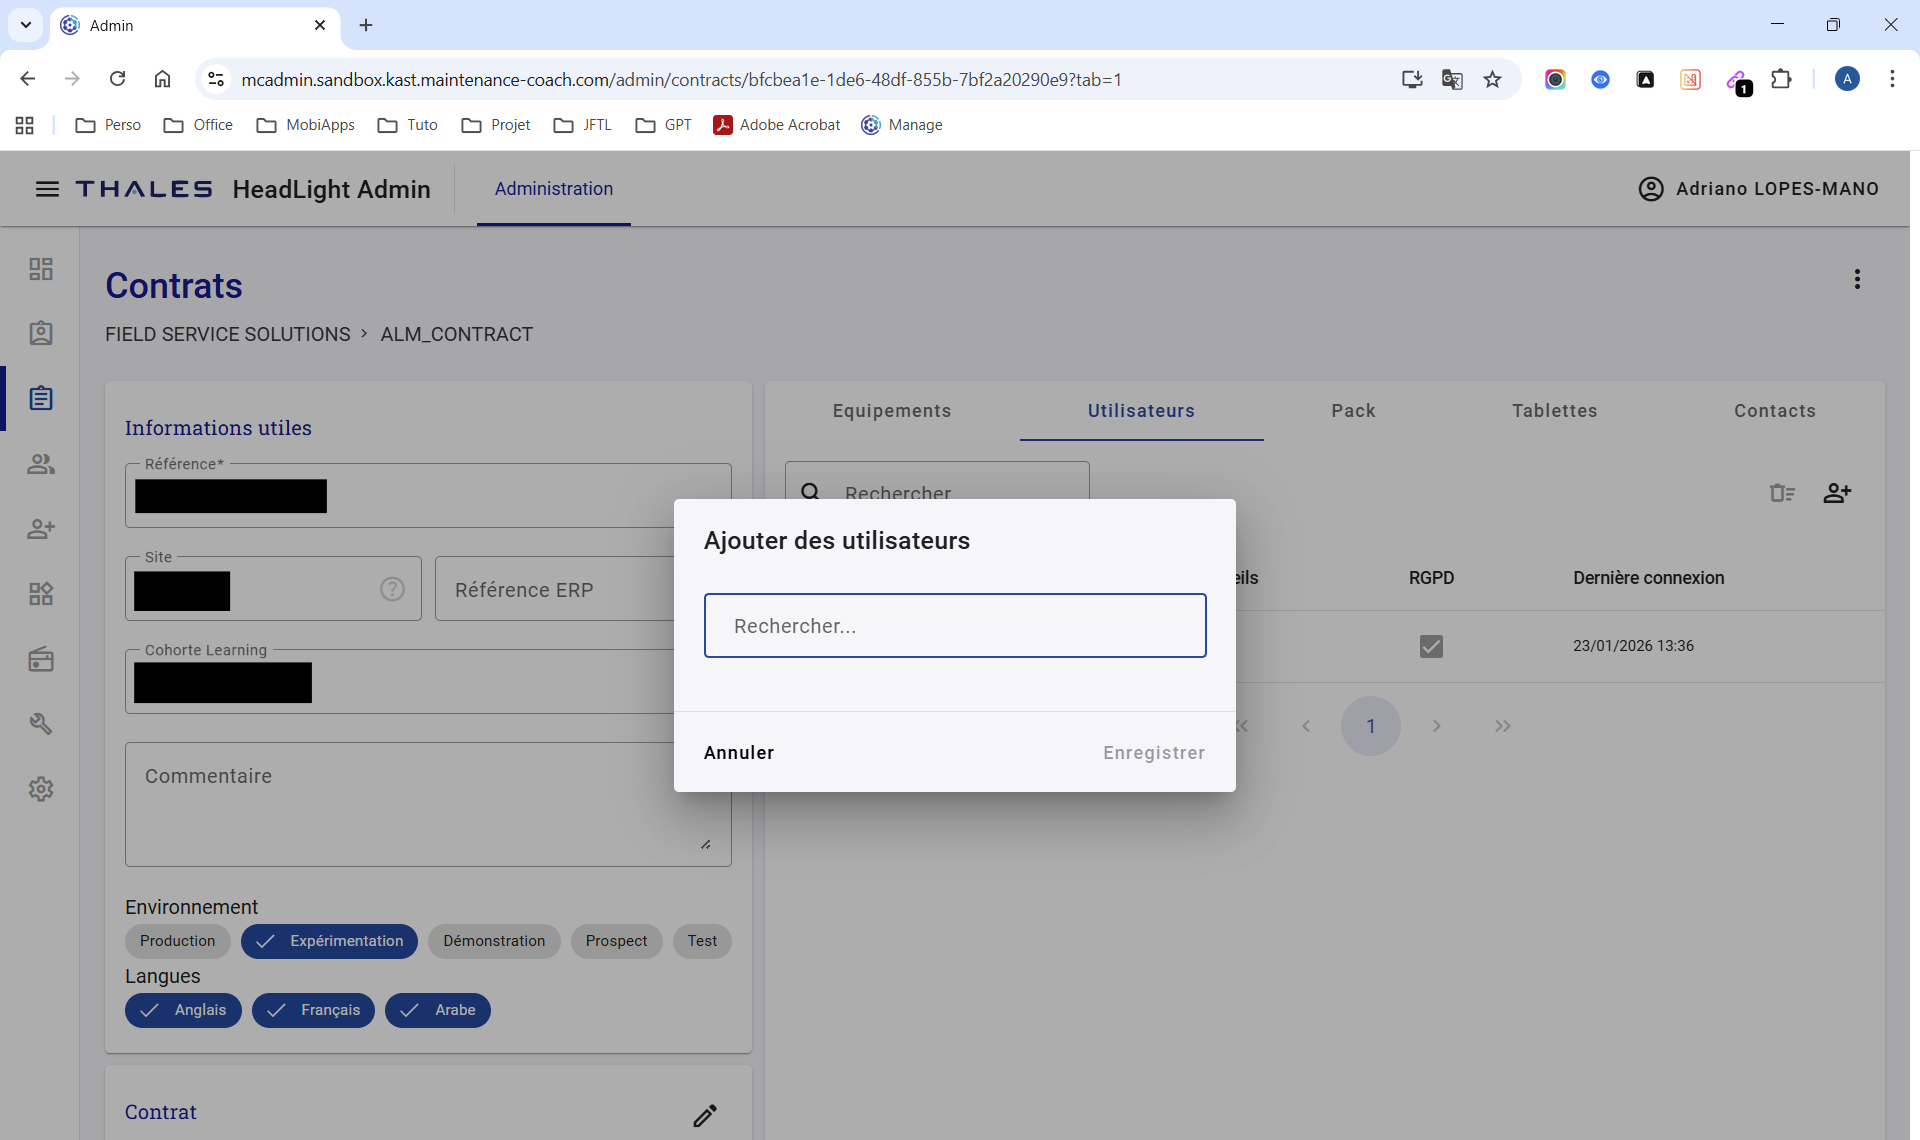
HL Admin - Contracts page - Contract record - Users tab - Add Users to a Contract window
Enter the User email address in the search field, then select the User to add to the Contract.
Create & Add Generic Equipment to a Contract
Video of demonstration
Prerequisites
The user must have one of the following roles [TO BE CONFIRMED]:
- super-admin
- super-park-manager
Generic Equipment is added from a Contract record.
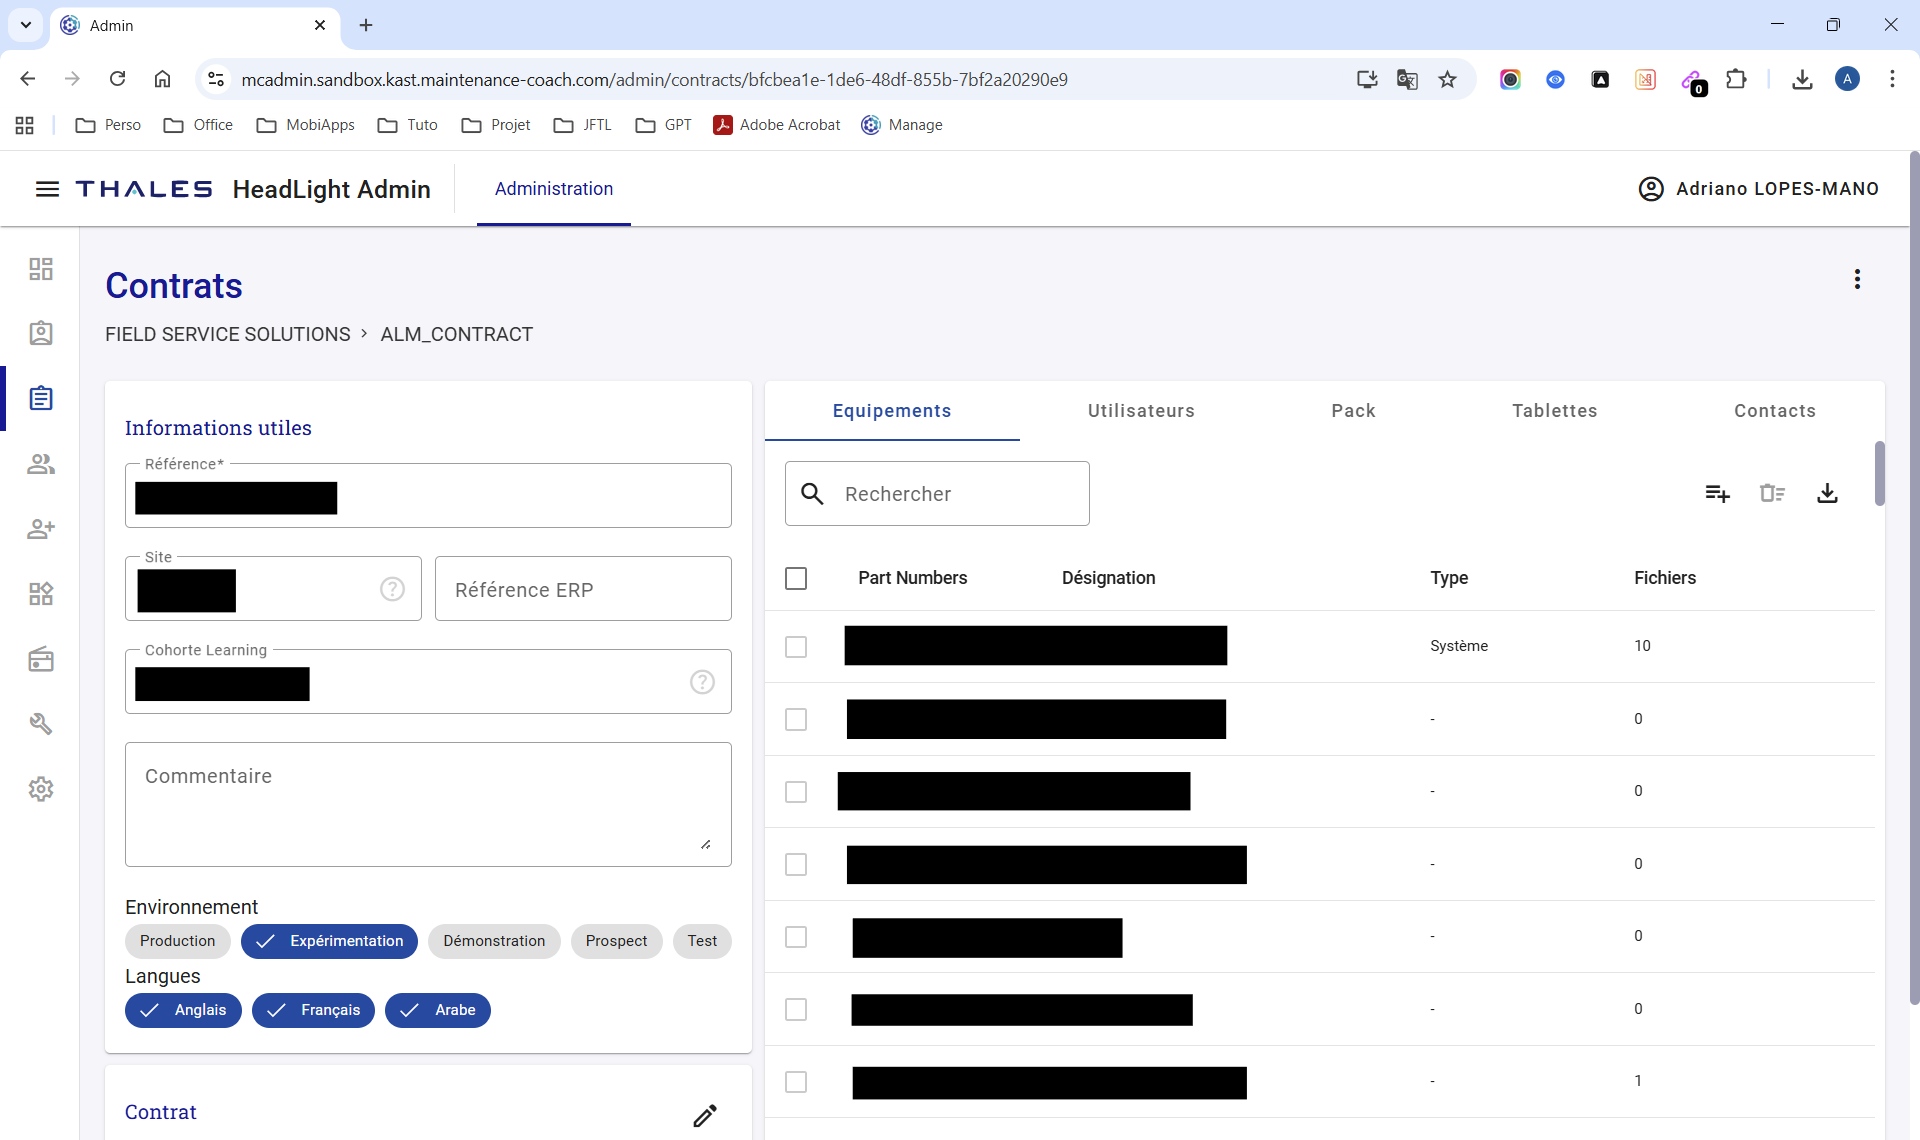
HL Admin - Contracts page - Contract record - Equipment tab
From the Contracts page, open the Equipment tab and click the + button. A small window appears.
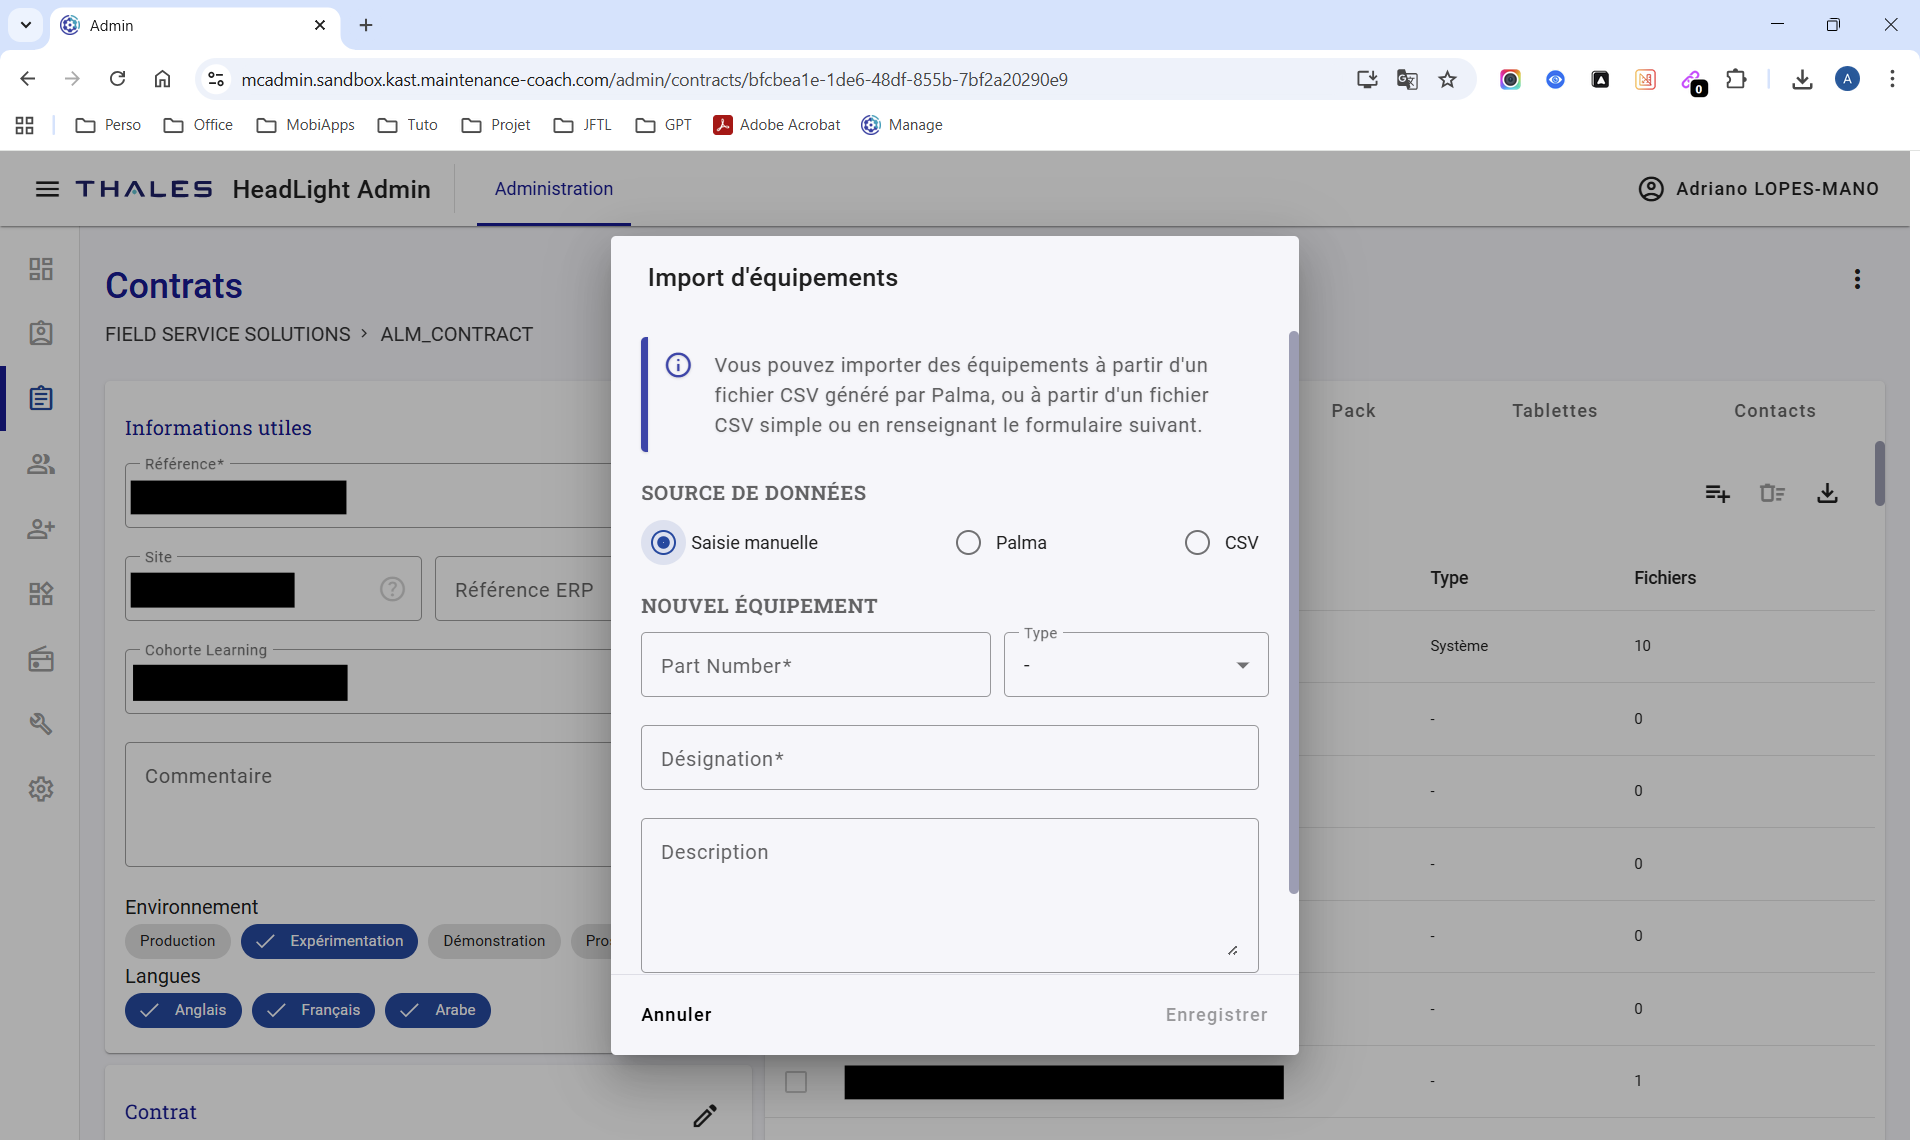
HL Admin - Contracts page - Add Generic Equipment to a Contract window
Fill in the following fields:
- Data source - Choose one of the following sources:
- Manual entry
- Palma
- CSV
- Part Number* - Generic Equipment Part Number
- Type - Choose one of the following values:
-- No typeEquipmentSystem
- Designation* - Generic Equipment name
- Description - Additional information about the Generic Equipment
At this stage, the Generic Equipment appears on the Equipment page in HL Admin and on the Fleet page in HL MCoach.
Resources can then be managed in Studio.
To create Individualized Equipment (PN.SN), an additional action must be performed in HL Manage: add the Generic Equipment to IBM Maximo.
Note - To make Generic Equipment visible on other Sites belonging to the same Organization, add it to the Equipment list of the Contracts linked to that Organization.
HeadLight Manage
Add Part-Number in IBM Maximo
Video of demonstration
Prerequisites
- The user must have one of the following roles [TO BE CONFIRMED]:
- super-admin
- super-park-manager
- Generic Equipment must already exist in HL Admin
Generic Equipment is added to Maximo from the Repository page in HL Manage.
When hovering over the Generic Equipment, a + icon appears.
Clicking this icon adds the Generic Equipment to IBM Maximo.
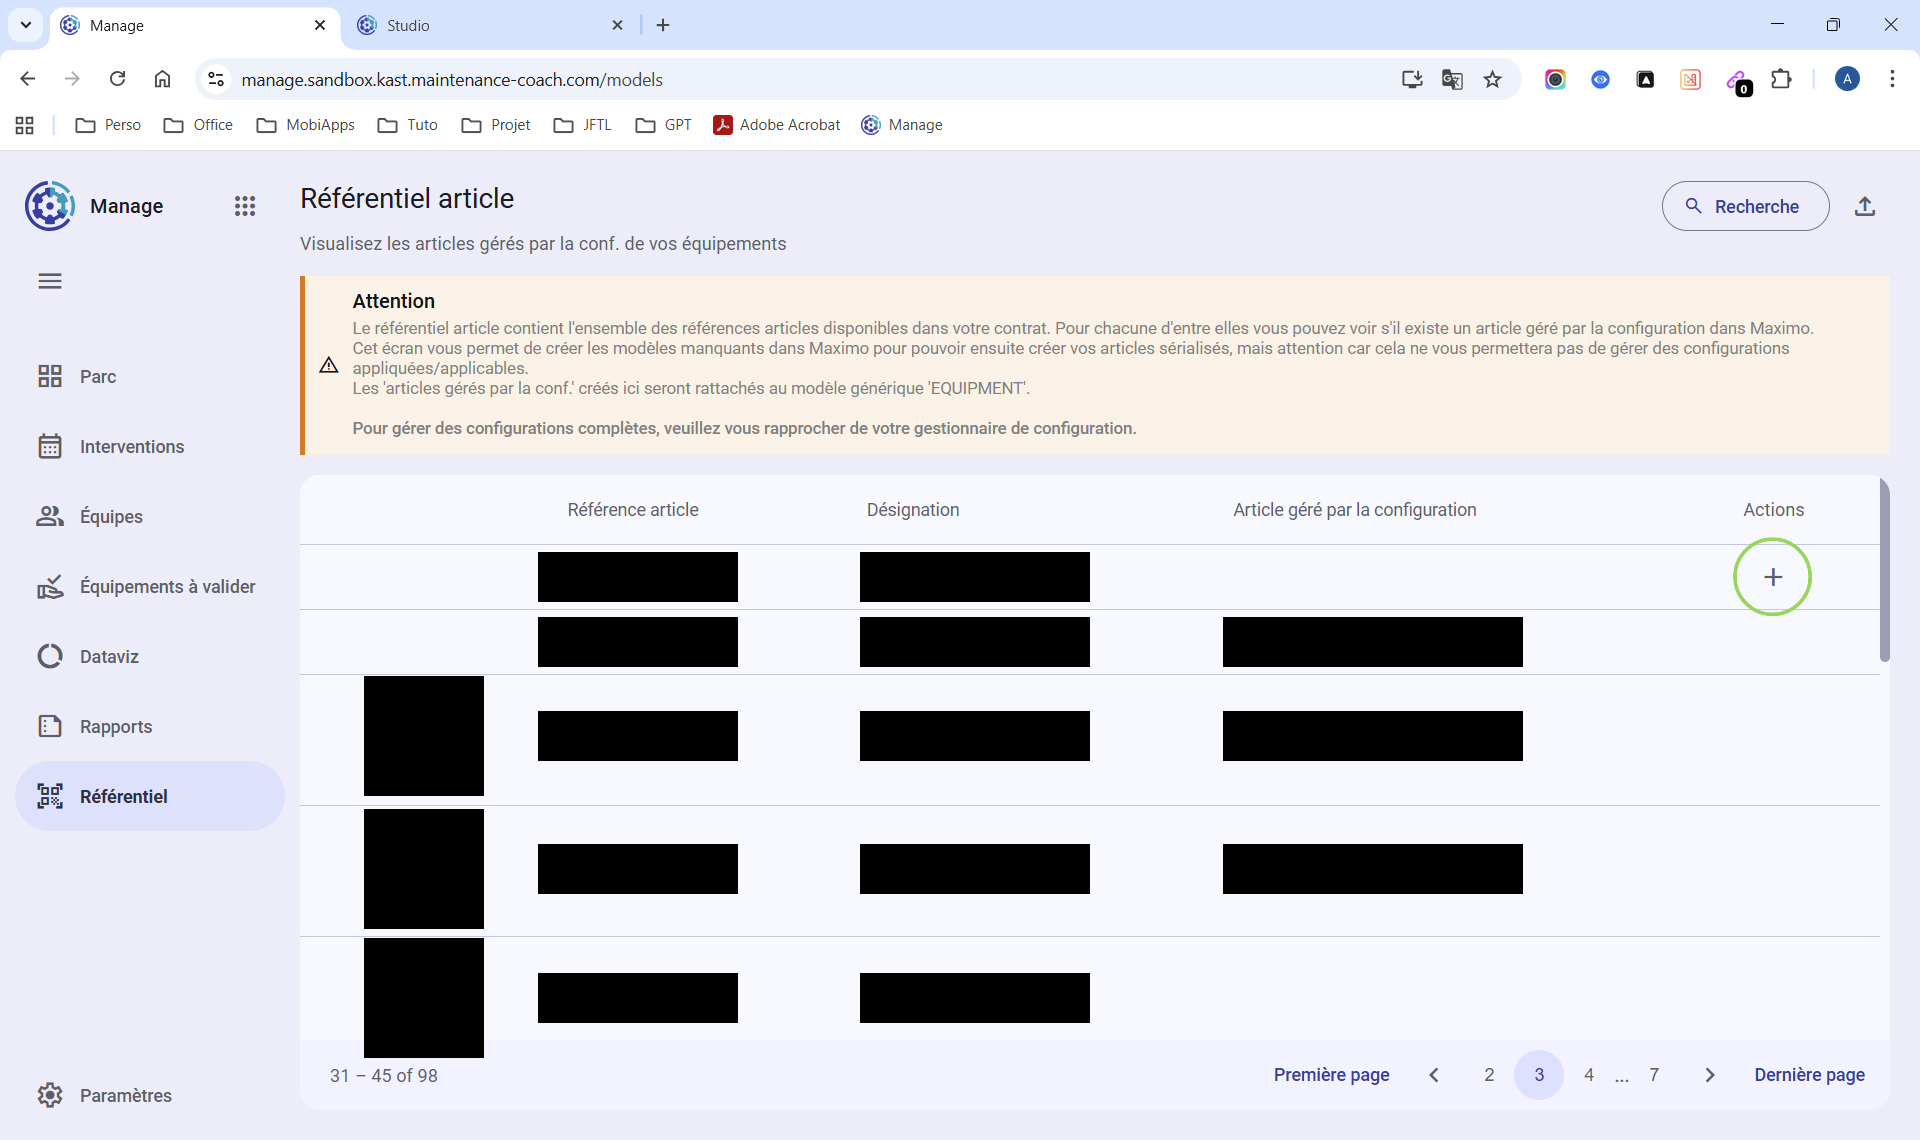
HL Manage - Repository page - Add Generic Equipment to IBM Maximo
Once the Generic Equipment is added to IBM Maximo, hovering over it no longer displays the + icon.
It then becomes possible to create Individualized Equipment in HL MCoach.
Add Part-Number in a contract
Video of demonstration
Prerequisites
The user must have one of the following roles [TO BE CONFIRMED]:
- super-admin
- super-park-manager
Generic Equipment is created or added from the Repository page in HL Manage.
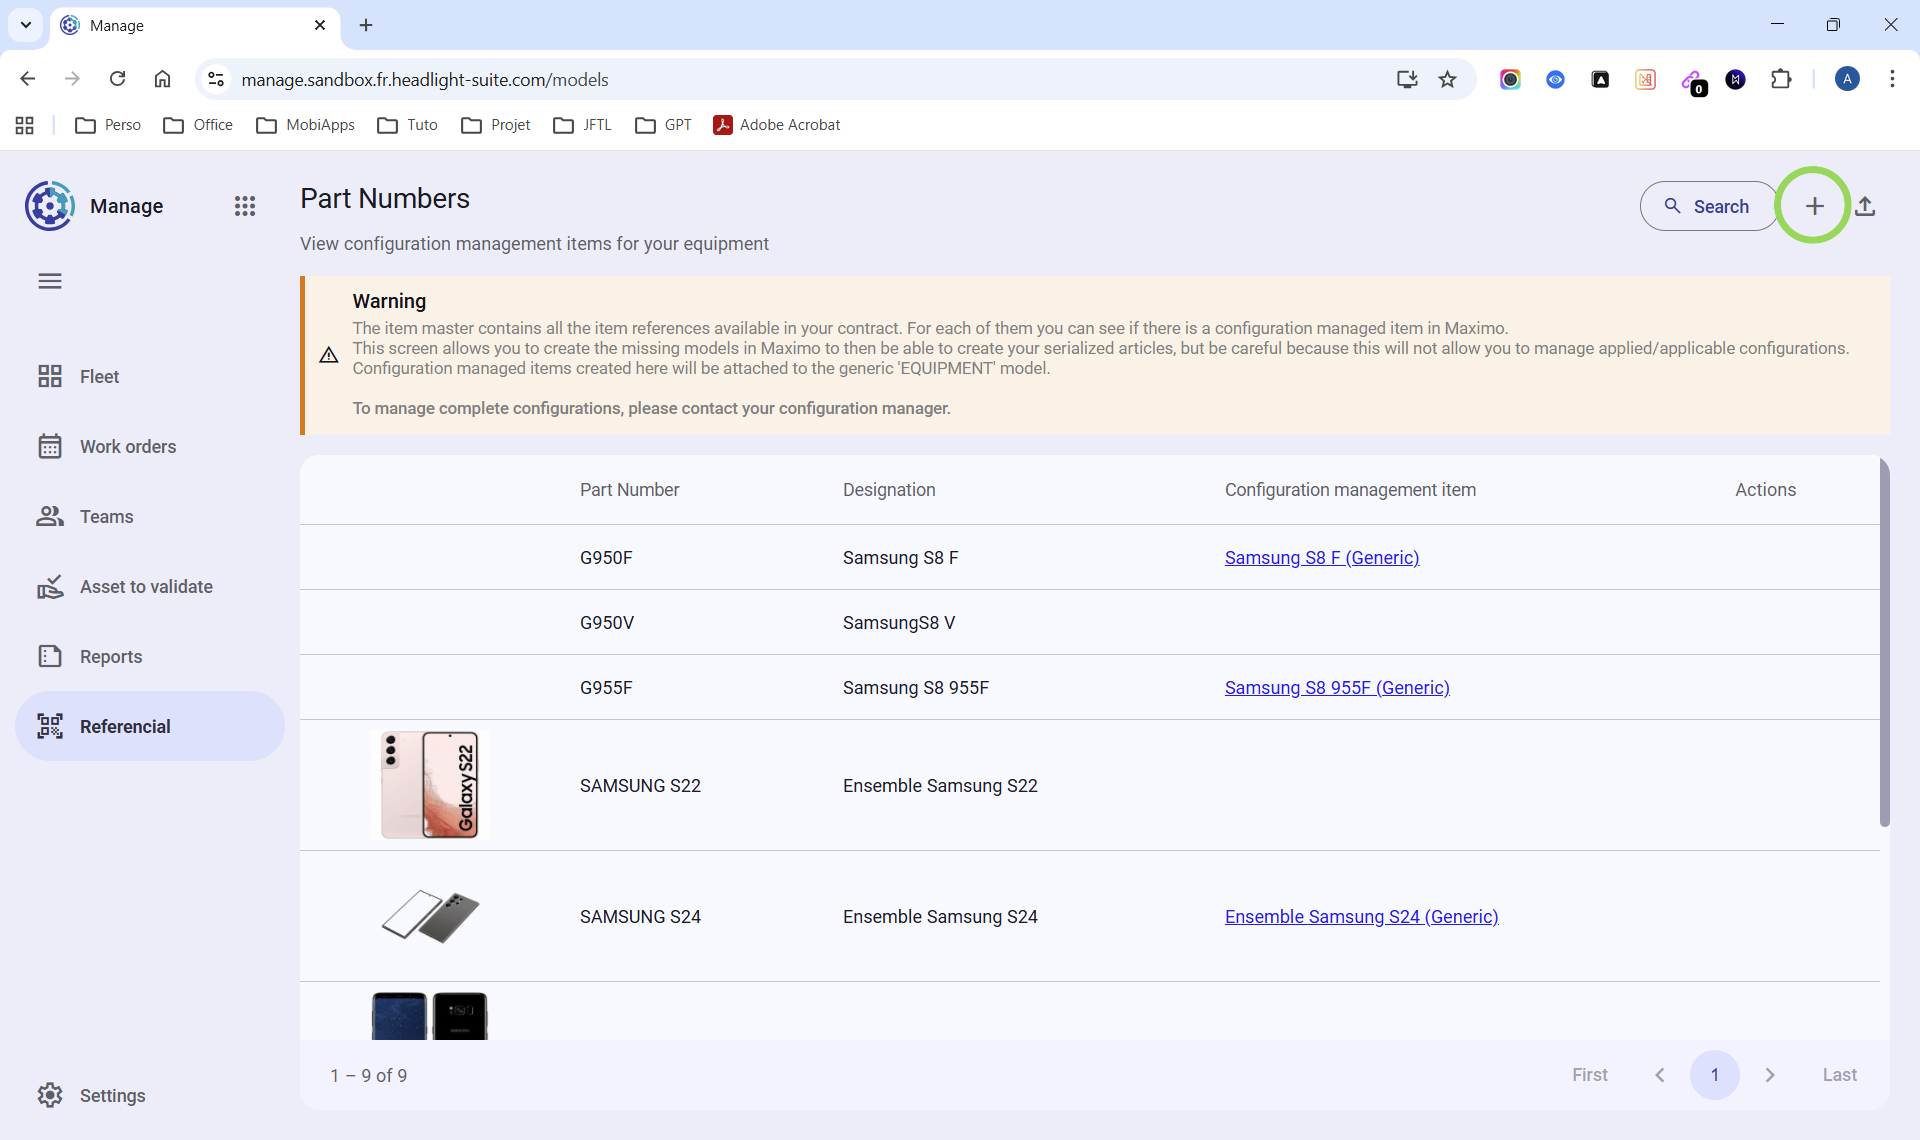
HL Manage - Repository page - Create/Add Generic Equipment button
Click the + icon to open the Generic Equipment creation window.
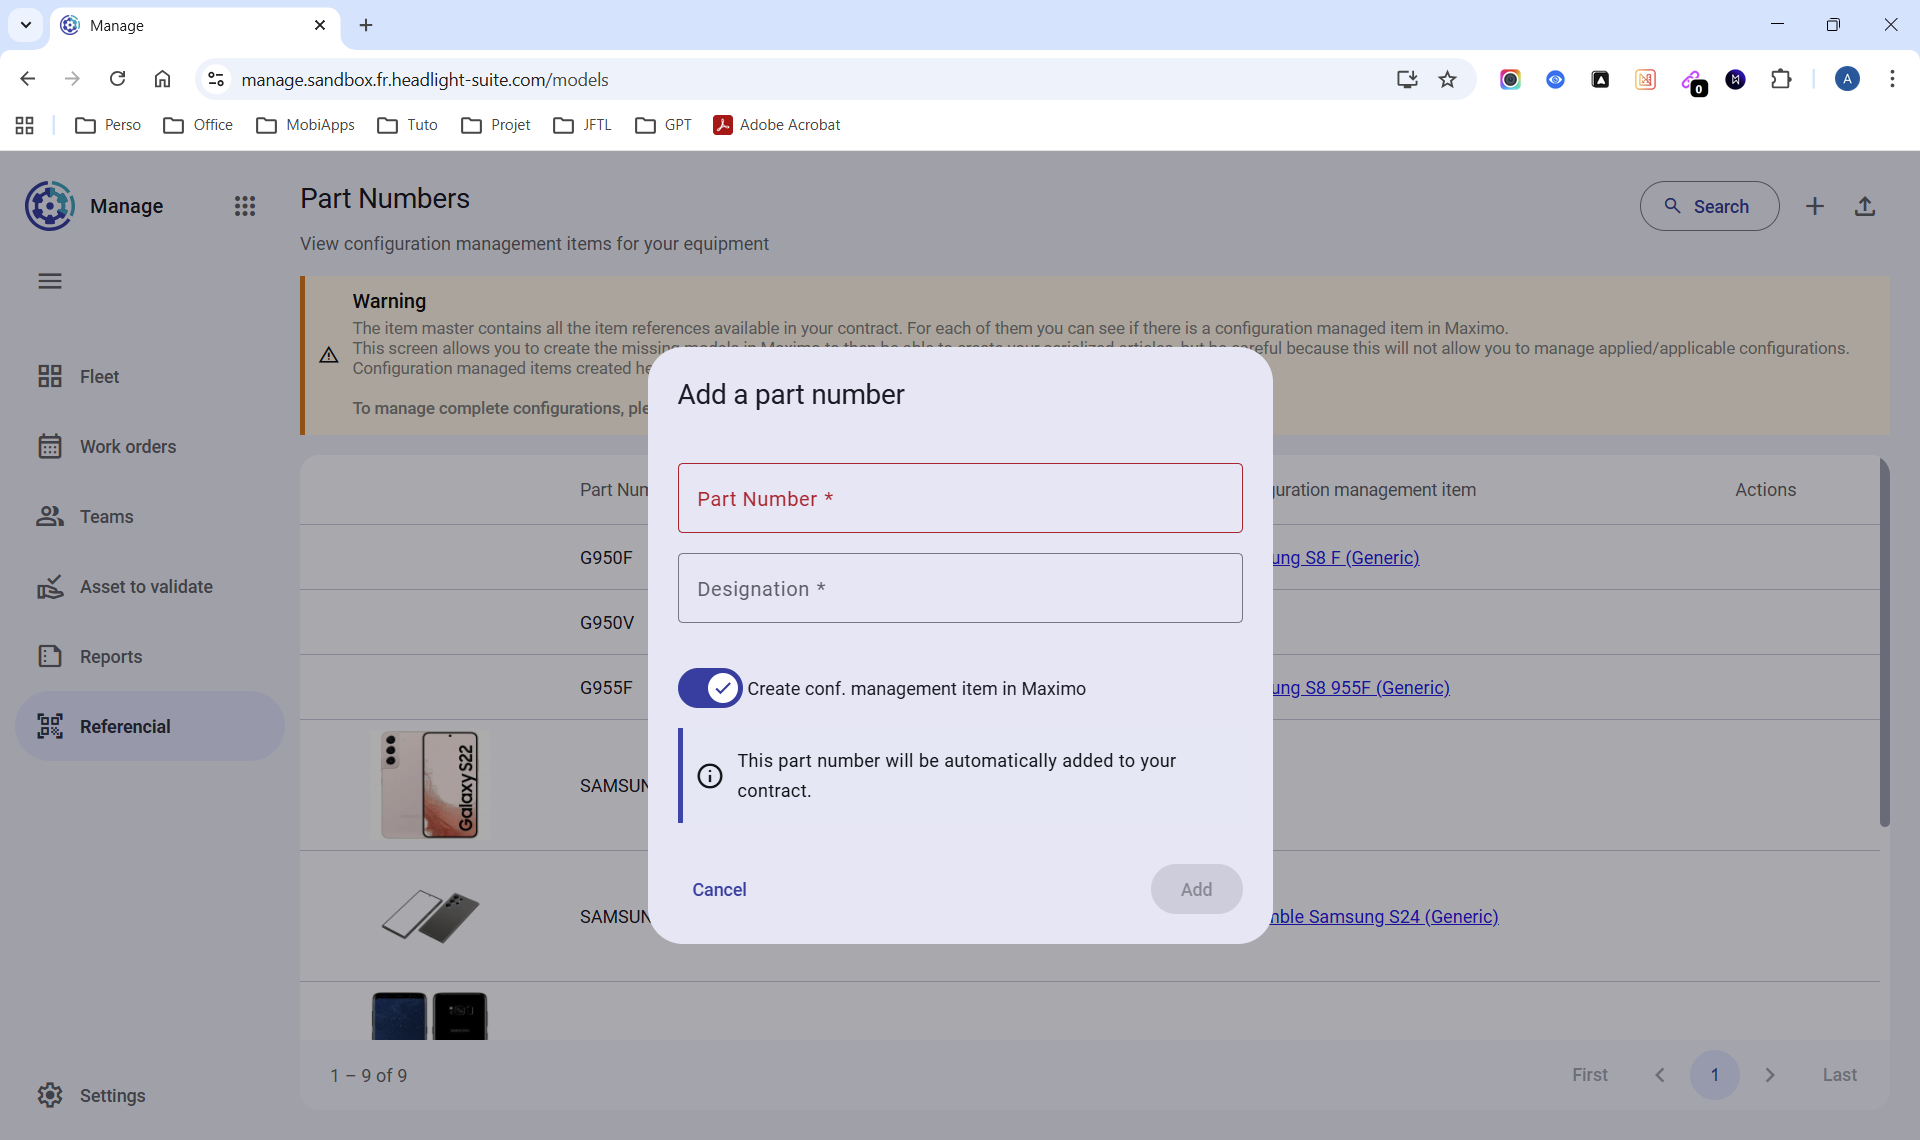
HL Manage - Repository page - Generic Equipment creation window
Fill in the following fields:
- Part Number* - Equipment Part Number
- Designation* - Generic Equipment name
- Create conf. managed item in Maximo - Selected by default
- Selected - The Generic Equipment is added to IBM Maximo
- Not selected - The Generic Equipment is not added to IBM Maximo
Maintenance Coach
Preliminary
Video of demonstration
**Prerequisites**The user must have one of the following roles:
- client-editor
- client-park-manager
- super-editor
- super-park-manager
- technician
Download & Install Maintenance Coach
TODO
Request the creation of a serial number
Lien vers la vidéo de démonstration :
Prerequisites
The user must have one of the following roles:
- client-editor
- client-park-manager
- super-editor
- super-park-manager
- technician
Individualized Equipment is created from a Generic Equipment record in HL MCoach.
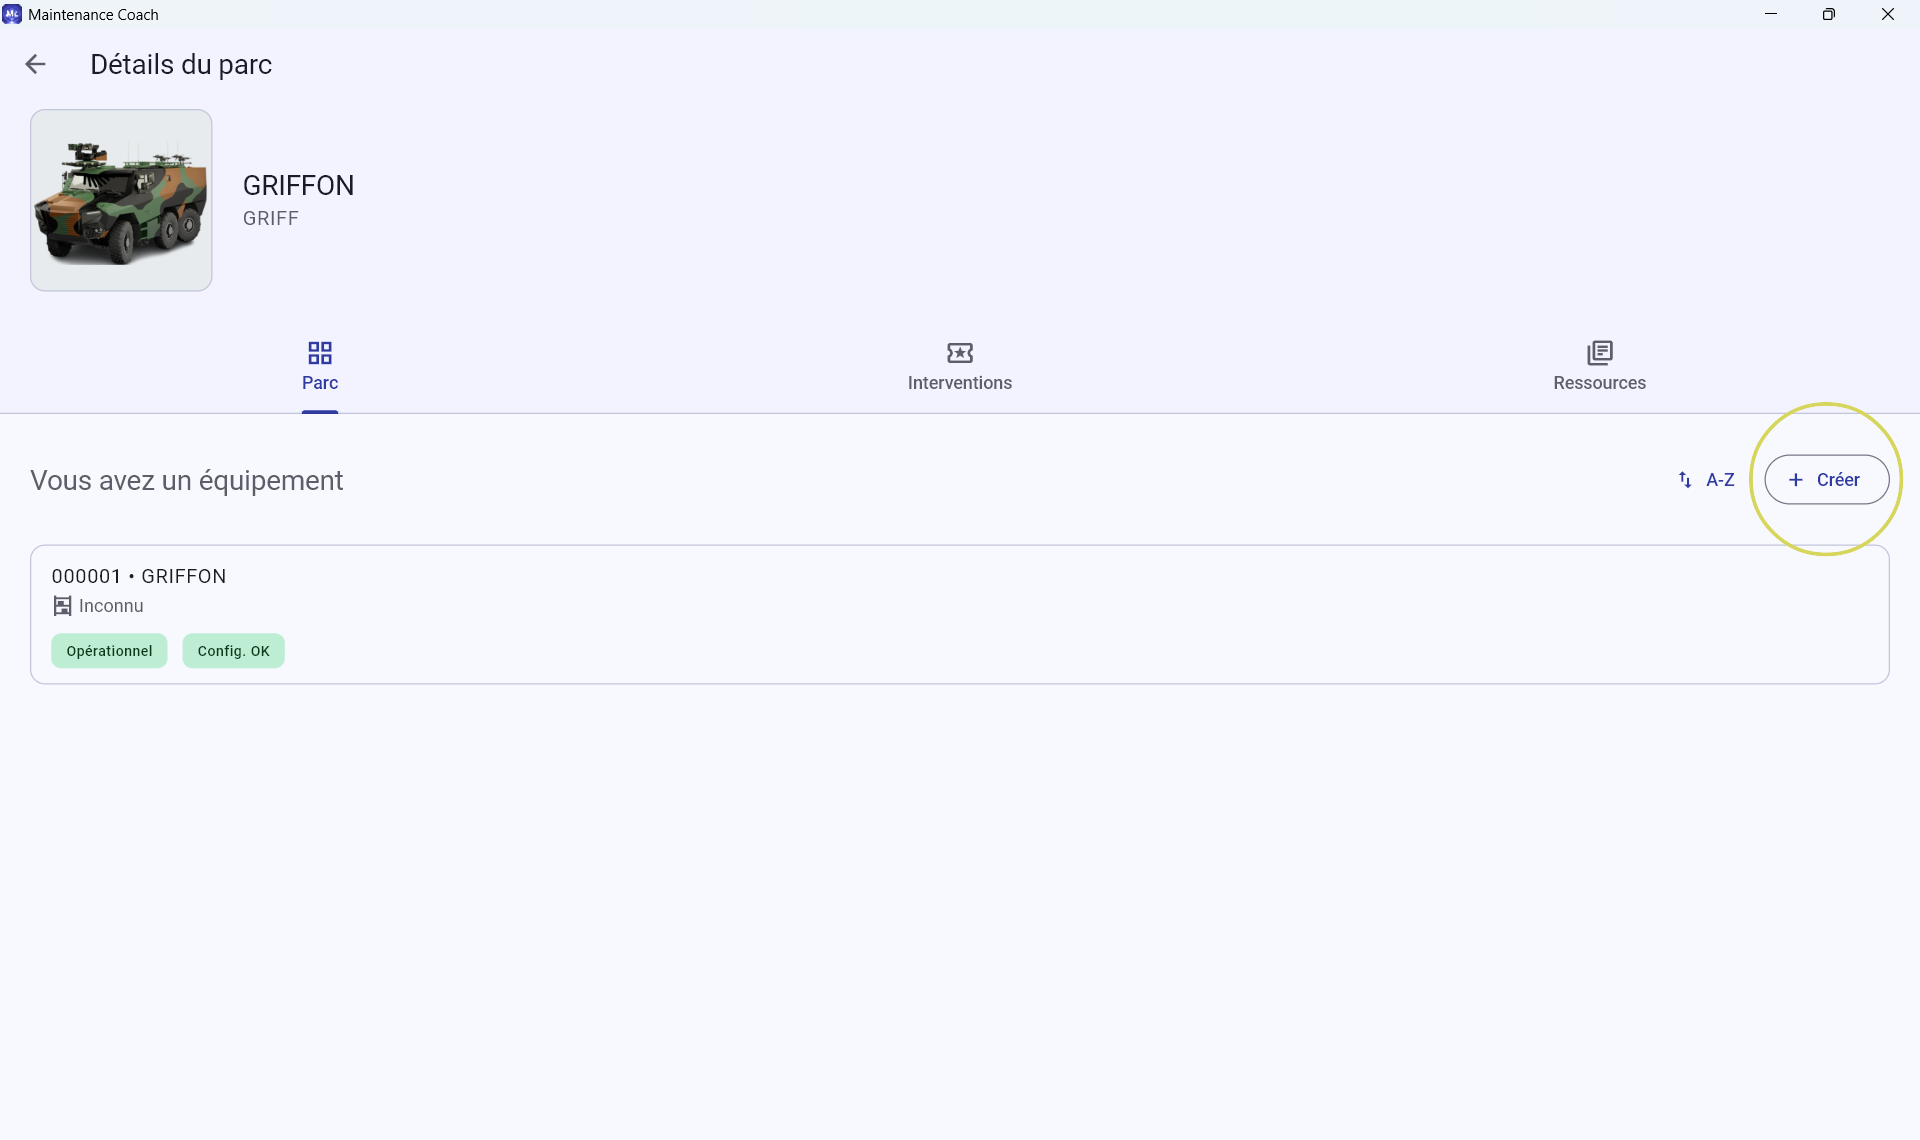
HL MCoach - Generic Equipment record - Fleet tab
From the Generic Equipment record, open the Fleet tab and click + Create. A window appears.
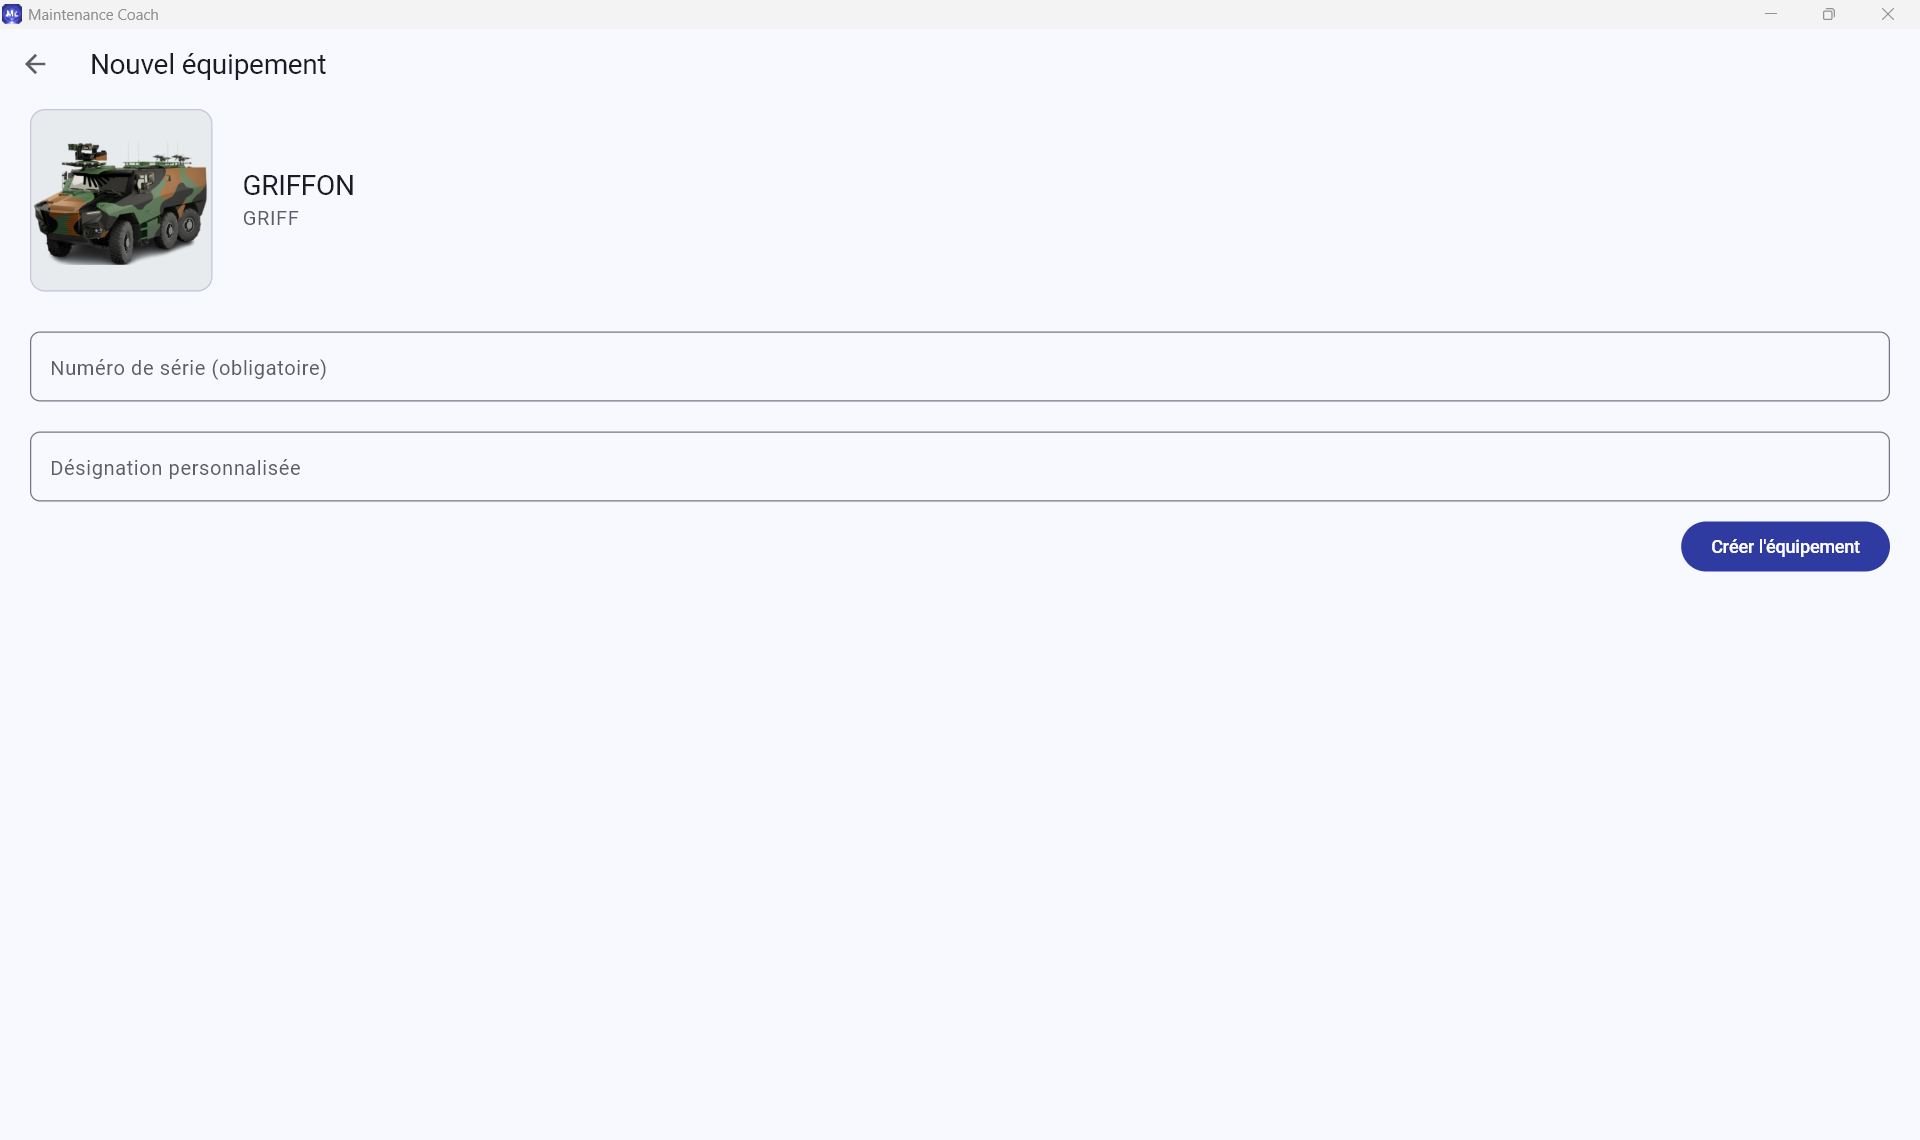
HL MCoach - Generic Equipment record - Fleet tab - Individualized Equipment creation
Fill in the following fields:
- Serial Number* - Serial Number of the Individualized Equipment
- Custom designation - Additional information specific to the Individualized Equipment
An equipment creation request is sent.
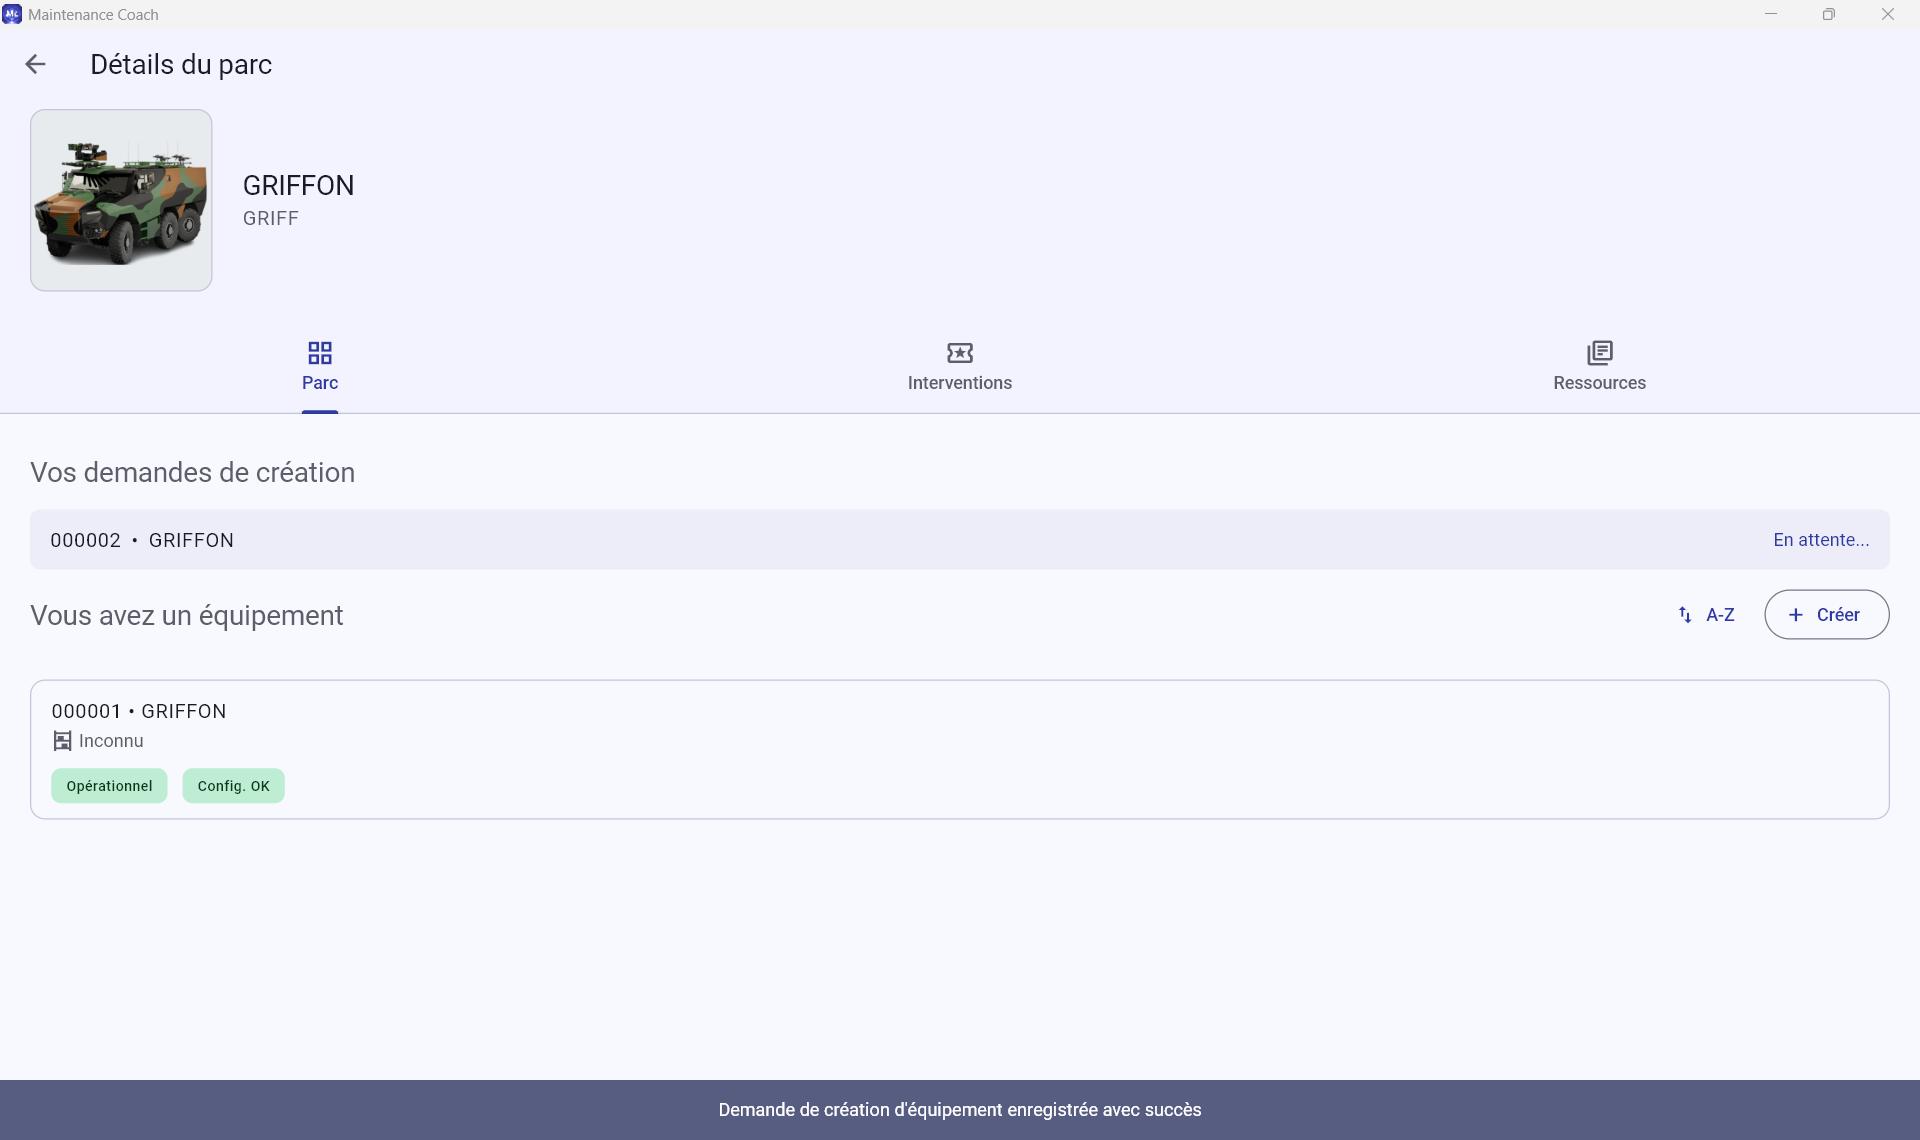
HL MCoach - Generic Equipment record - Fleet tab - Pending Individualized Equipment creation request
At this stage, the Individualized Equipment creation request is pending validation in HL Manage.
Validate the creation of a serial number in HeadLight Manage
Video of demonstration
Prerequisites
The user must have one of the following roles [TO BE CONFIRMED]:
- super-admin
- super-park-manager
Validation of Individualized Equipment is performed from the Equipment to validate page in HL Manage.
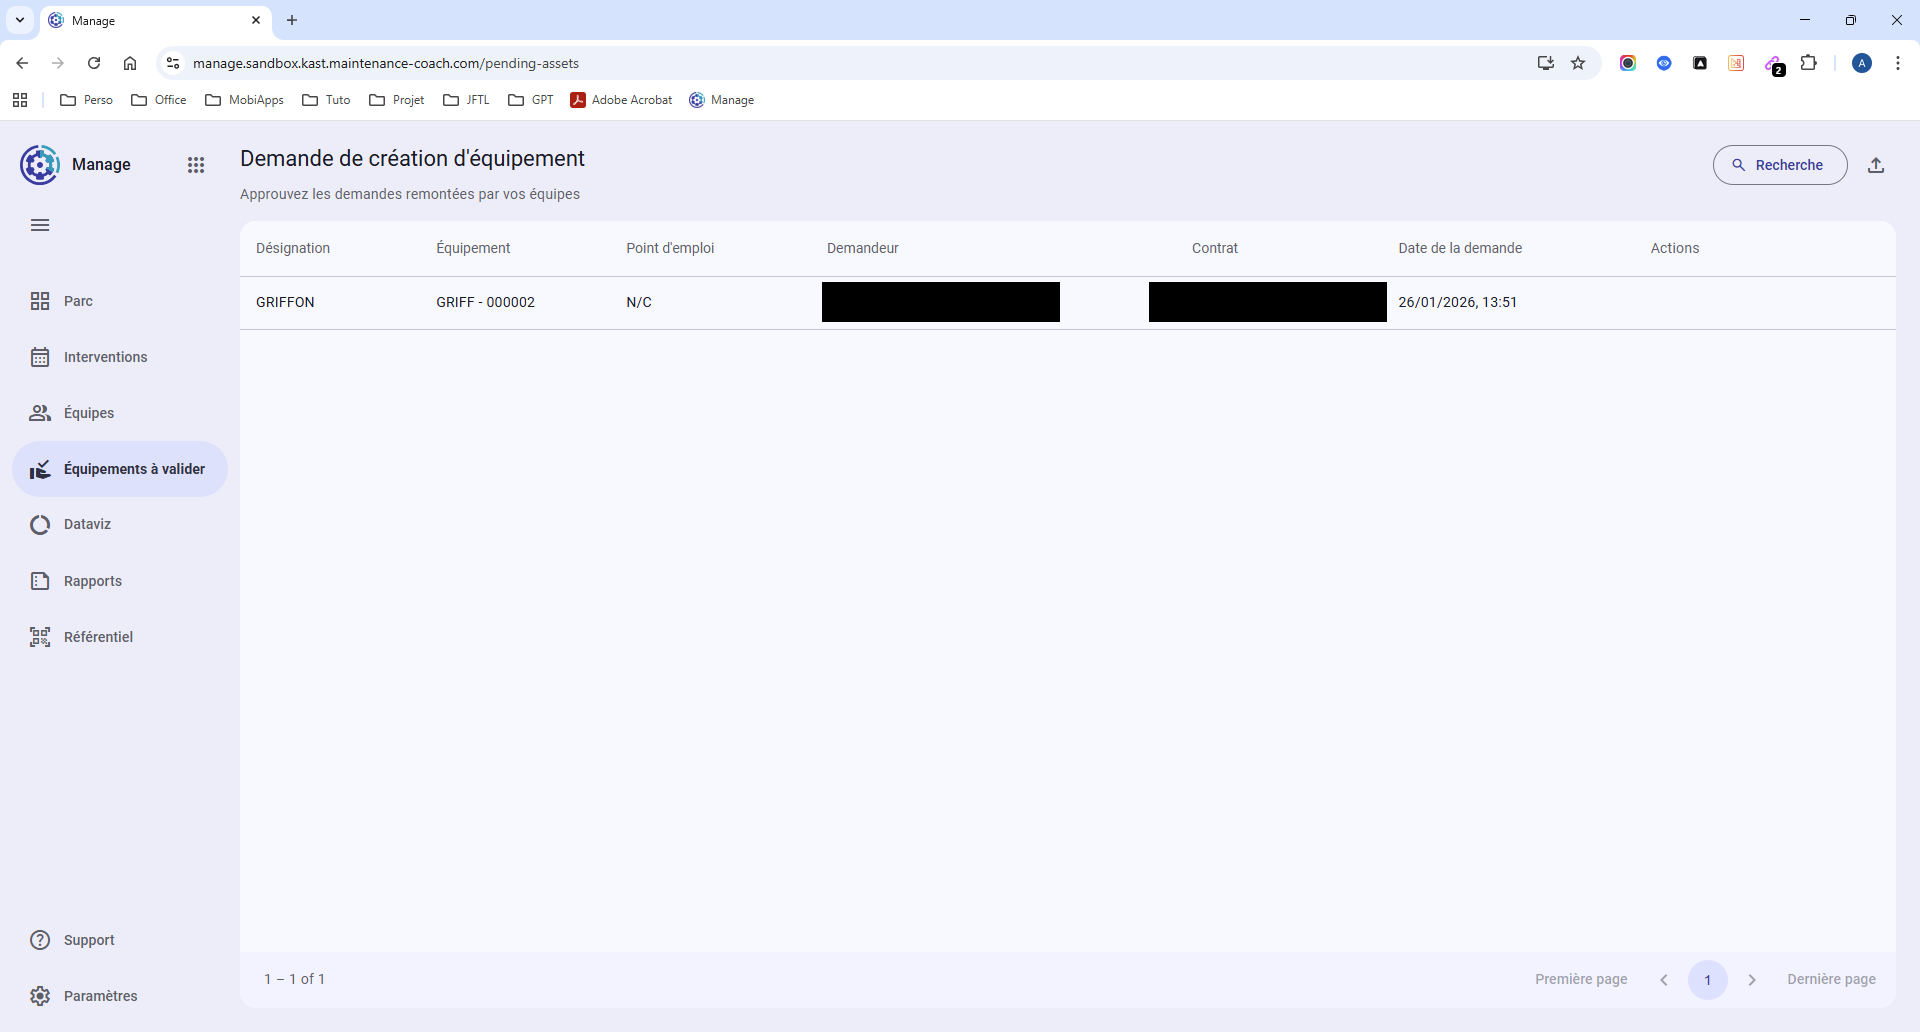
HL Manage - Equipment to validate page
To validate the creation request, hover over the line to display three action icons:
- Edit request
- Validate request
- Delete request
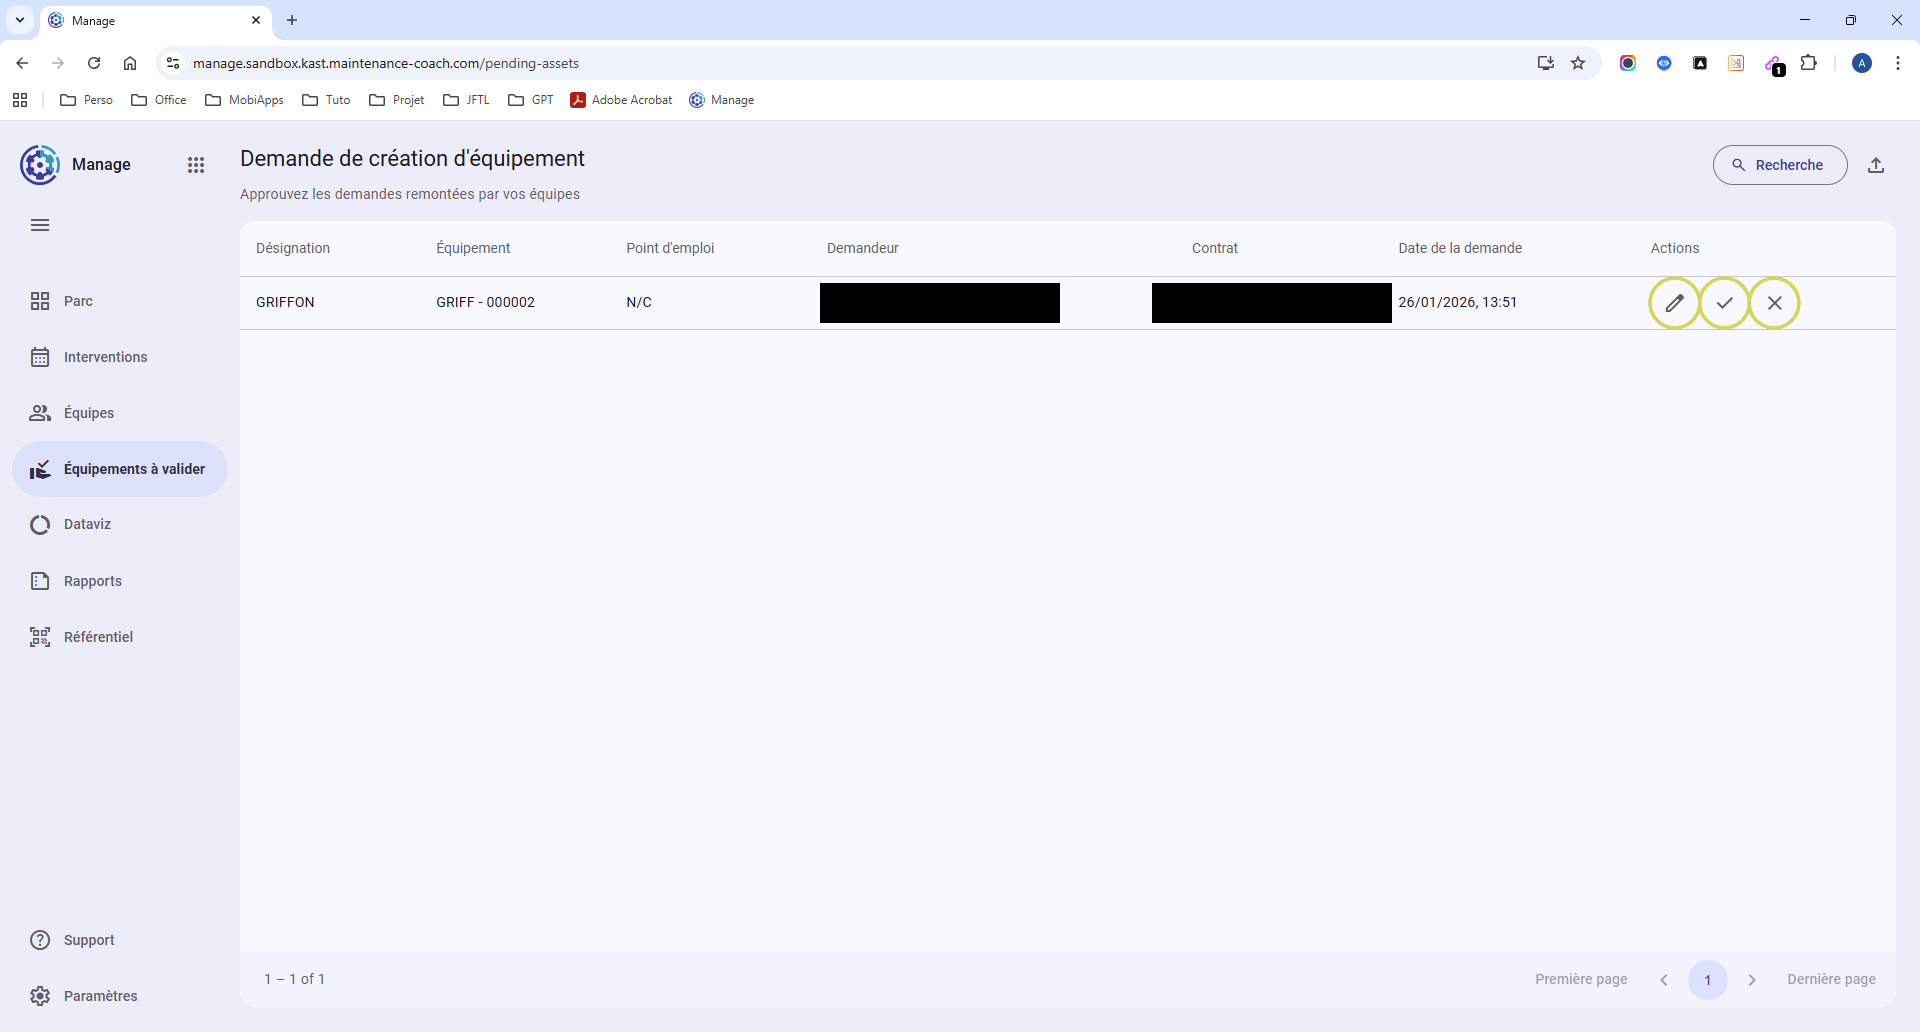
HL Manage - Equipment to validate page - Action icons
Validating the Individualized Equipment creation request will:
- remove the request from HL Manage
- display the Individualized Equipment in HL MCoach
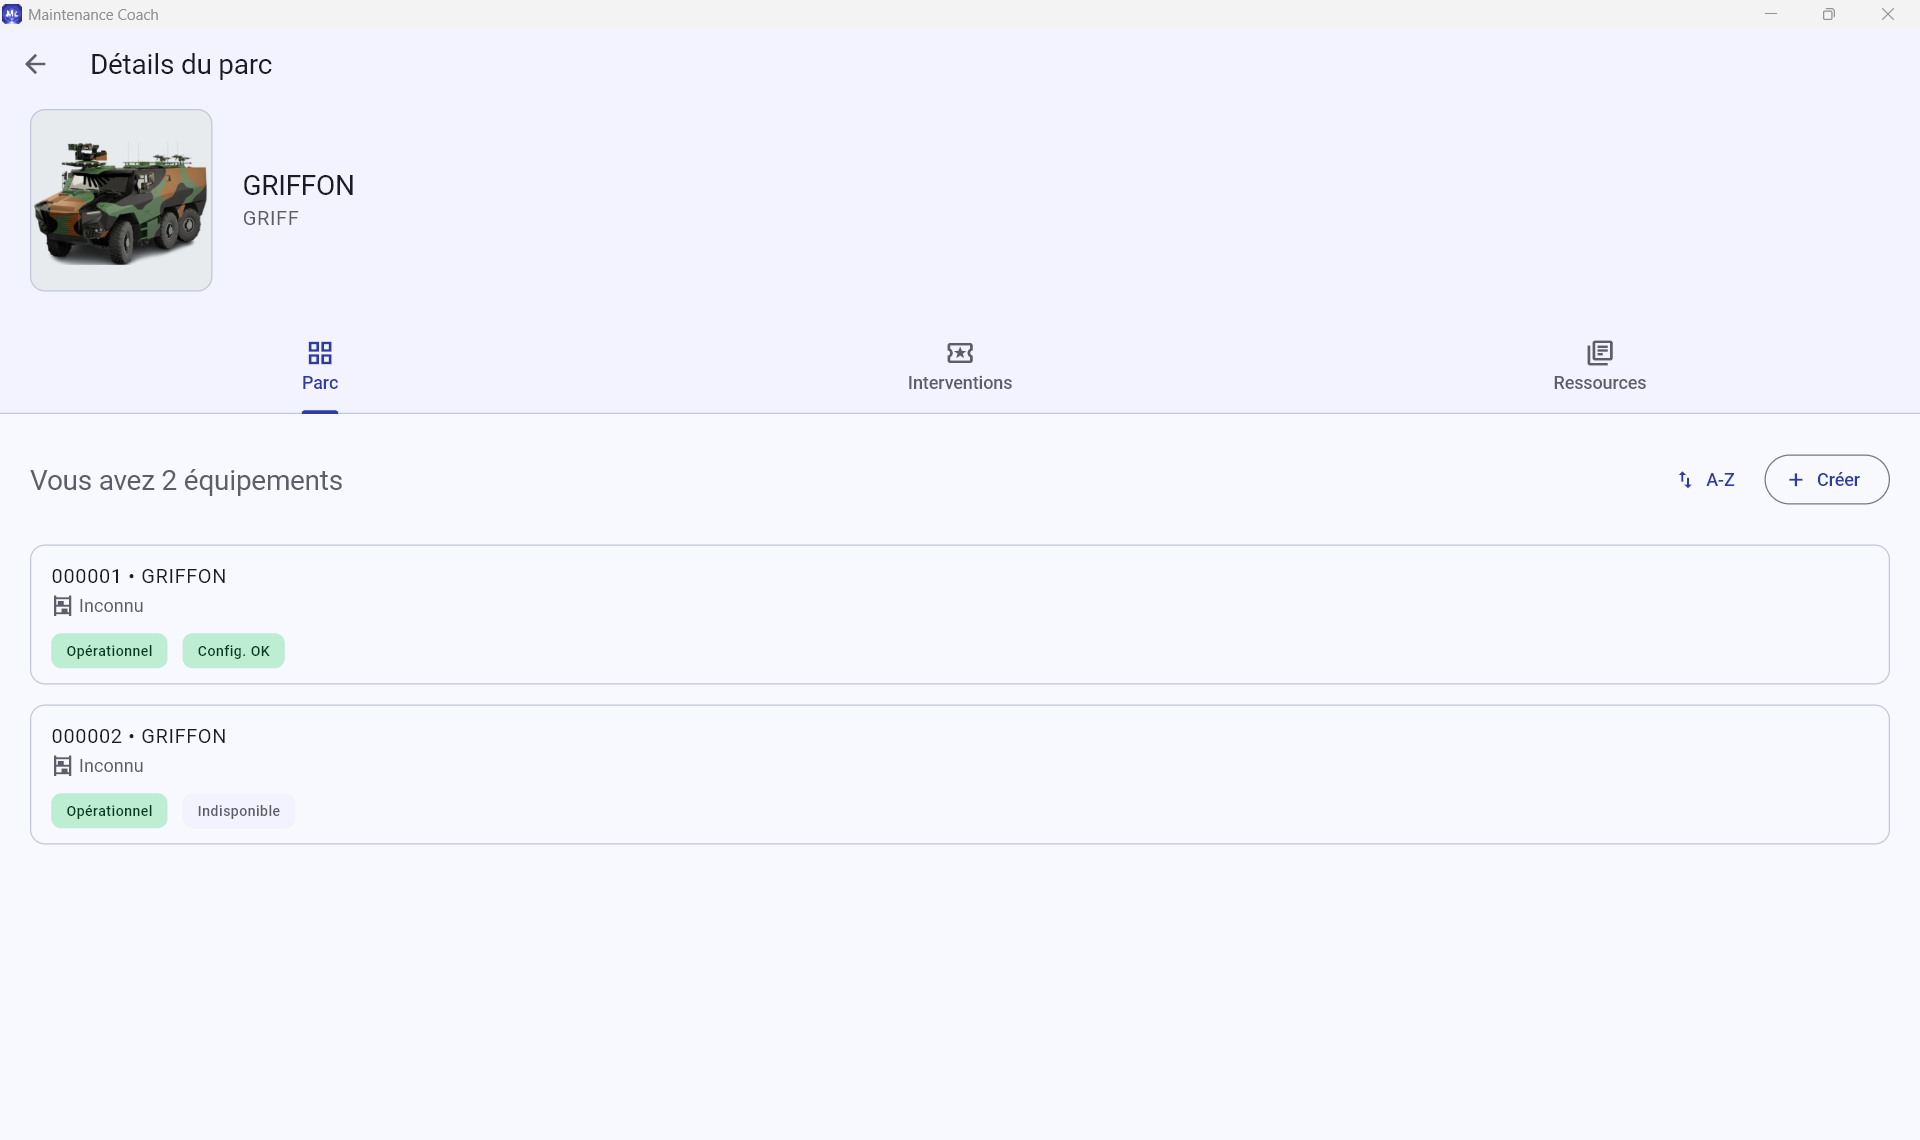
HL MCoach - Generic Equipment record - Fleet tab - Validated Individualized Equipment creation request
HeadLight Studio
Create your Knowledge Base
Video of demonstration
Prerequisites
The user must have the super-editor role.
Access HeadLight Studio using one of the following links:
- Sandbox - Studio - Sandbox
- Production - Studio - Production
Content is created in HL Studio.
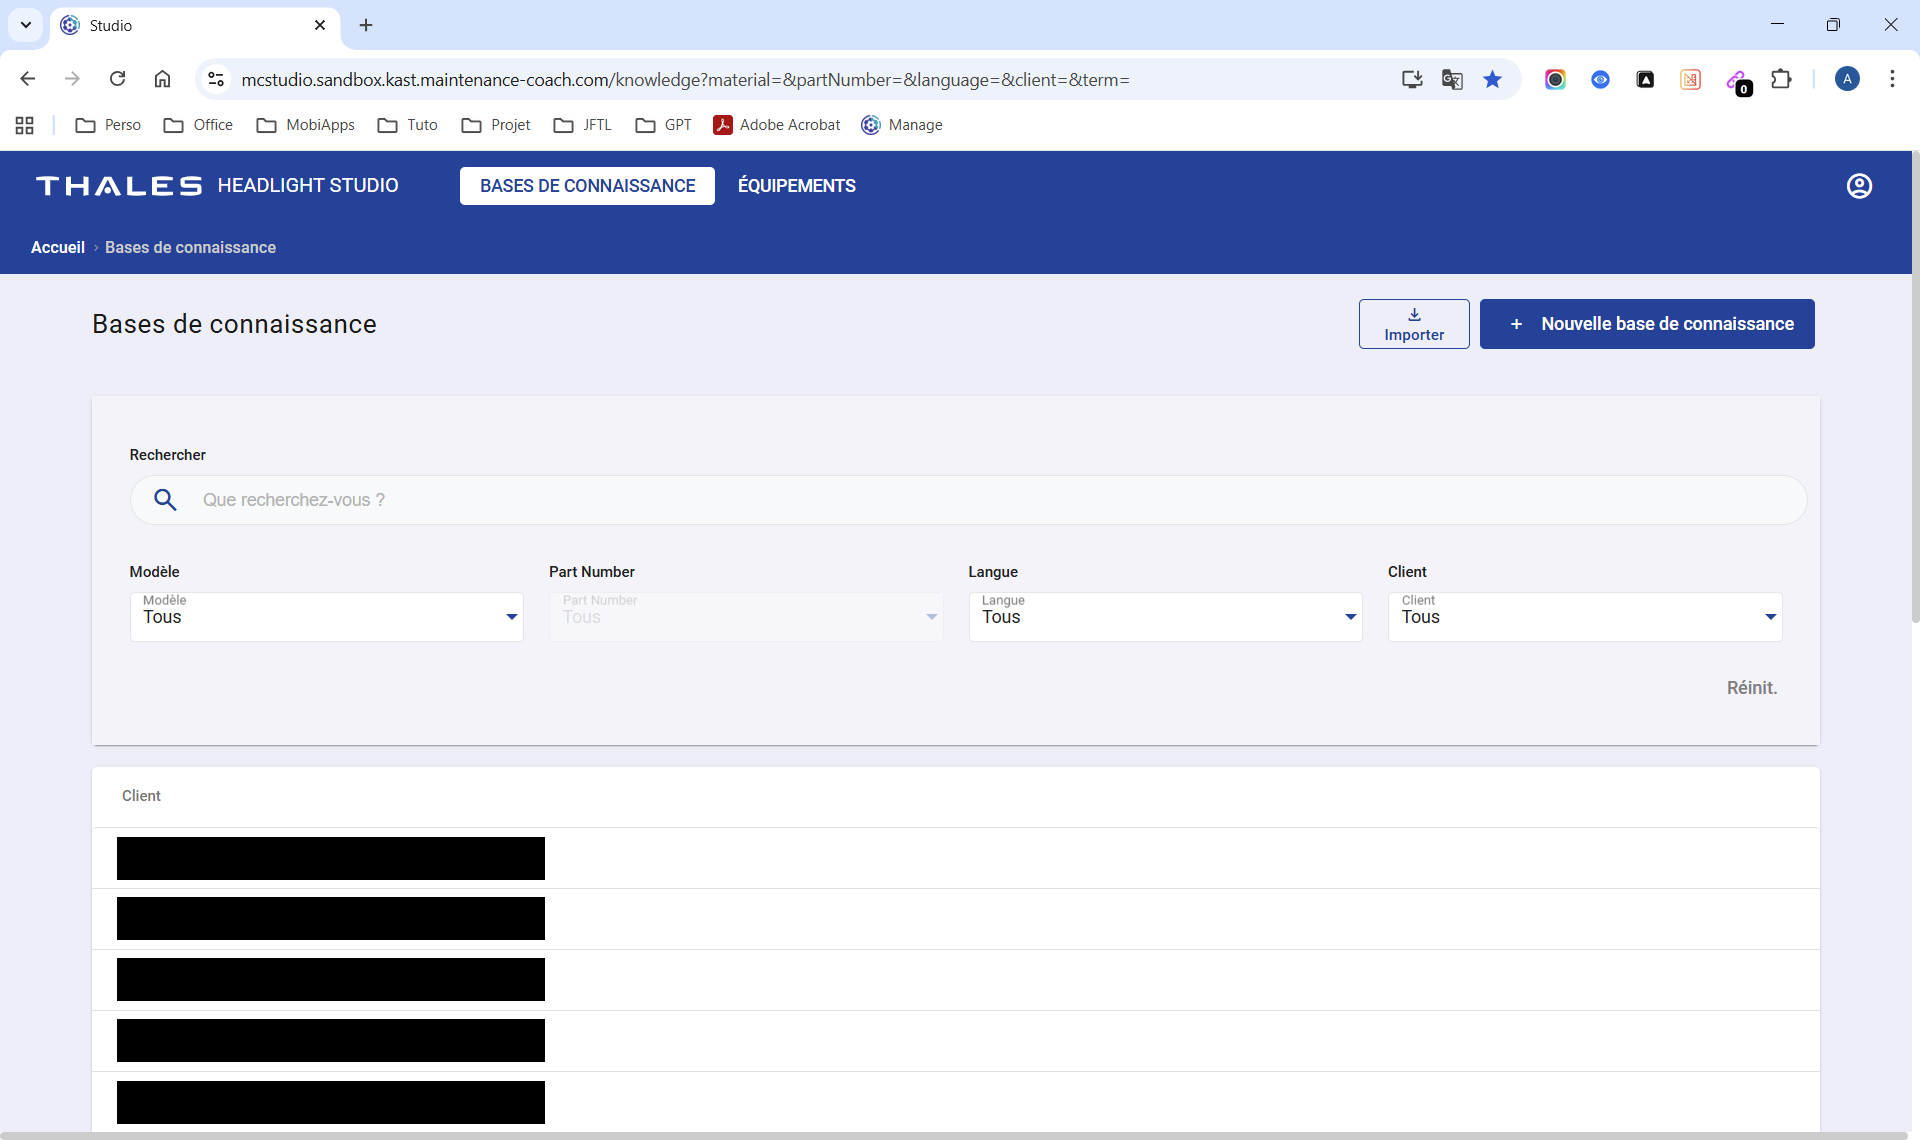
HL Studio - Knowledge Bases page
Video of demonstration
From the Knowledge Bases page, click + New Knowledge Base. A small window appears.
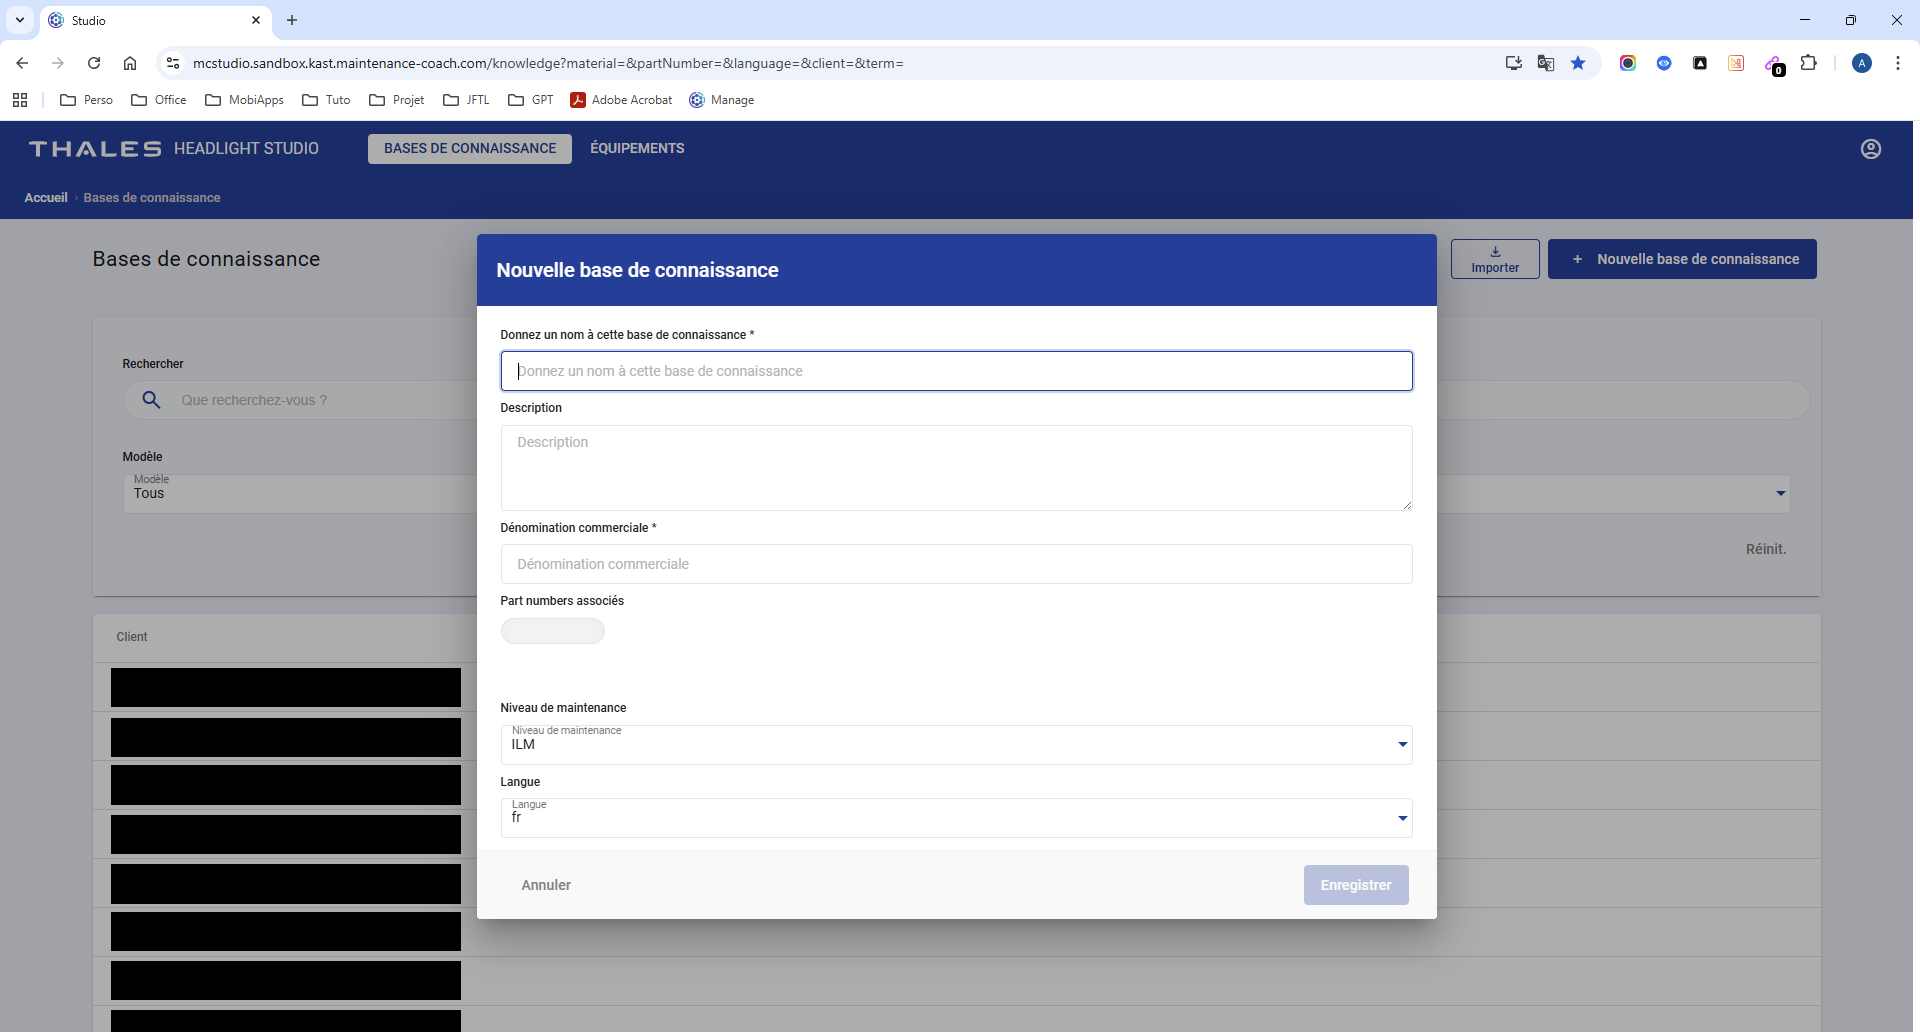
HL Studio - Knowledge Bases page - New Knowledge Base window
Fill in the following fields:
- Give a name to this knowledge base* - Often identical to the commercial designation
- Description - Useful additional information
- Commercial designation* - Name of the equipment, building, or other item
- Associated Part Numbers - Associate PNs to display Resources in HL MCoach
- Maintenance level - Choose one of the following levels:
- NA
- DLM
- ILM
- OLM
- Language - Choose one of the following languages in which the Resources will be displayed in HL MCoach:
- NA
- AR
- EN
- FR
Here is an example for a presentation document.
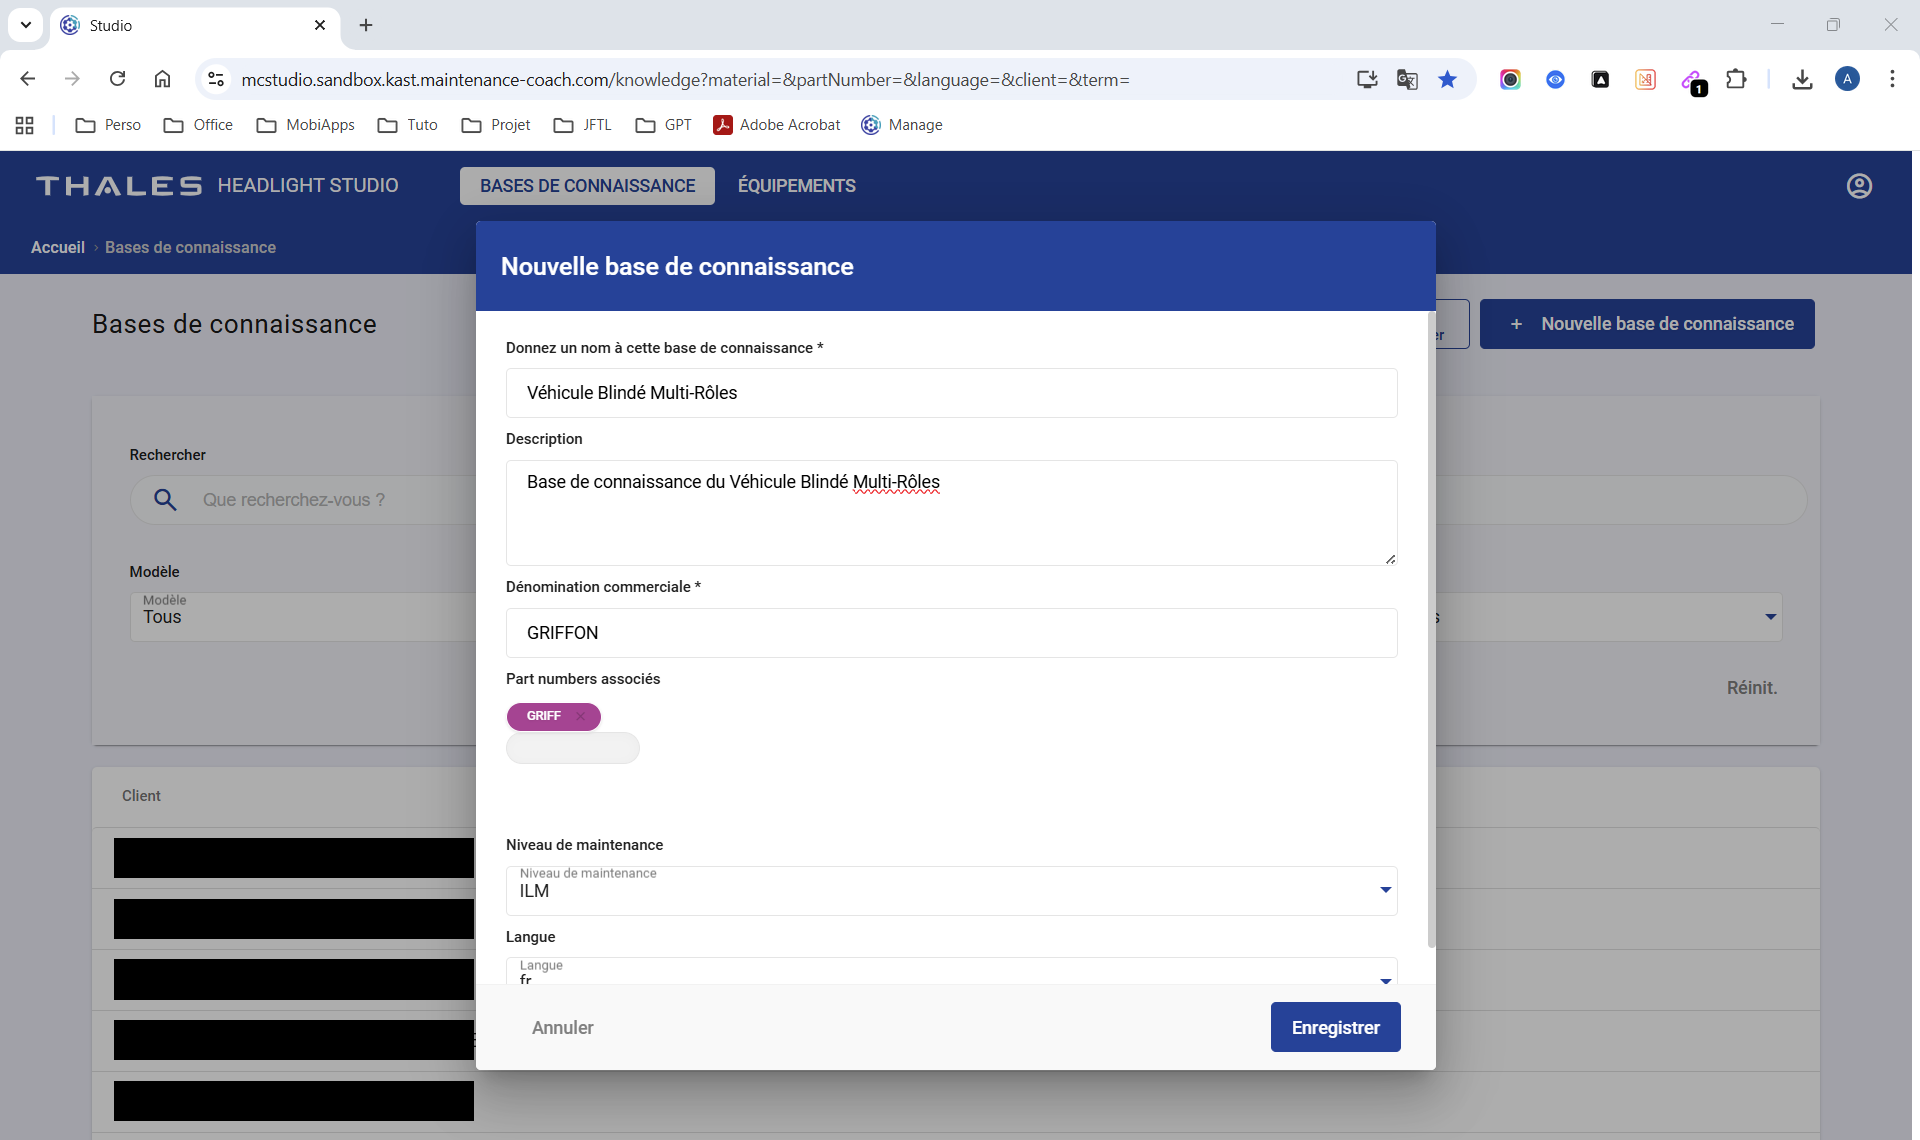
HL Studio - Knowledge Bases page - New Knowledge Base window - Example
Once the Knowledge Base for the Generic Equipment is created, it appears in the list.
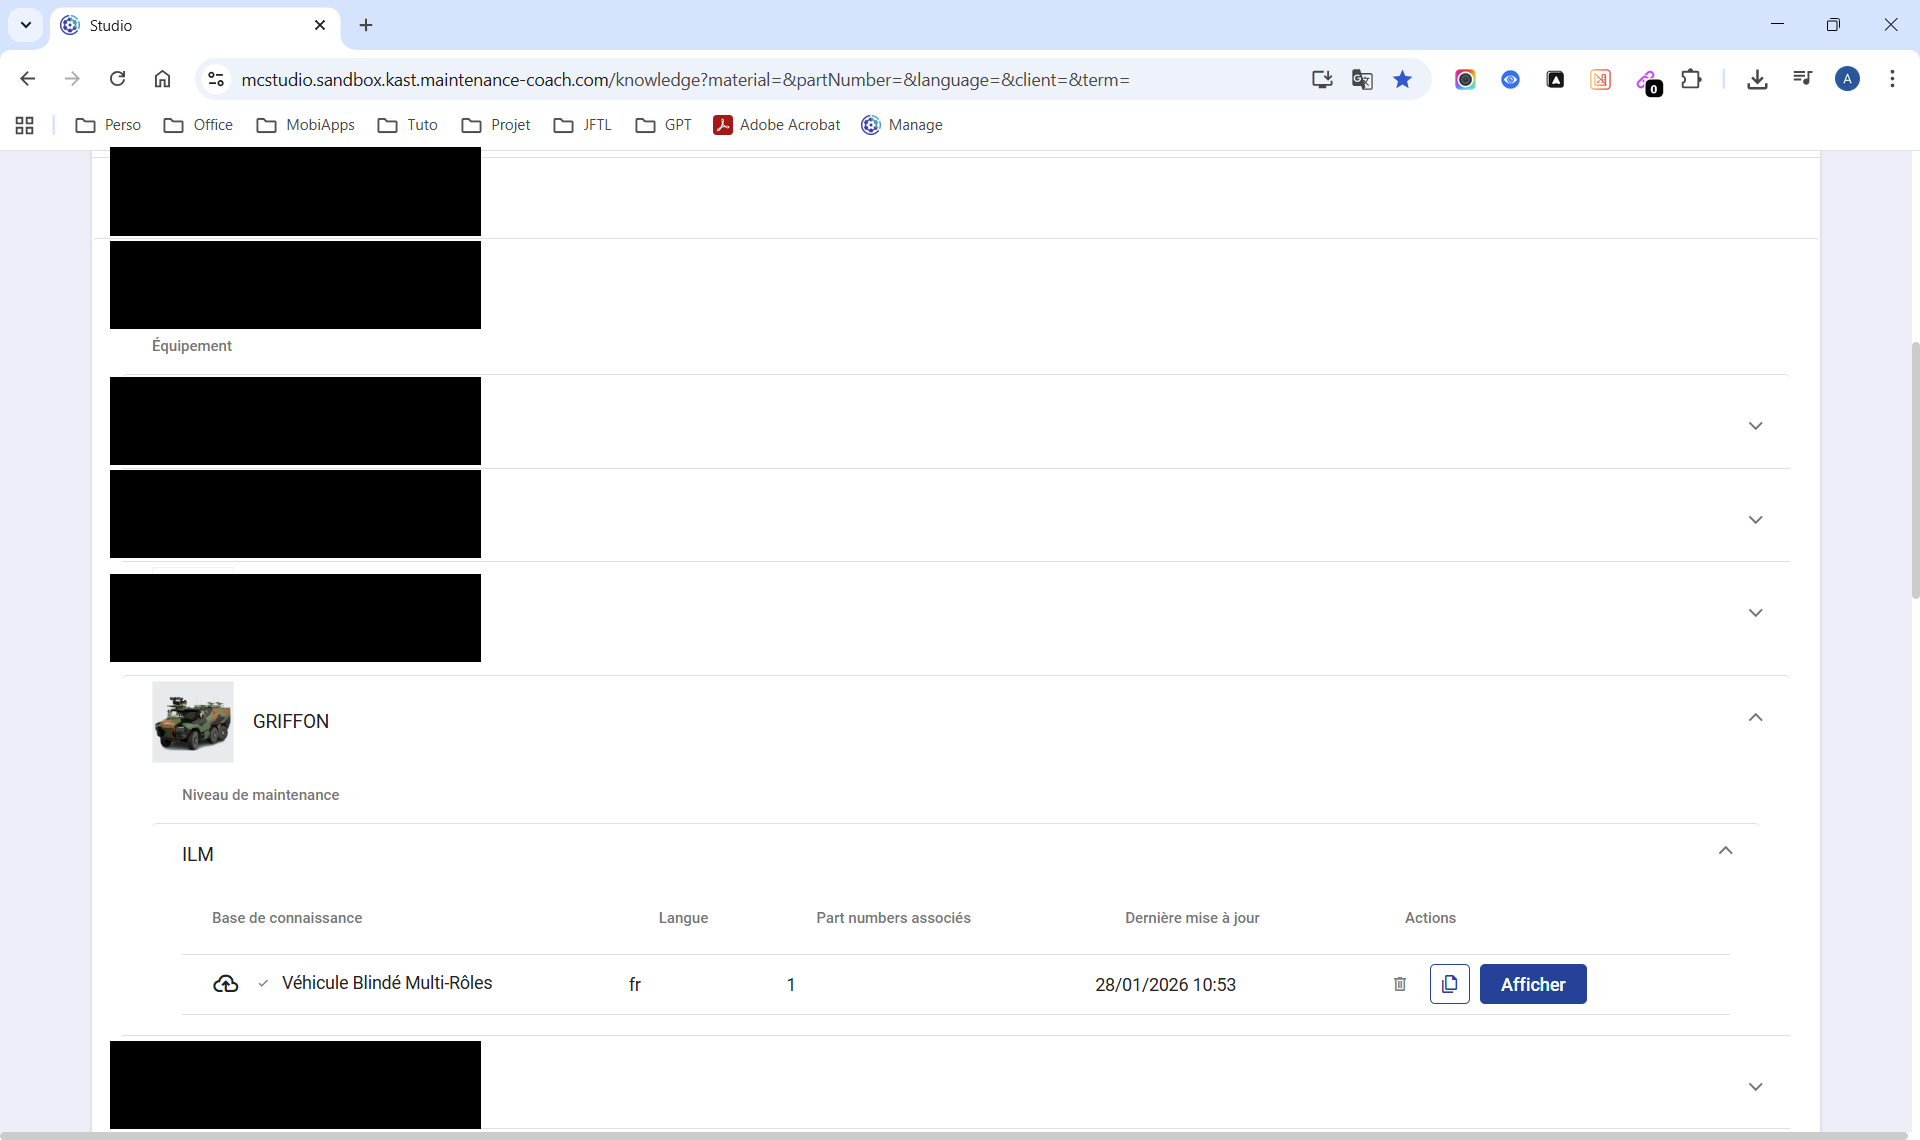
HL Studio - Knowledge Bases page
It then becomes possible to add the following content:
- Troubleshooting
- Documents & Media
- Procedure sheets
- Inspection forms (Checklists)
- Configuration files
- Software & Firmware
- Training files
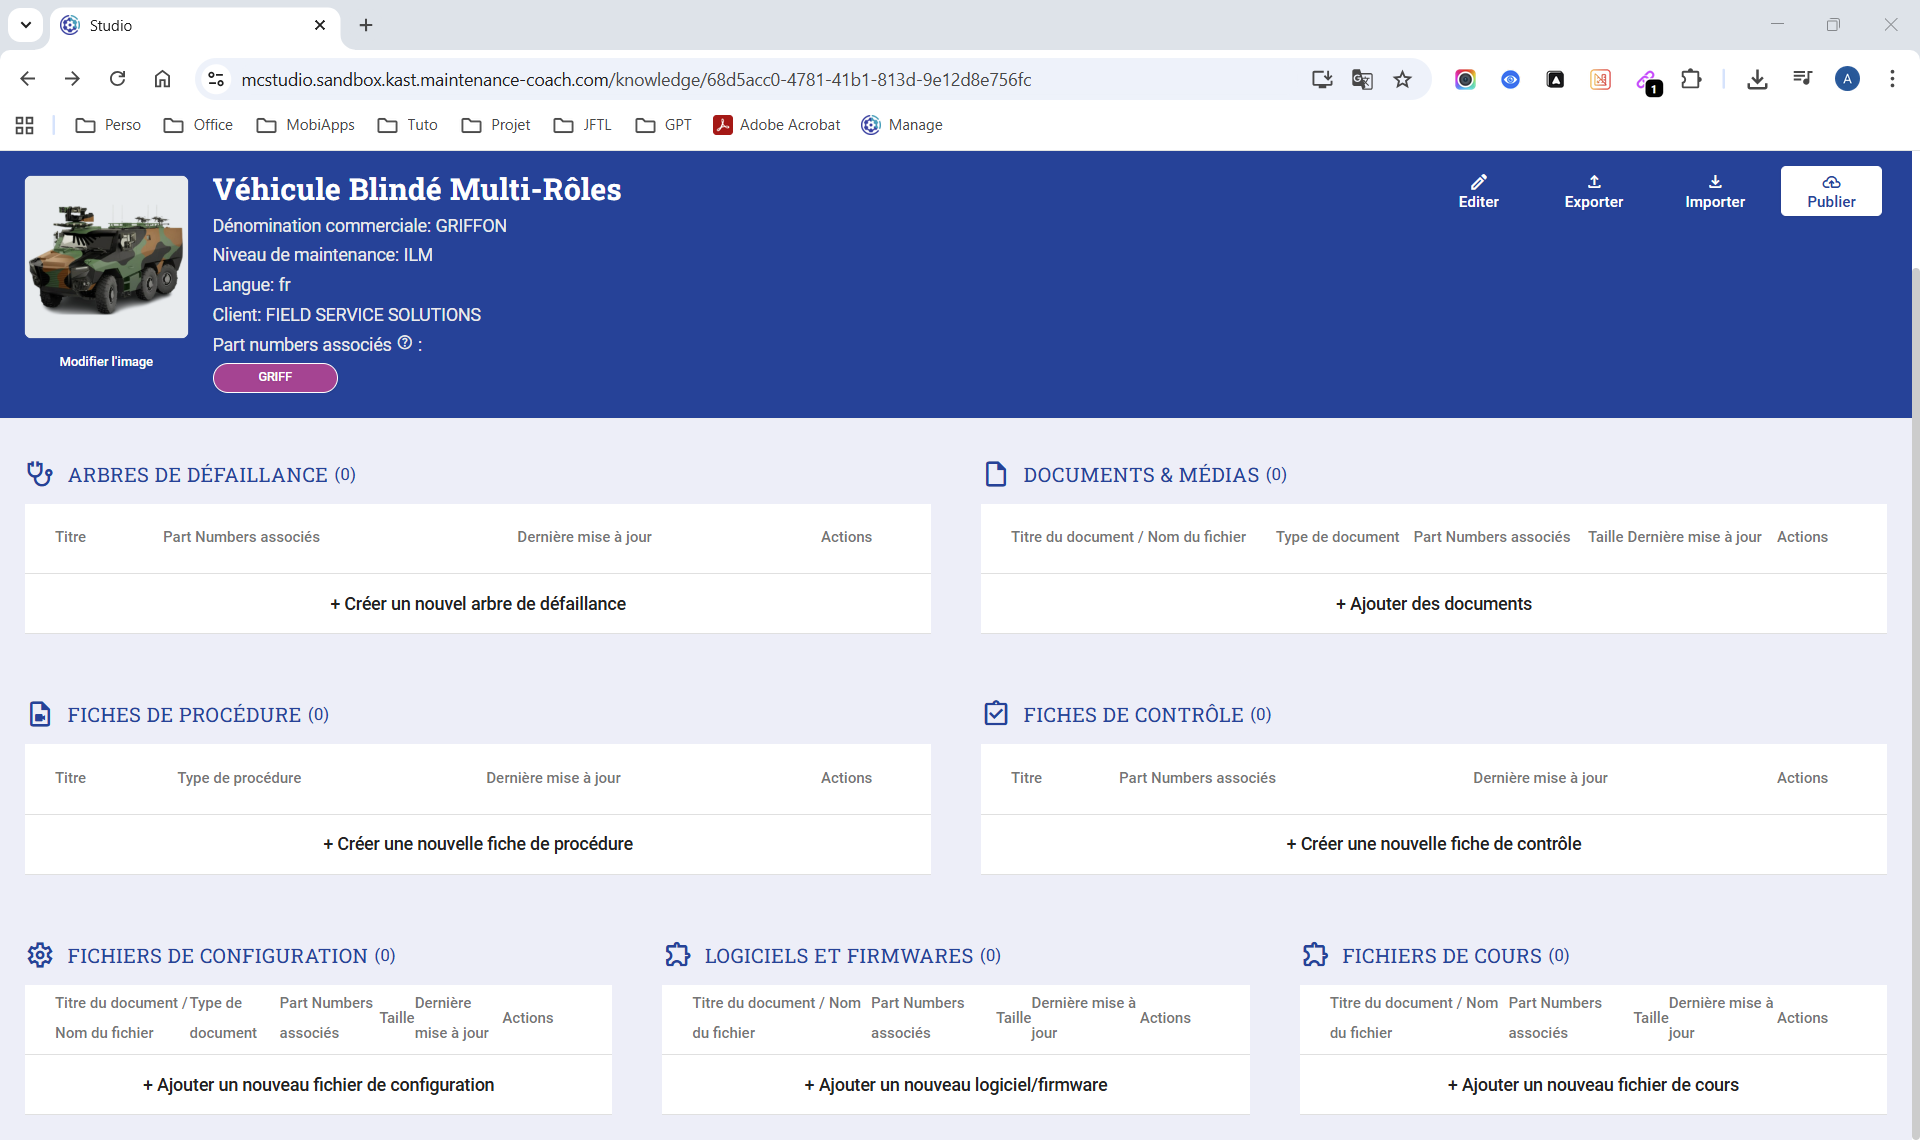
HL Studio - Knowledge Bases page - Equipment record
Create your Troubleshooting
Video of demonstration
From the Generic Equipment Knowledge Base page, click + Create new troubleshooting. A small window appears.
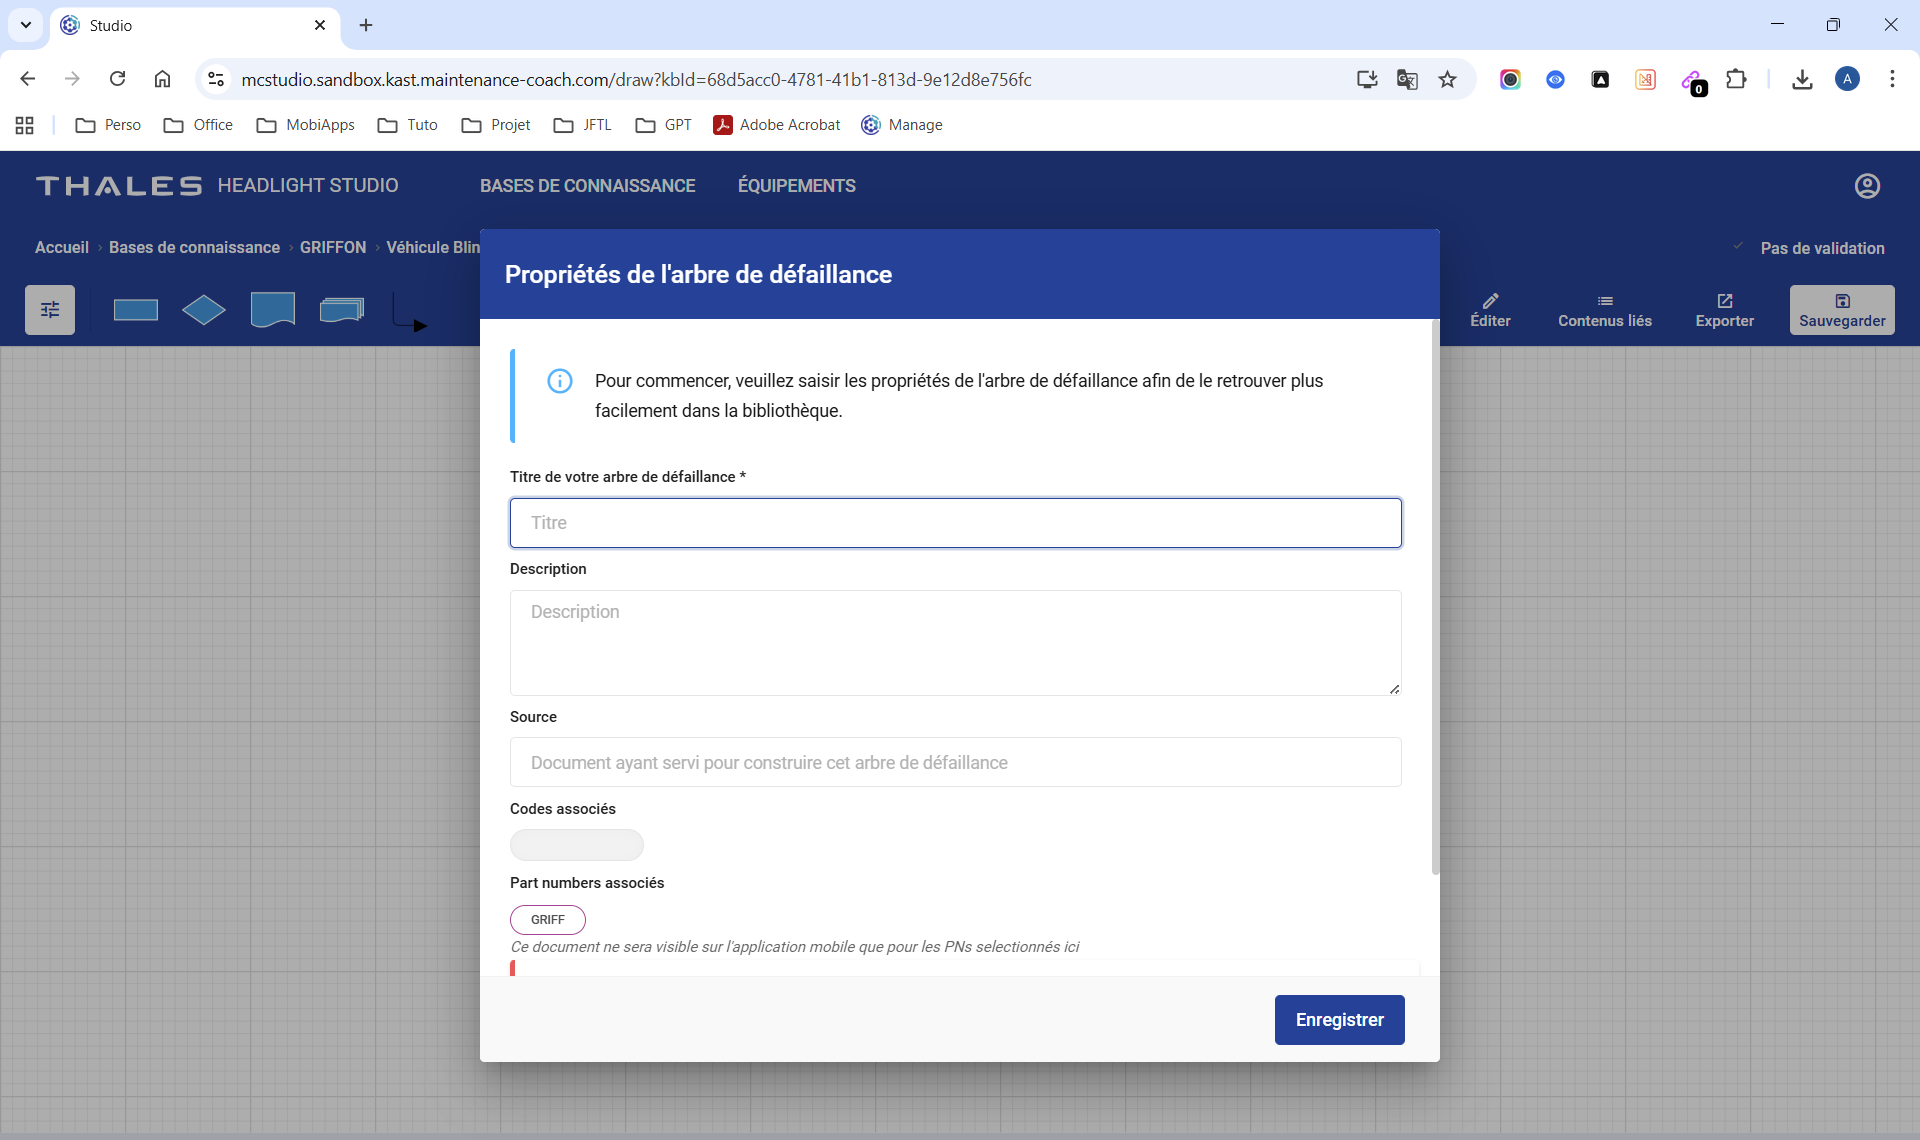
HL Studio - Knowledge Bases page - Equipment record - Troubleshooting creation window
Fill in the following fields:
- Troubleshooting title* - Name of the troubleshooting
- Description - Useful additional information
- Source - Document used to build this troubleshooting
- Associated codes - Useful for configuring the display of Resources for a user or a team
- Associated Part Numbers - Associate PNs to display Resources in HL MCoach
Import your Documents & Media
Video of demonstration
From the Generic Equipment Knowledge Base page, click + Add documents. A small window appears.
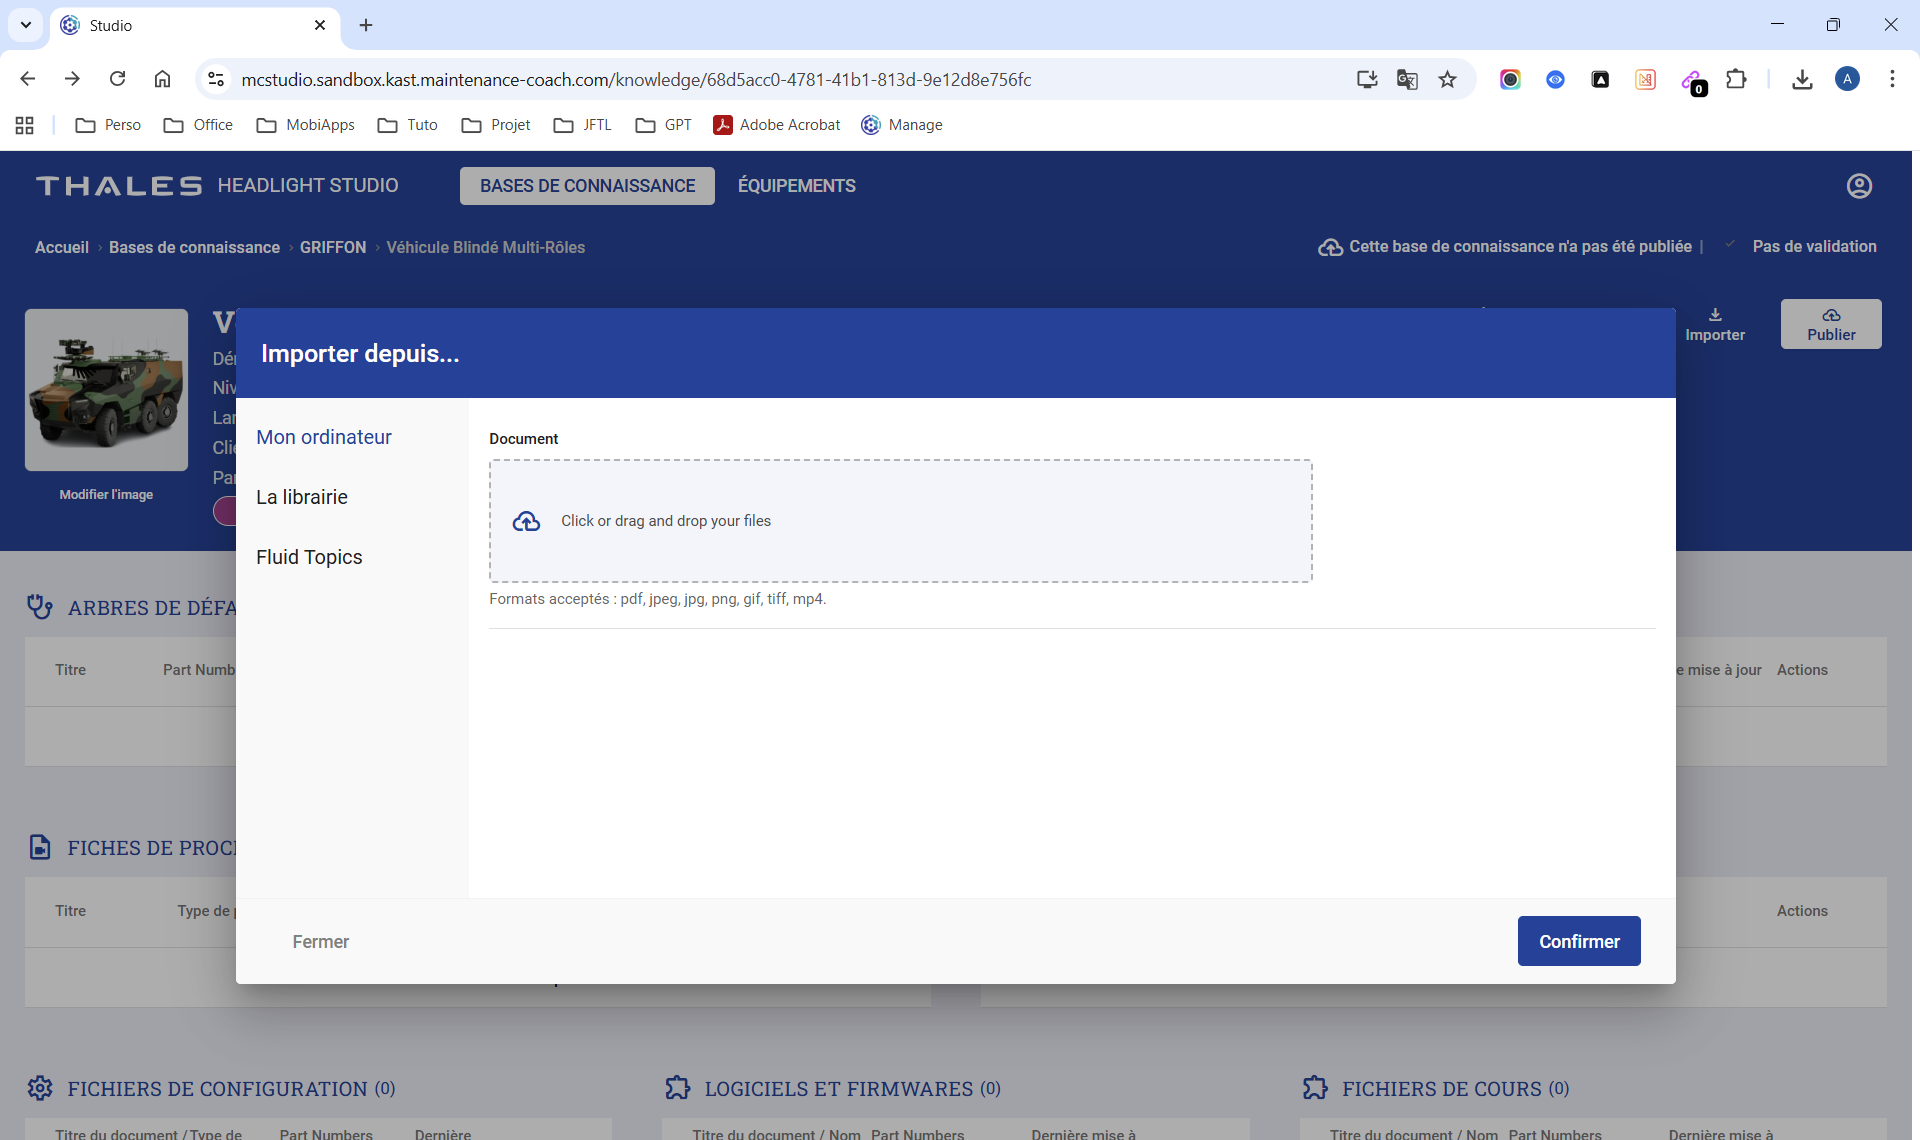
HL Studio - Knowledge Bases page - Equipment record - Documents & Media creation window
When adding a document, a drop-down list allows you to select the document type.
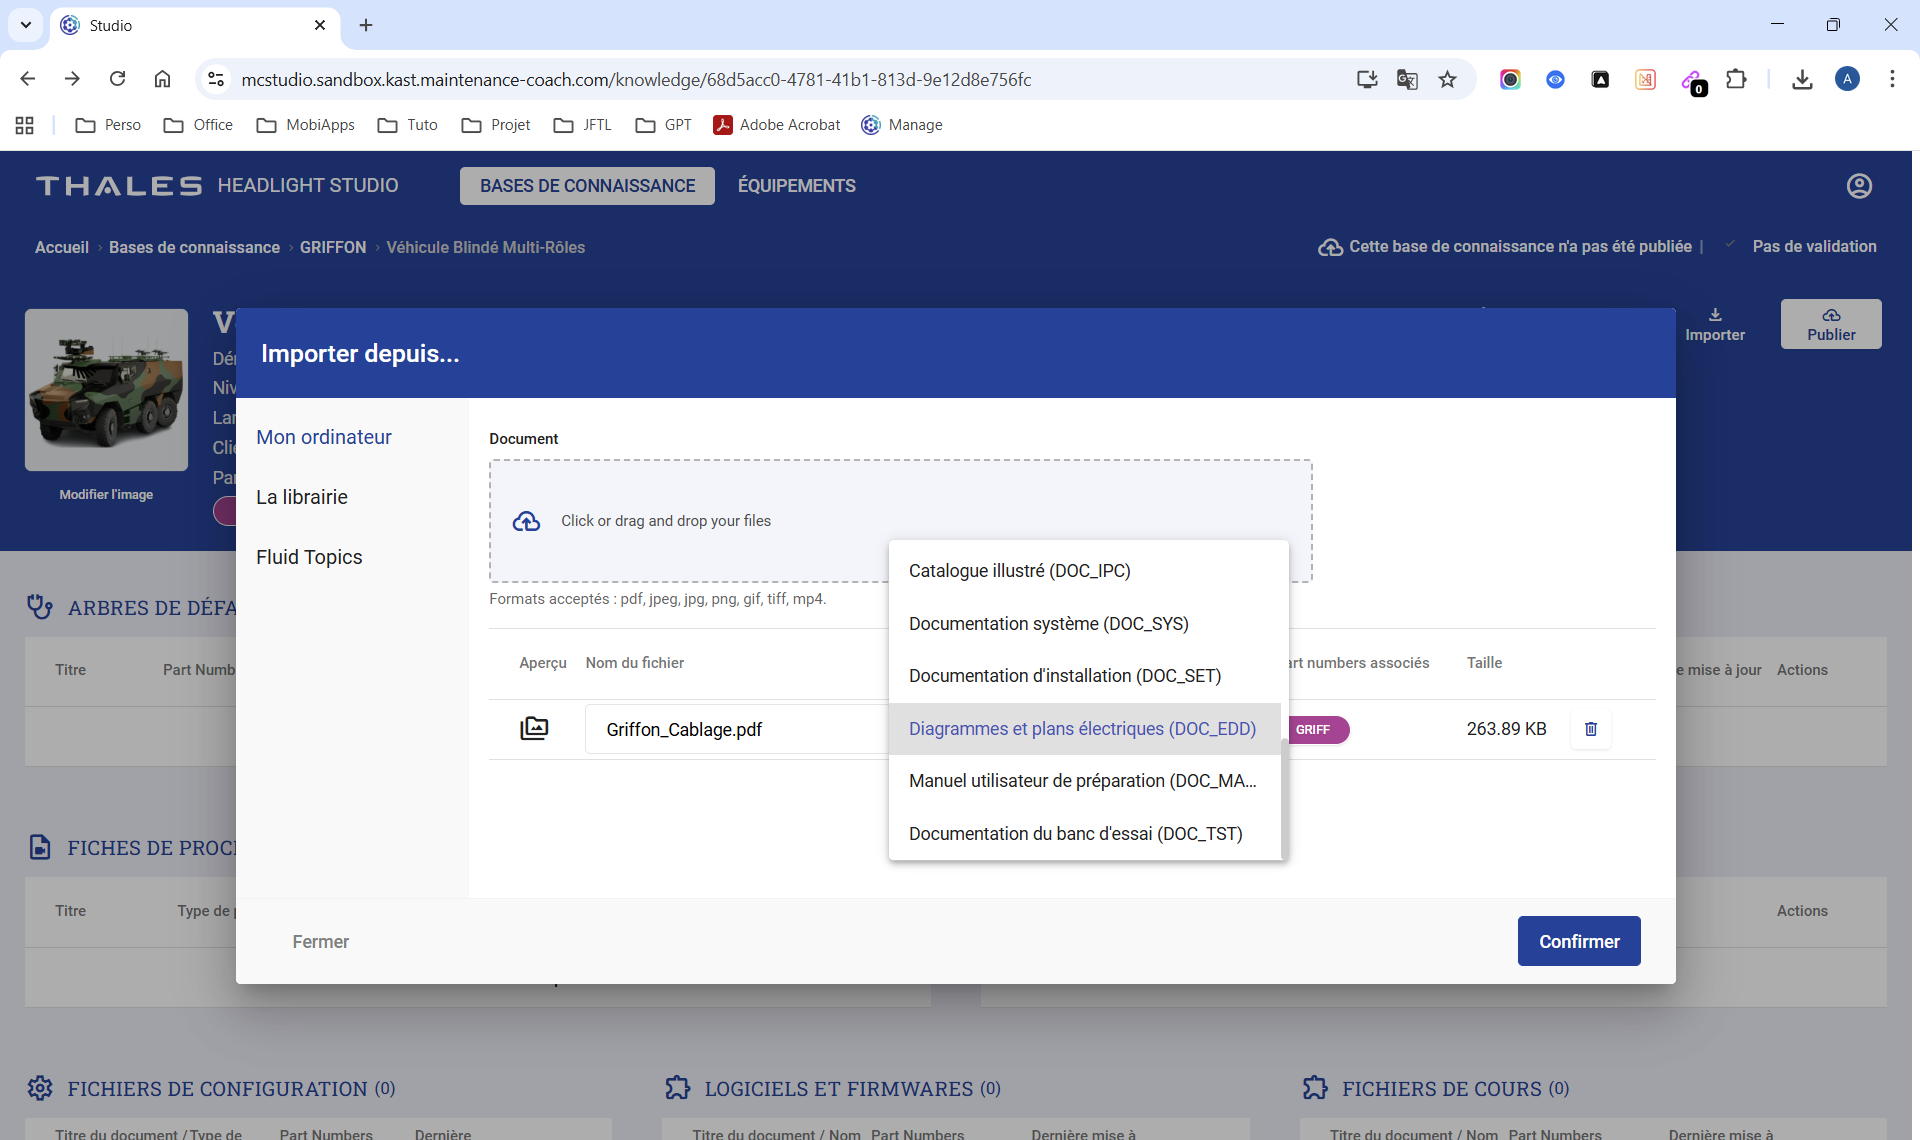
HL Studio - Knowledge Bases page - Equipment record - Documents & Media creation window - Document type list
Fields to fill in:
- File name - The document name is filled in by default. It can be changed.
- Document type - Choose one of the following types:
- Image media
- Video media
- OLM technical guide
- ILM technical guide
- DLM technical guide
- User manual
- Technical notes
- Brochure
- Retrofit procedure
- Other documentation
- Illustrated catalog
- System documentation
- Installation documentation
- Electrical diagrams and drawings
- Preparation user manual
- Test bench documentation
- Associated Part Numbers - PNs are selected automatically
Create your Maintenance Procedures
Video of demonstration
From the Generic Equipment Knowledge Base page, click + Create a new procedure sheet. A small window appears.
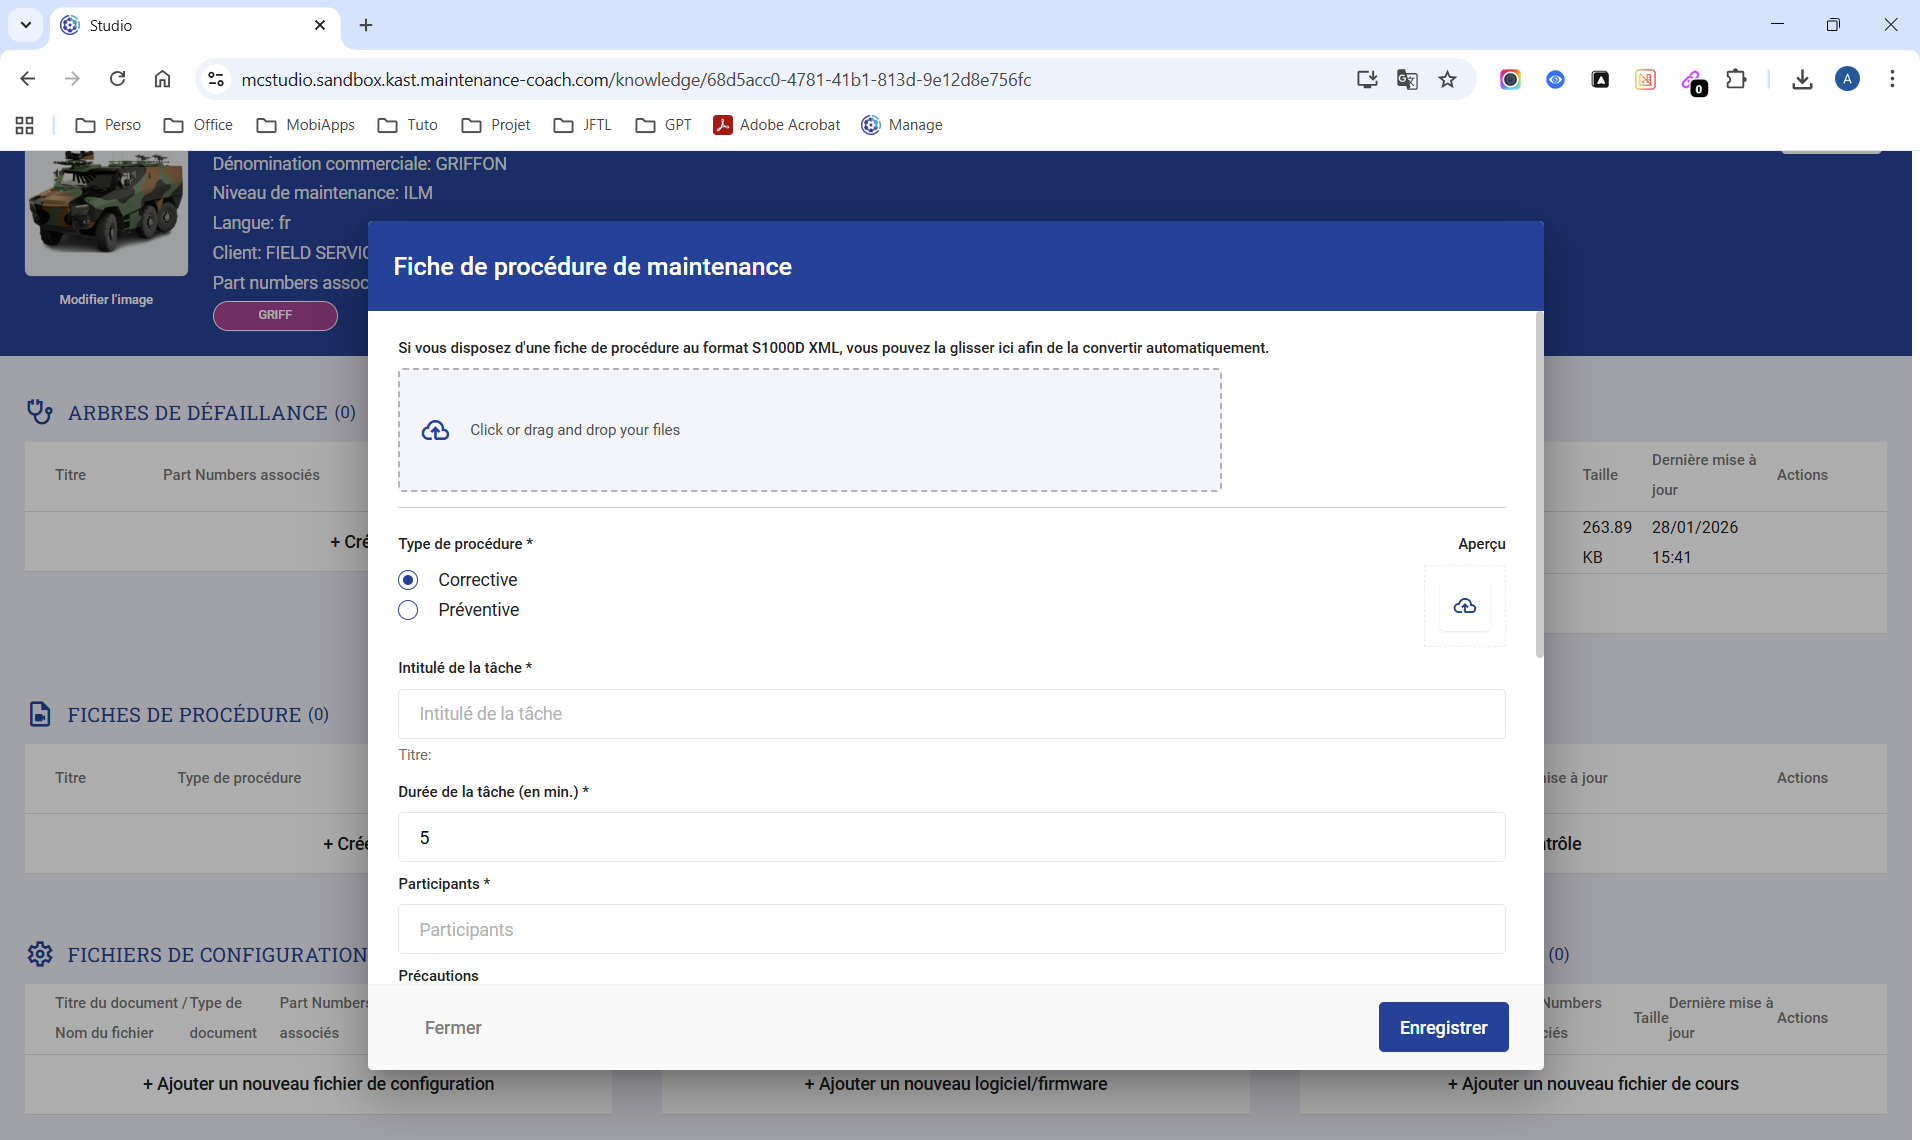
HL Studio - Knowledge Bases page - Equipment record - Procedure Sheet creation window
Fields to fill in:
- Procedure type* - Choose one of the following types:
- Corrective
- Preventive
- Task title* - Name of the procedure sheet
- Task duration (in minutes)* - Estimated time required to complete the task
- Participants* - Indicate who is authorized to perform the task
- Precautions - Additional information
- Tools - Required tools
- Spare parts - Required spare parts
- Associated codes - Useful for configuring the display of Resources for a user or a team
- Steps - Add the steps required to complete the task
Create your Checklists
Video of demonstration
From the Generic Equipment Knowledge Base page, click + Create a new inspection form. A page appears.
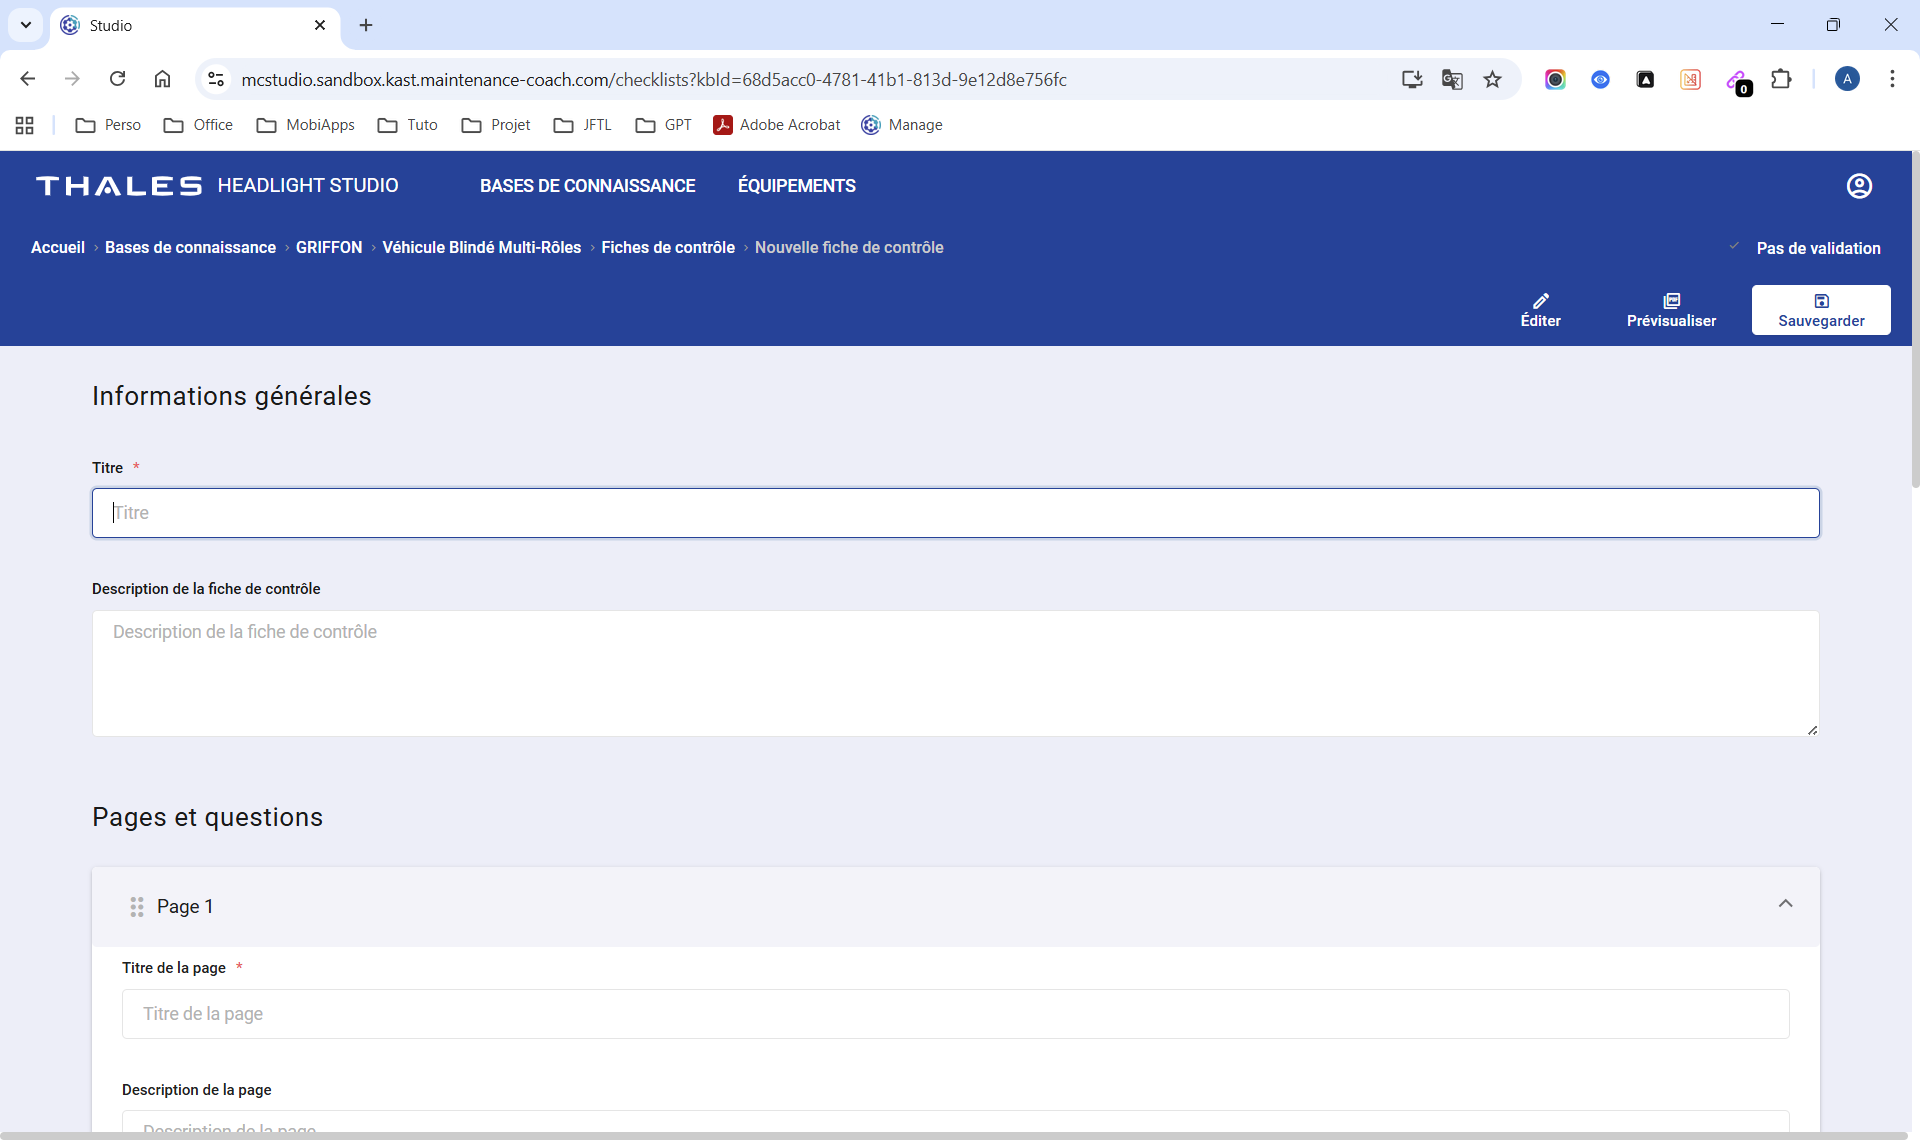
HL Studio - Knowledge Bases page - Equipment record - Inspection Form creation page
Fields to fill in:
- Title* - Checklist name
- Inspection form description - Useful additional information
- Pages and questions - Choose one of the following response types:
- Text response
- Multiple choice
- Number
- Date & time
- Date
- Checkbox
- Signature
- Table
- Report customization - Choose one of the following options:
- Carbone.io
- Header, Footer, and Cover page
Import your Configuration files
Video of demonstration
From the Generic Equipment Knowledge Base page, click + Add a new configuration file. A small window appears.
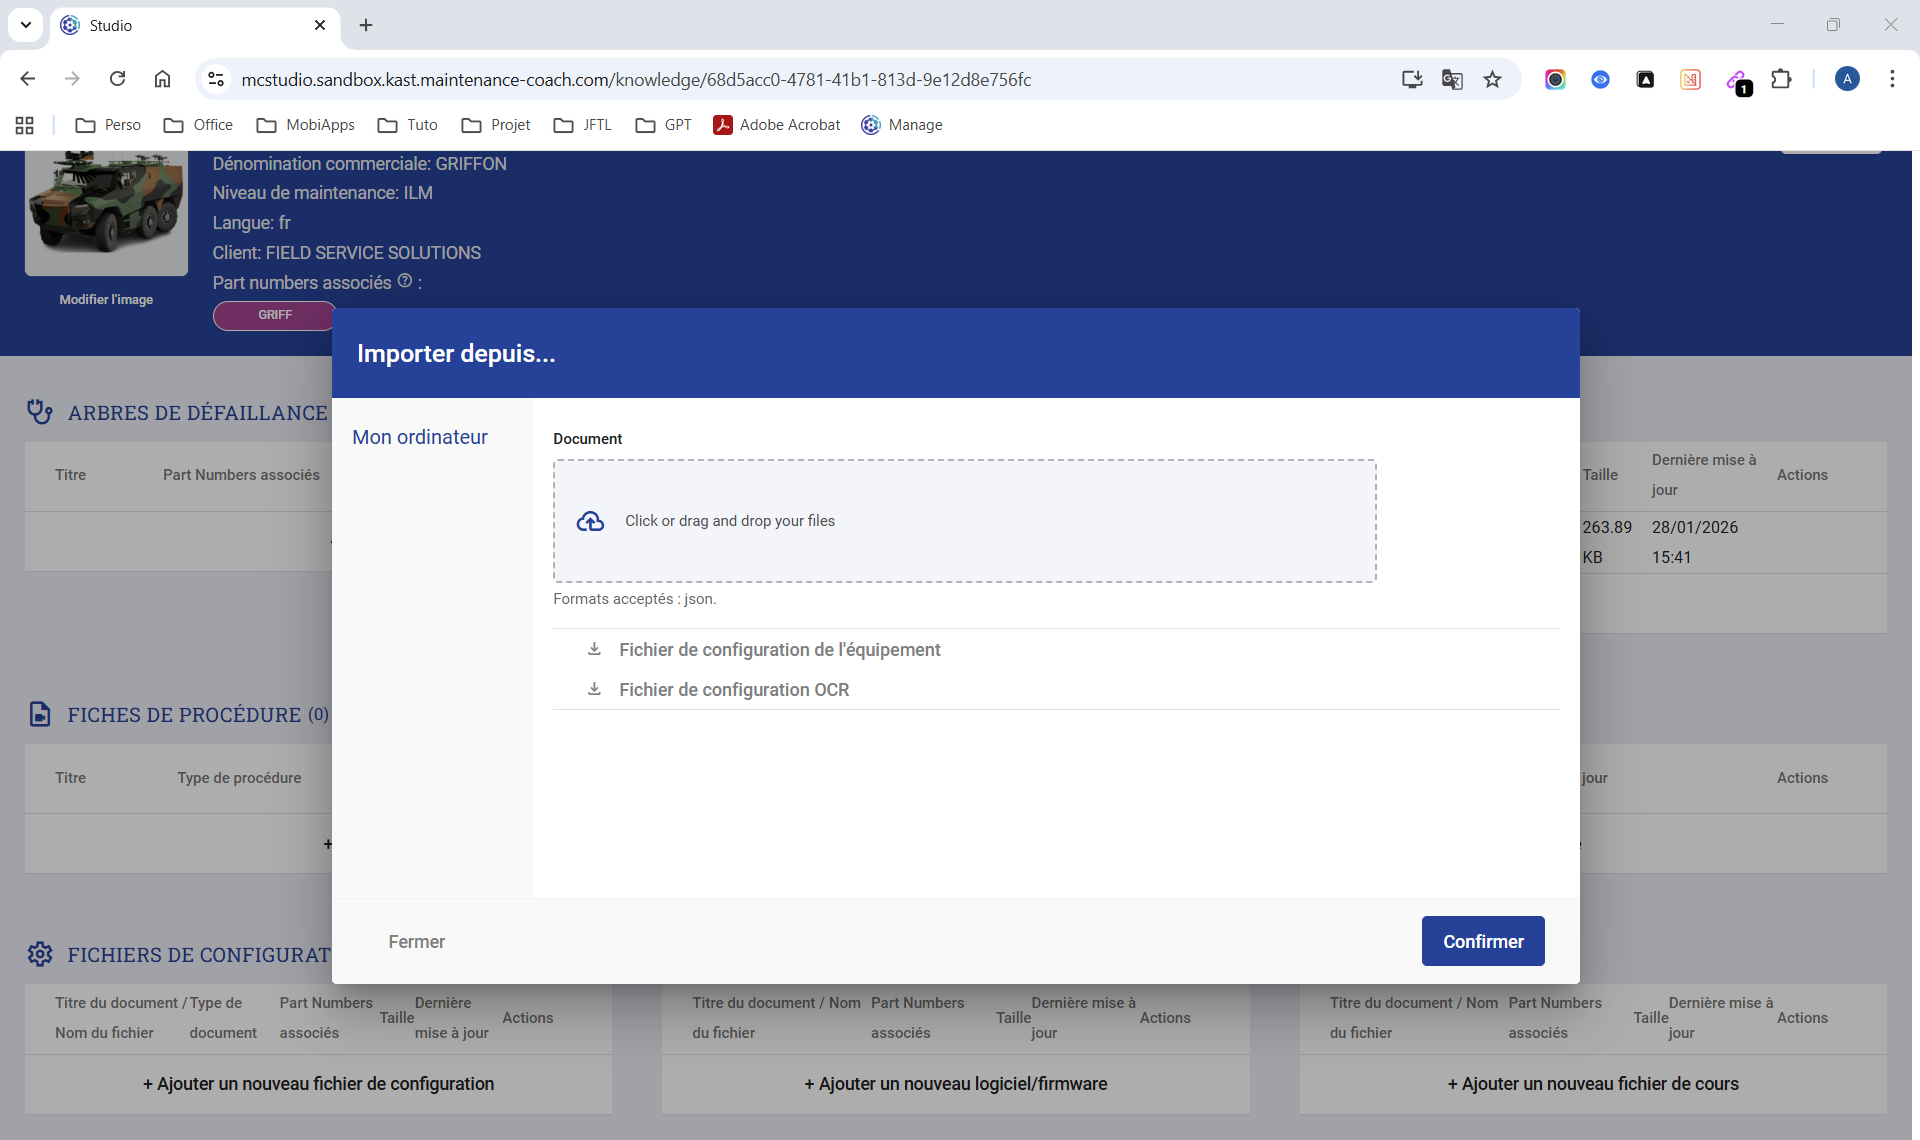
HL Studio - Knowledge Bases page - Equipment record - Configuration File upload window
Two types of configuration files can be imported:
- Equipment
- OCR
Import your Software & Firmware
Video of demonstration
From the Generic Equipment Knowledge Base page, click + Add new software/firmware. A small window appears.
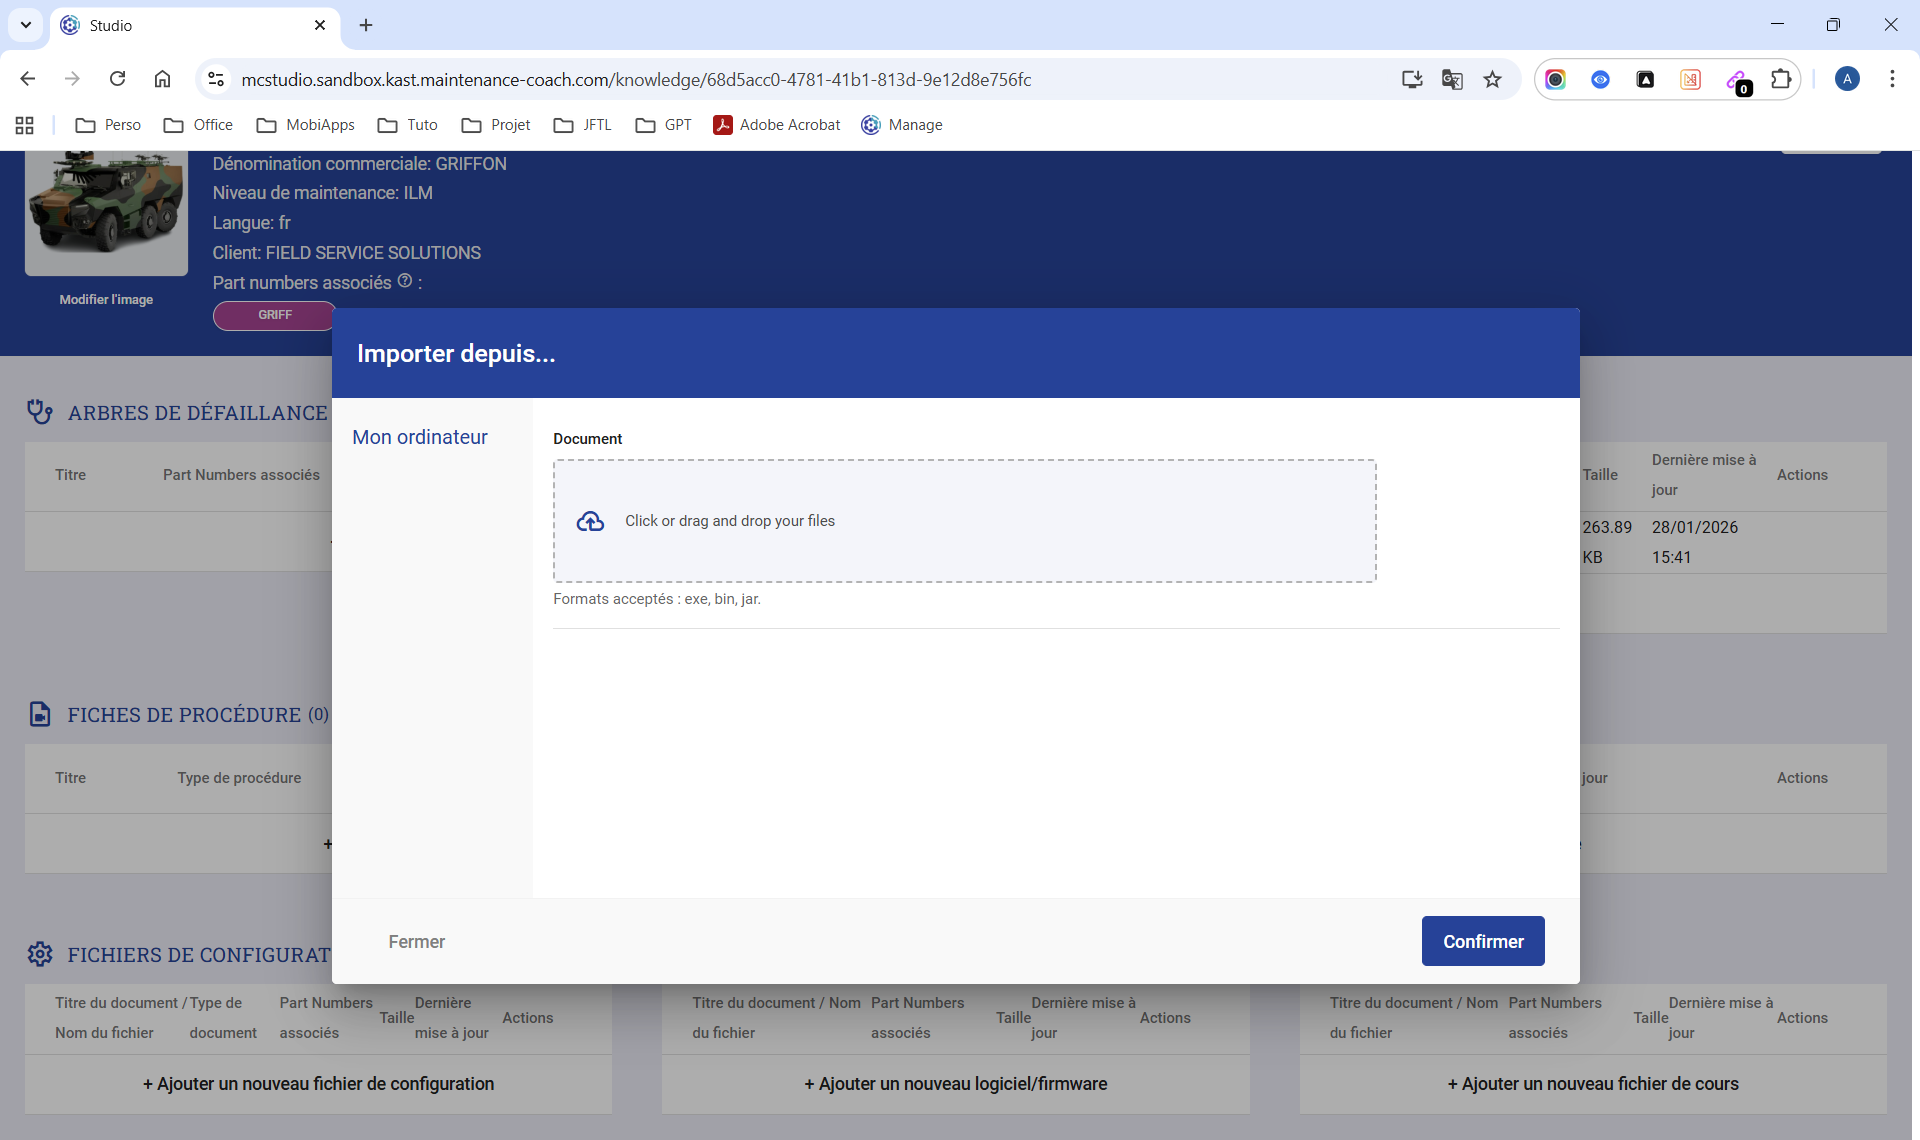
HL Studio - Knowledge Bases page - Equipment record - Software & Firmware upload window
A document must be imported. Supported formats:
- .exe
- .bin
- .jar
Import your Training files
Video of demonstration
From the Generic Equipment Knowledge Base page, click + Add a new training file. A small window appears.
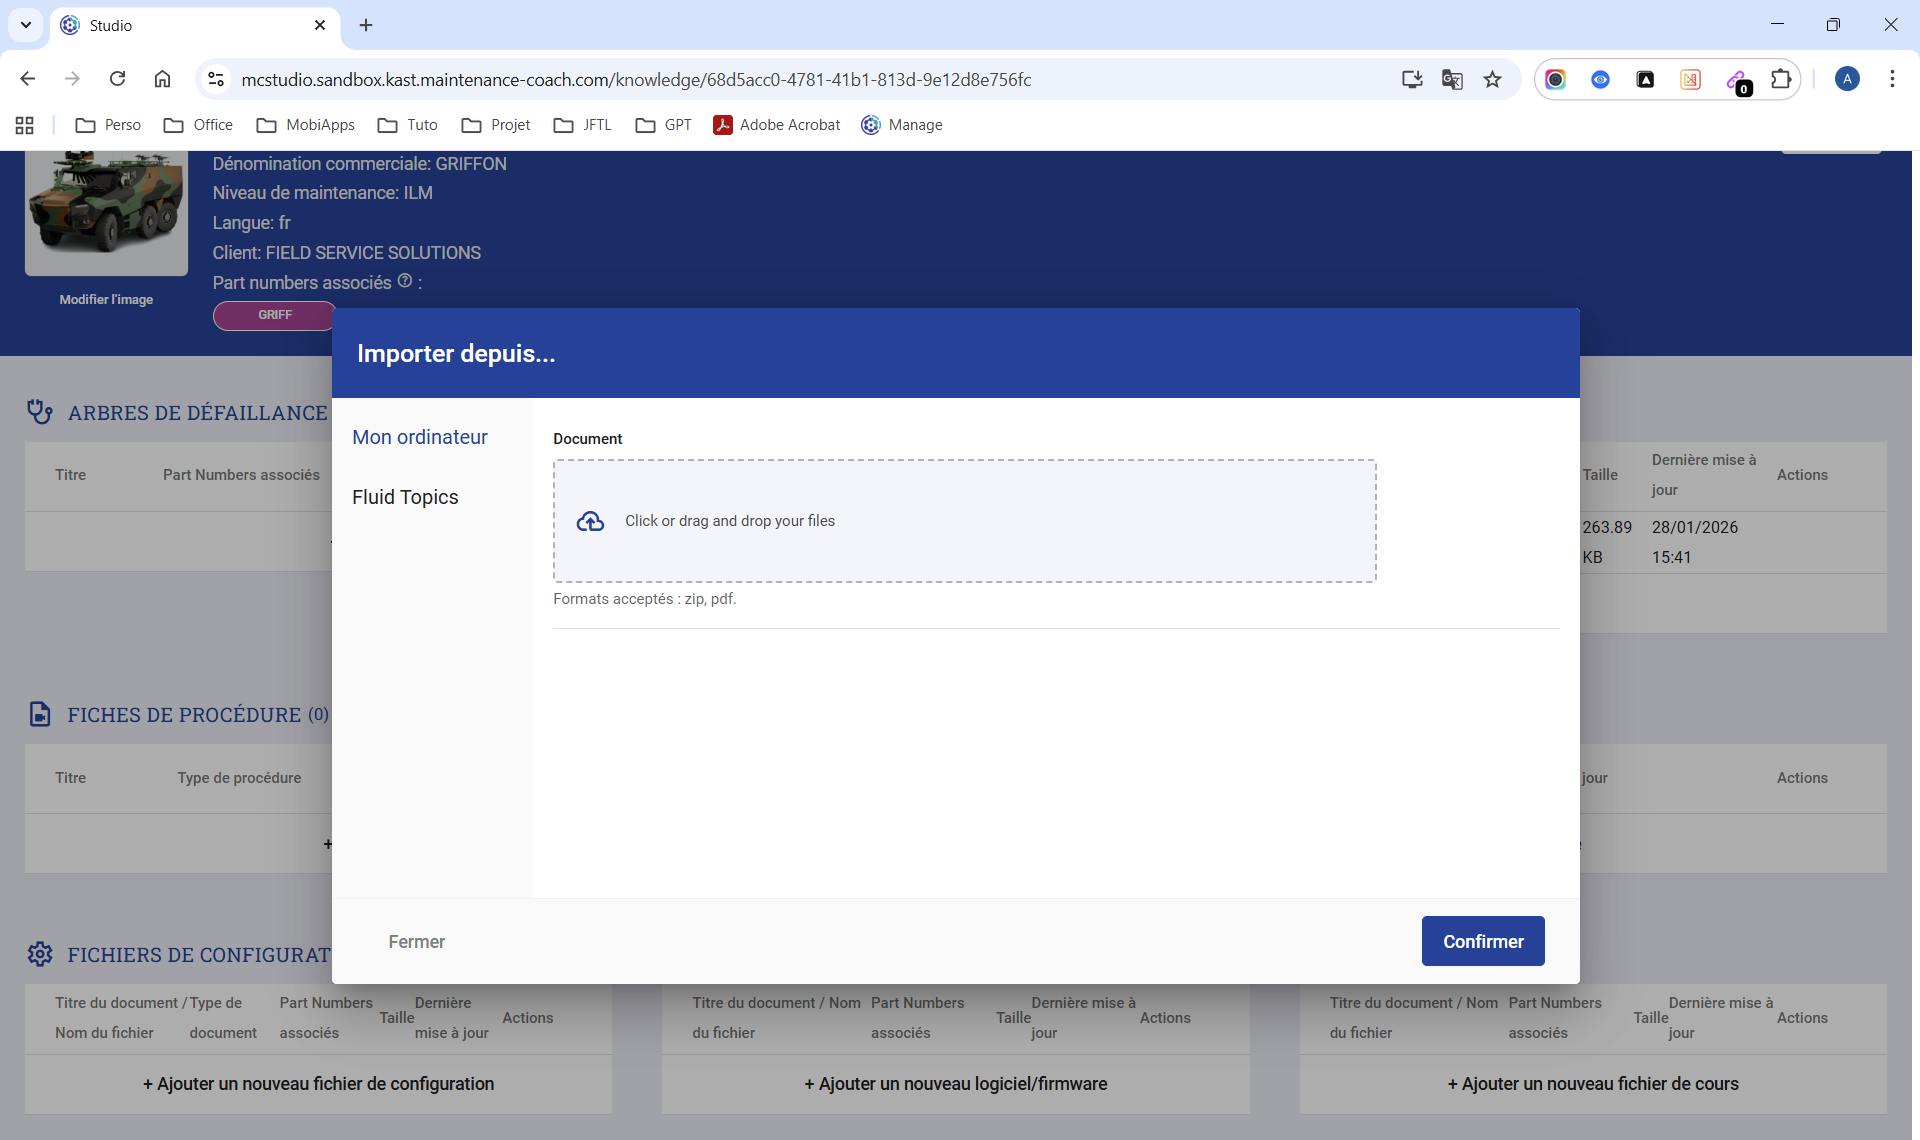
HL Studio - Knowledge Bases page - Equipment record - Training File upload window
A document must be imported. Supported formats:
- .zip
IBM Maximo
Create Meters for Generic and Individualized Equipment
Video of demonstration
Meters are created in Maximo.
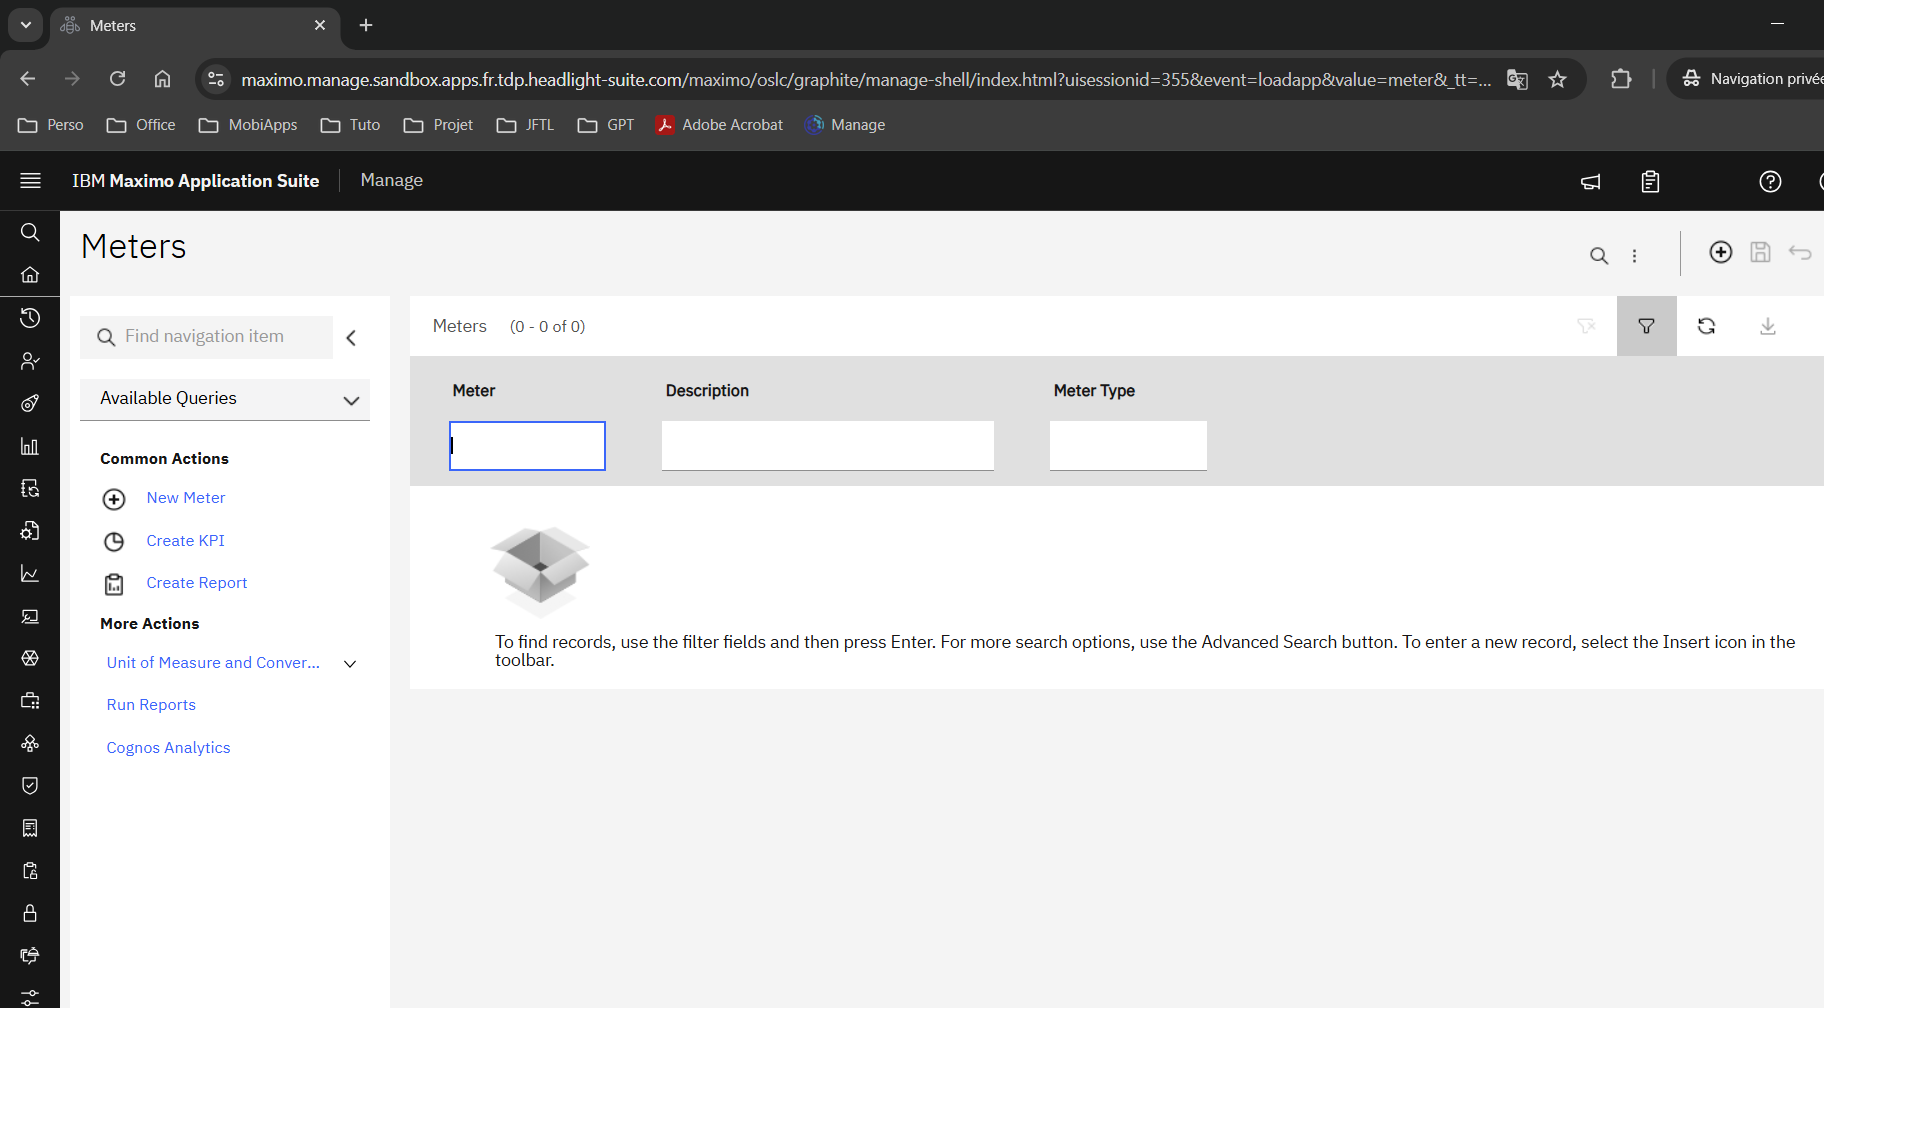
Maximo / Module - Aircraft and Equipment / Application - Meters
From the Meters page, click the + button. A page appears.
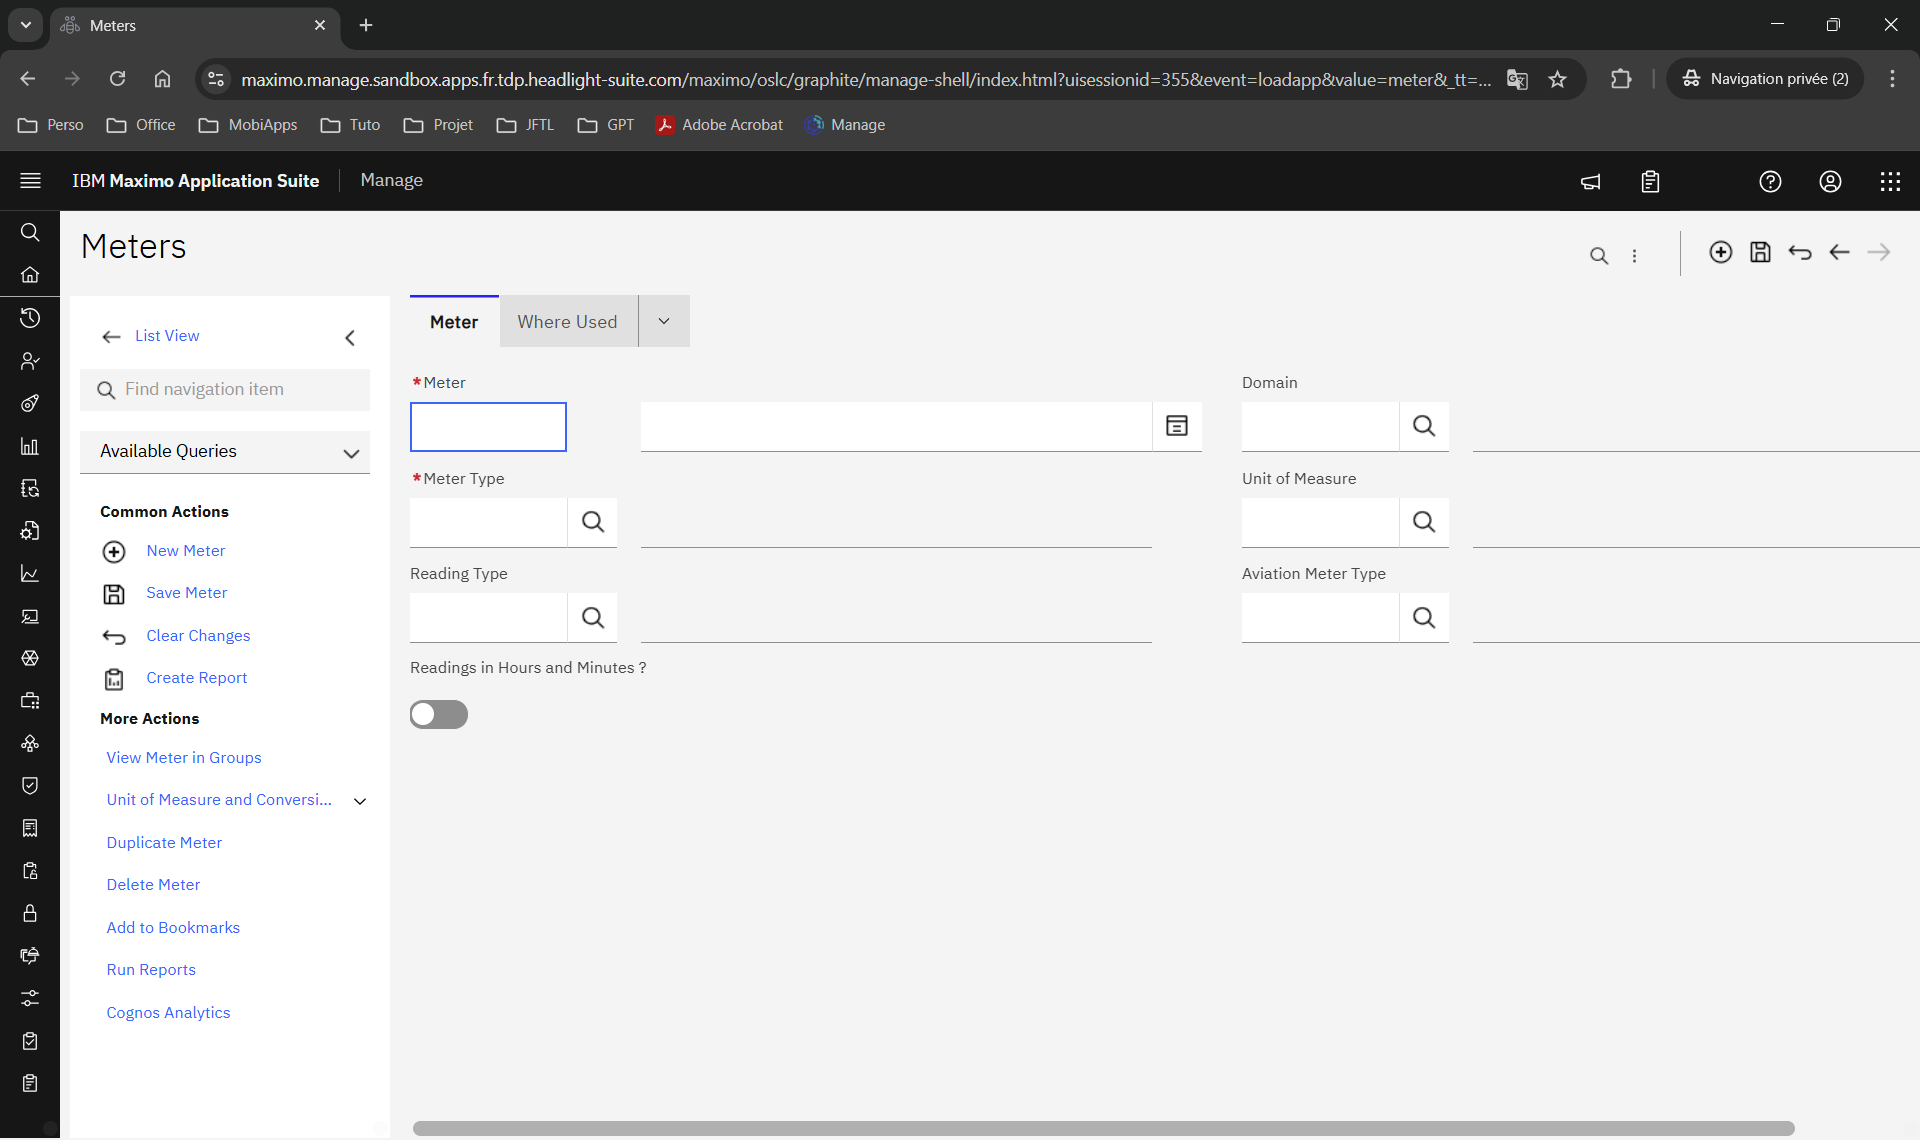
Maximo / Module - Aircraft and Equipment / Application - Meters / Meter creation page
Fields to fill in:
- Meter* - Meter identifier
- Description - Meter description
- Domain - Used only for a Characteristic Meter. Allows customization of expected values.
- Meter Type* - Choose one of the following types:
- Characteristic - Qualitative observation
- Purpose: standardize findings during inspections and support condition monitoring
- Examples: oil color, cleanliness, clarity, observation status
- Continuous - Cumulative meter
- Purpose: trigger usage-based preventive maintenance
- Examples: operating hours, mileage, engine starts, cycles
- Gauge - Fluctuating measurement
- Purpose: condition monitoring with alert/action thresholds that can trigger a Work Order
- Examples: temperature, pressure, vibrations, noise level
- Characteristic - Qualitative observation
- Unit of Measure - Meter unit of measure
- Reading Type - Mainly used for Continuous meters. Choose one of the following types:
- Actual - The user enters the current cumulative meter value
- Delta - The user enters only the increment since the last reading
- Aviation Meter Type - Aviation-specific. Prerequisite:
Meter Type = ContinuousandReading Type = Delta. Common values:- Flight Cycles
- Flight Hours
- Mission Profile
- Readings in Hours and Minutes? - Enable this option to display durations in hours and minutes
Create Meter Groups
Video of demonstration
Using Meter Groups makes it easier to create Generic Equipment with Meters.
Each Meter belonging to the Group is added to each Individualized Equipment item.
Adding a new Meter to the Group can also be propagated automatically to all related Individualized Equipment items. This helps maintain consistency.
Note - A Meter Group can contain all three Meter types: Characteristic, Continuous, and Gauge.
In Maximo, these Meters appear in different tabs:
- Continuous meters appear in the Equipment Hierarchy tab
- Characteristic and Gauge meters appear in the Meters tab
In HL MCoach, all these Meters appear in the Overview tab of the Individualized Equipment record.
Meter Groups are created in Maximo.
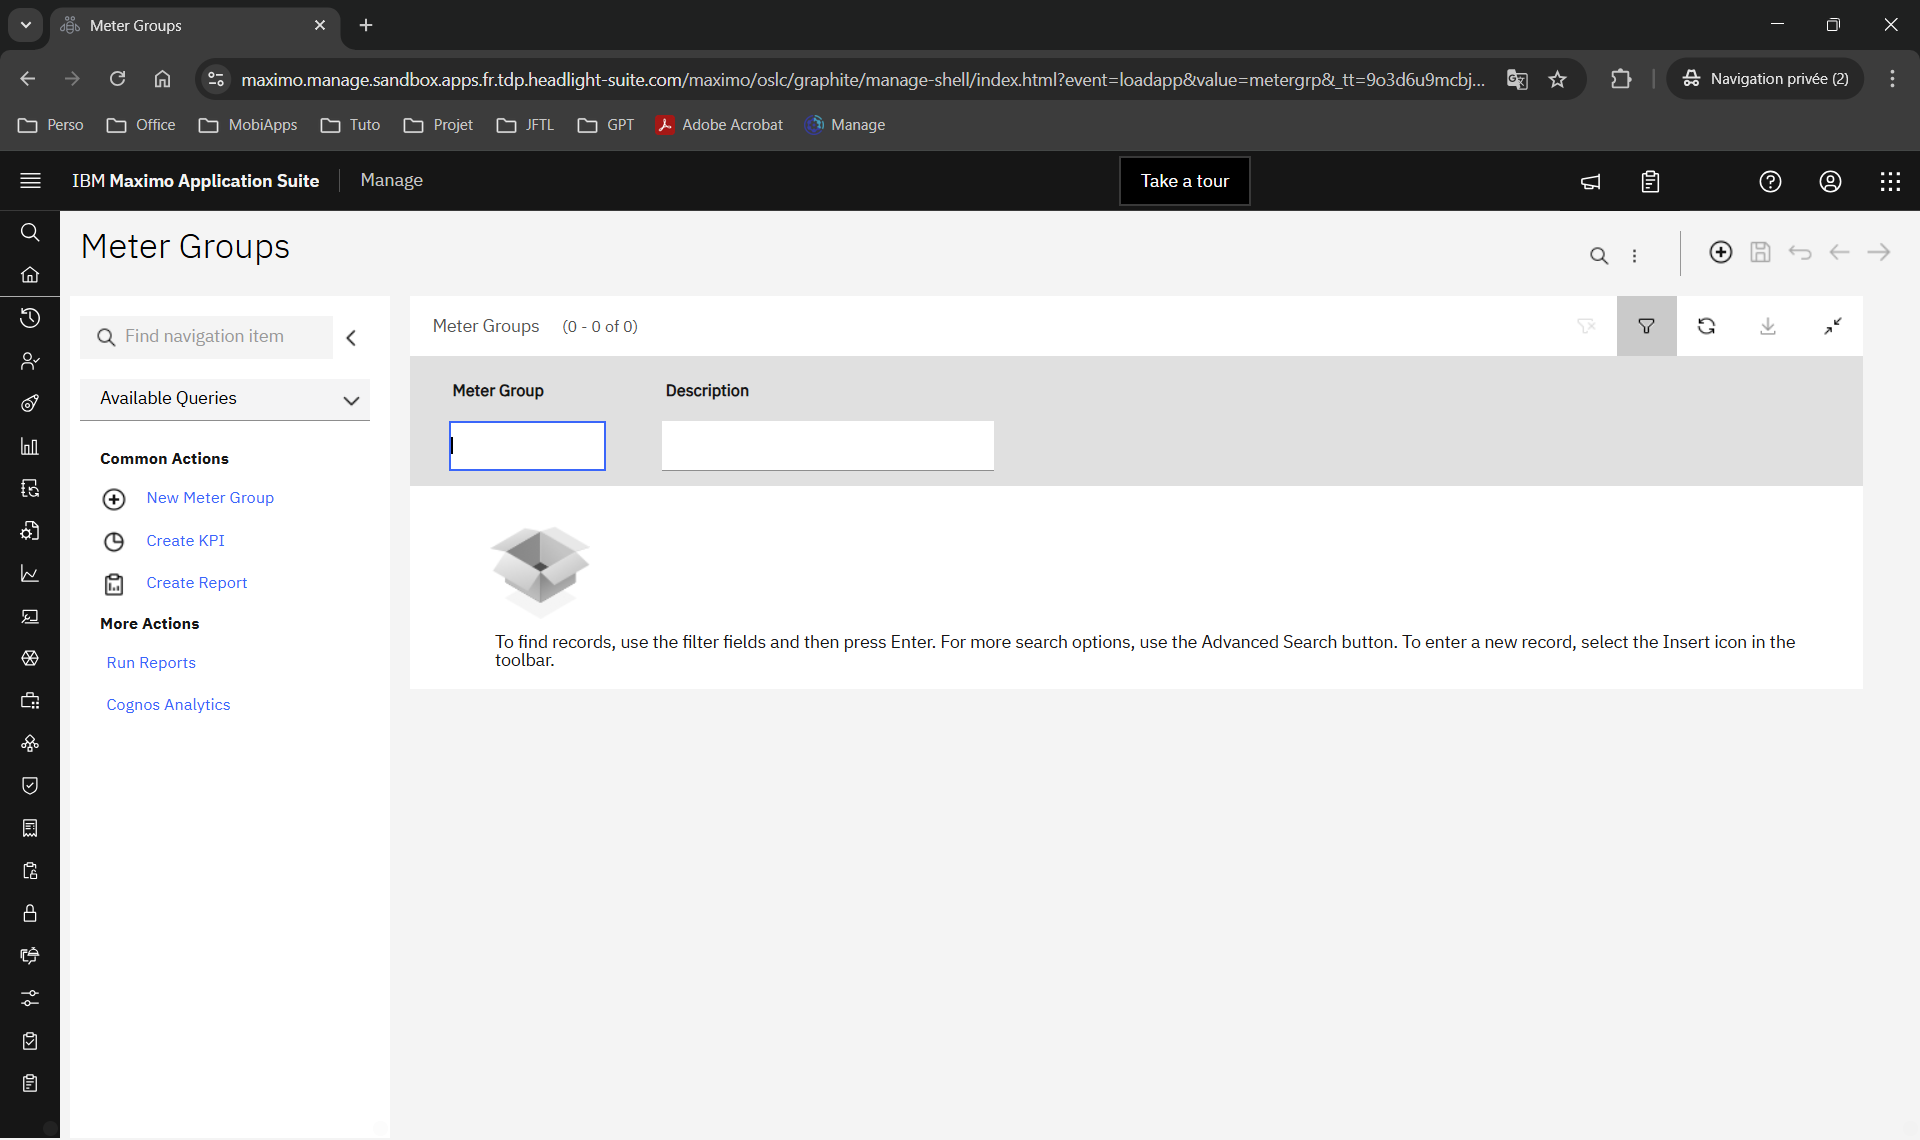
Maximo / Module - Aircraft and Equipment / Application - Meter Groups
From the Meter Groups page, click the + button. A page appears.
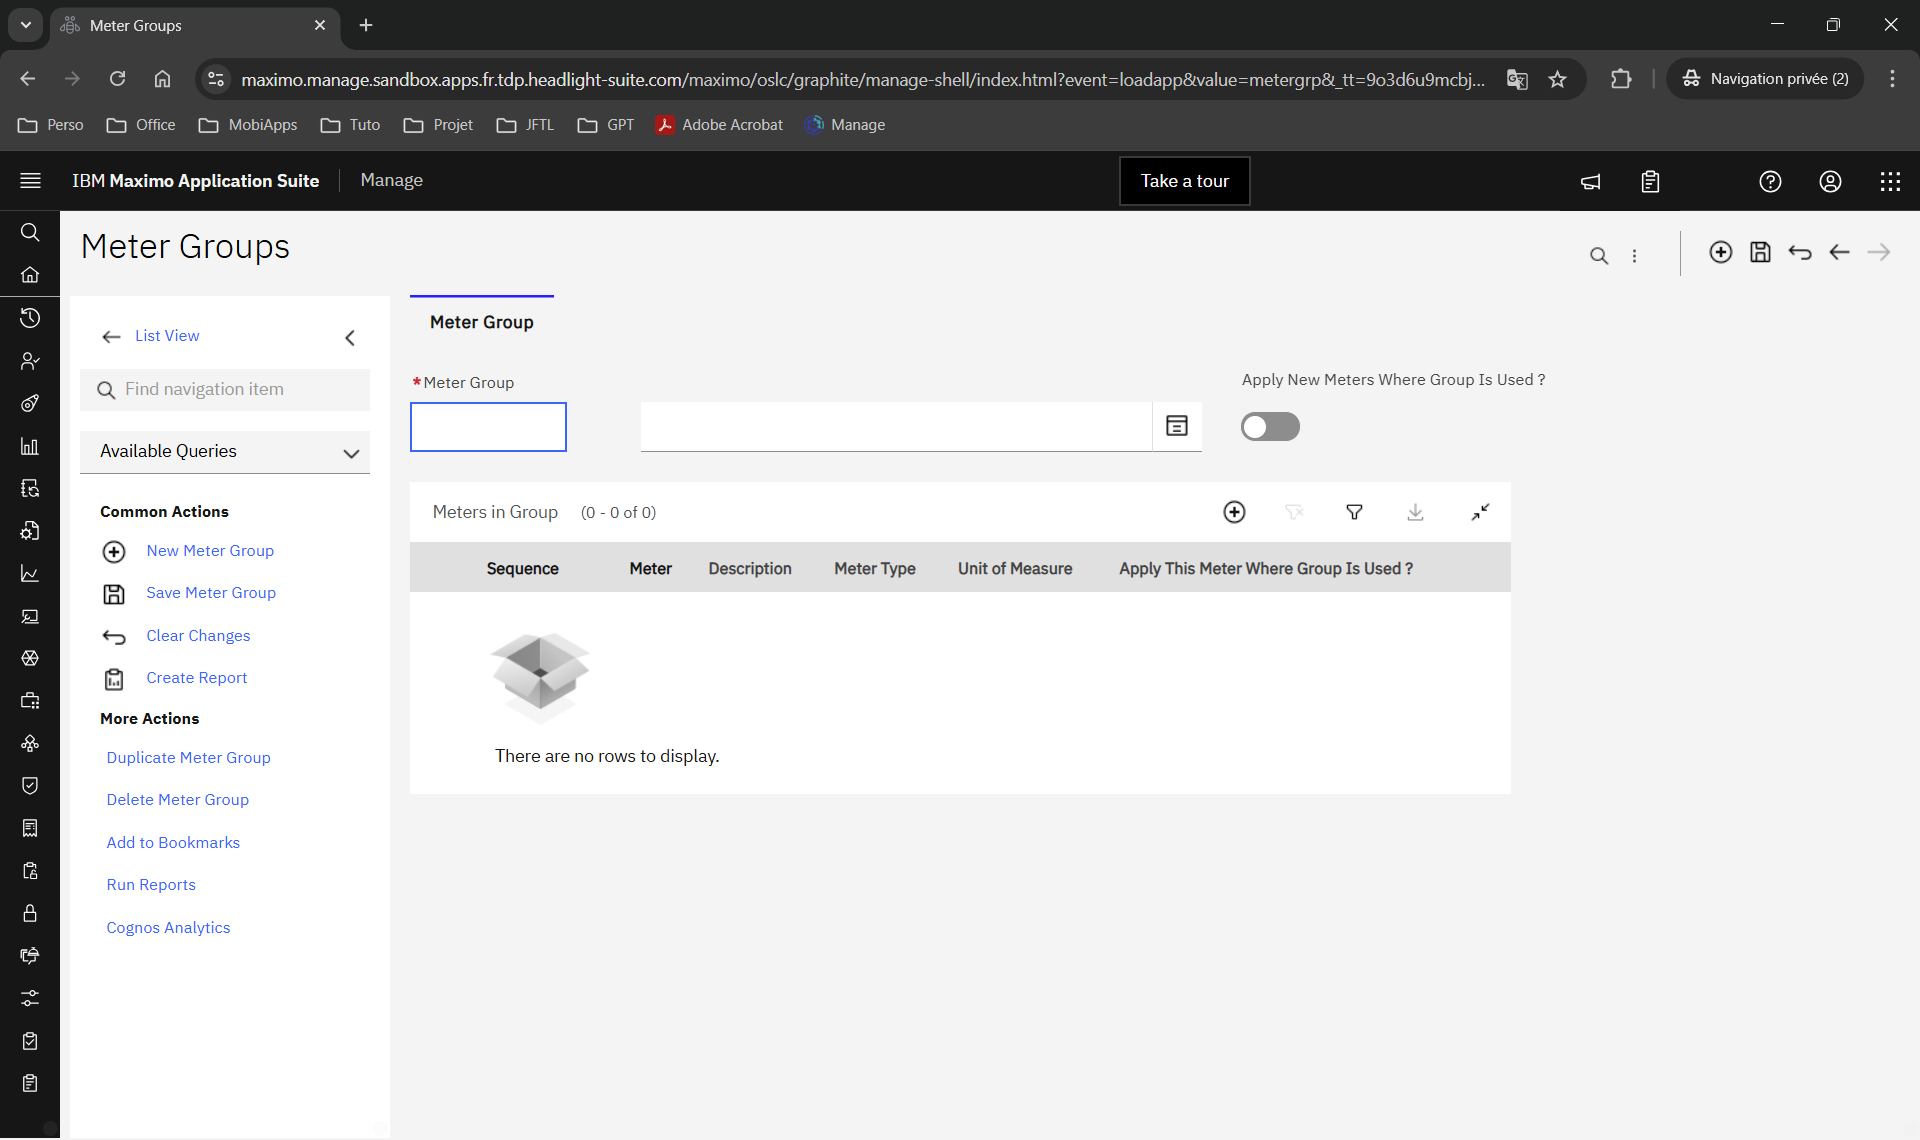
Maximo / Module - Aircraft and Equipment / Application - Meter Groups / Meter Group creation page
Fill in the following fields:
- Meter Group* - Meter Group name
- Description - Useful information about the Meter Group
- Apply New Meters Where Group Is Used? - Enables propagation of a new Meter added to the Group
From the Meter Group creation page, click the + button to add a Meter. A line appears.
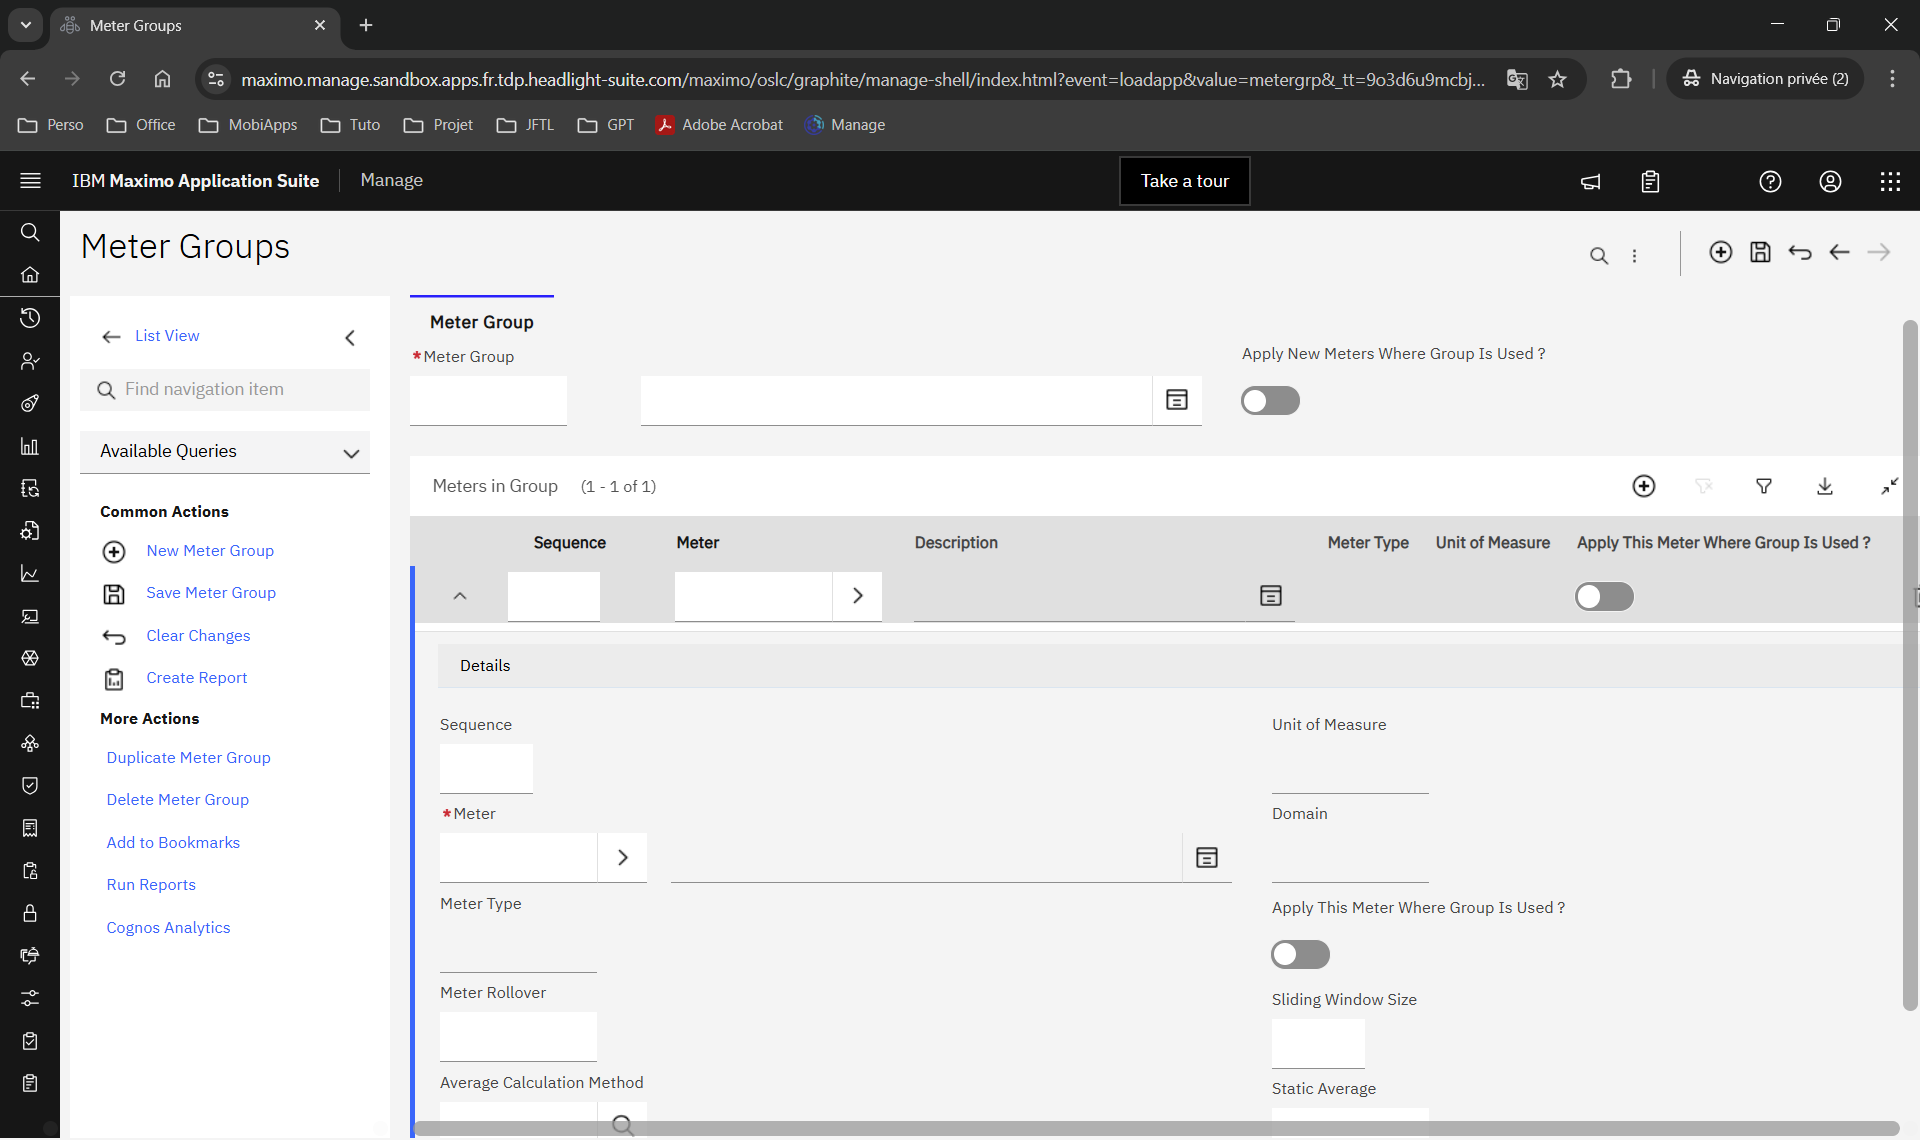
Maximo / Module - Aircraft and Equipment / Application - Meter Groups / Meter Group creation page / Add Meter
Fill in the following fields:
- Sequence - Meter display order. Use increments of 10 (10, 20, 30, etc.)
- Meter* - Select the Meter
- Meter Rollover - Useful for Continuous meters. Defines the point at which the meter restarts from zero, for example an odometer
- Sliding Window Size - Size of the average calculation window for a Continuous meter. Required when Average Calculation Method is filled in
- Average Calculation Method - Choose one of the following methods:
- All - Calculates the average using all available readings
- Sliding Days - Calculates the average over the last N days (
N = Sliding Window Size) - Sliding Readings - Calculates the average over the last N readings (
N = Sliding Window Size) - Static - Uses a manually defined average. Maximo does not recalculate it.
- Static Average - Fixed usage average used only when Average Calculation Method = Static. Helps estimate when Preventive Maintenance is due when there is not enough reading history.
Add a Meter Group to Generic Equipment
Video of demonstration
A Meter Group is added in Maximo from a Generic Equipment record, in the Part tab.
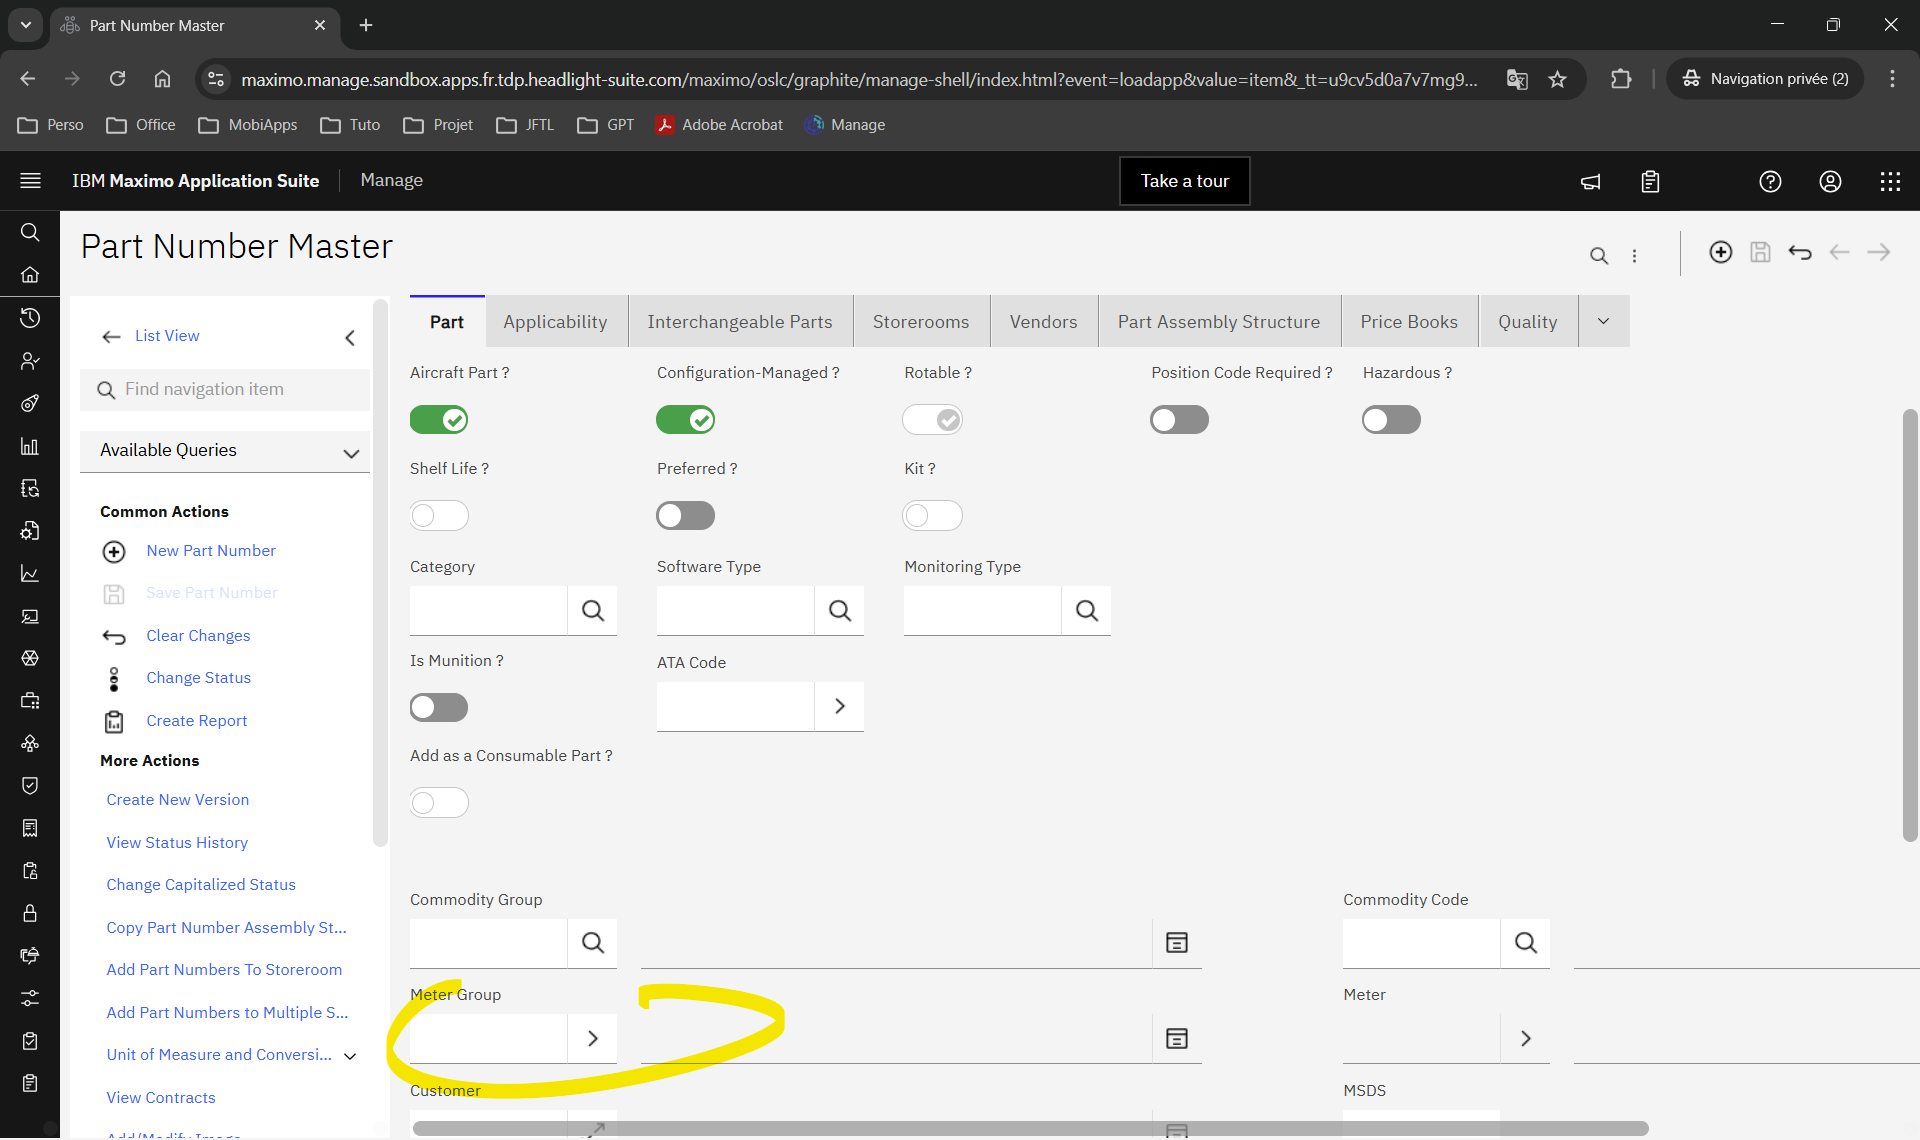
Maximo / Module - Inventory / Application - Part Number Master / Record - Part Number / Tab - Part / Field - Meter Group
From the Part tab, click the > button in the Meter Group field to open the list of Meter Groups.
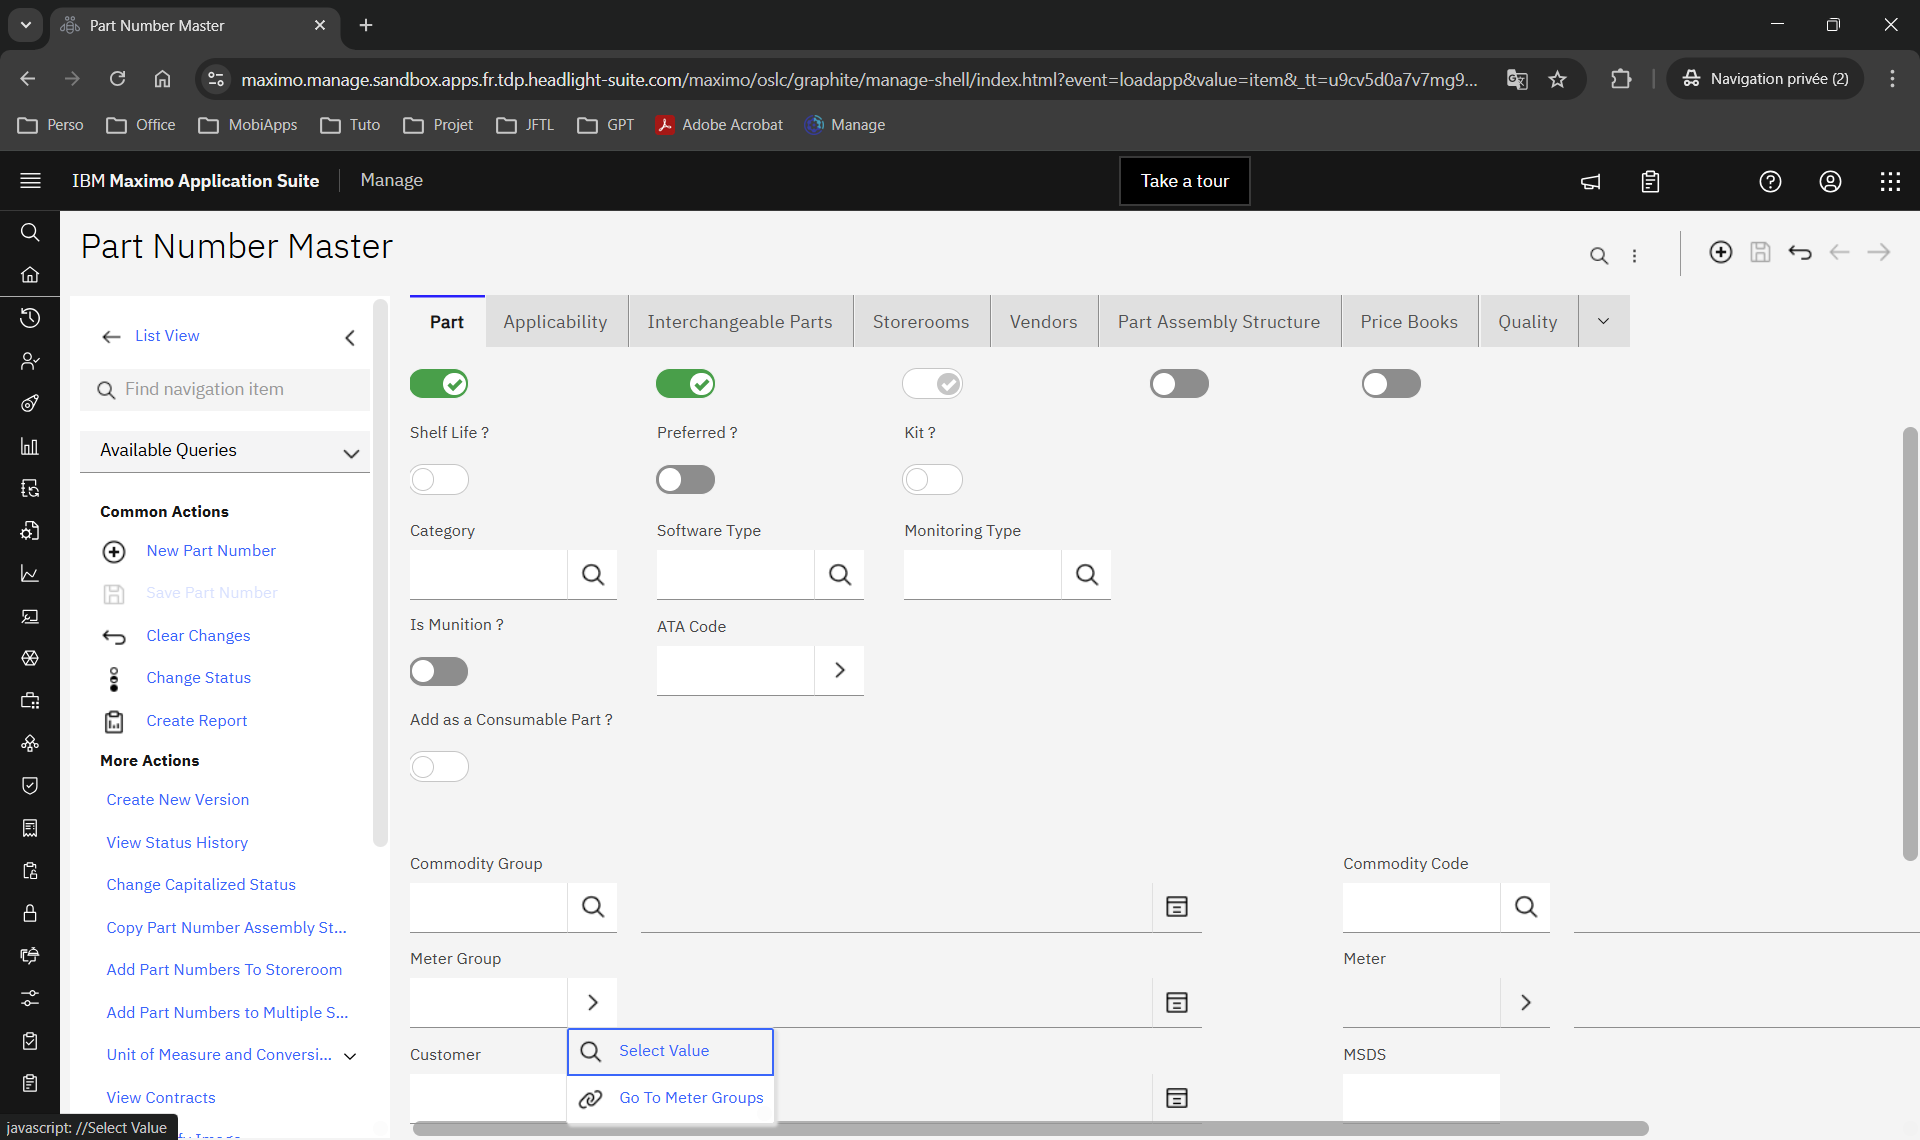
Maximo / Module - Inventory / Application - Part Number Master / Record - Part Number / Tab - Part / Field - Meter Group / Button - Select Value
Click Select Value to display the list of Meter Groups, then select the required Group.
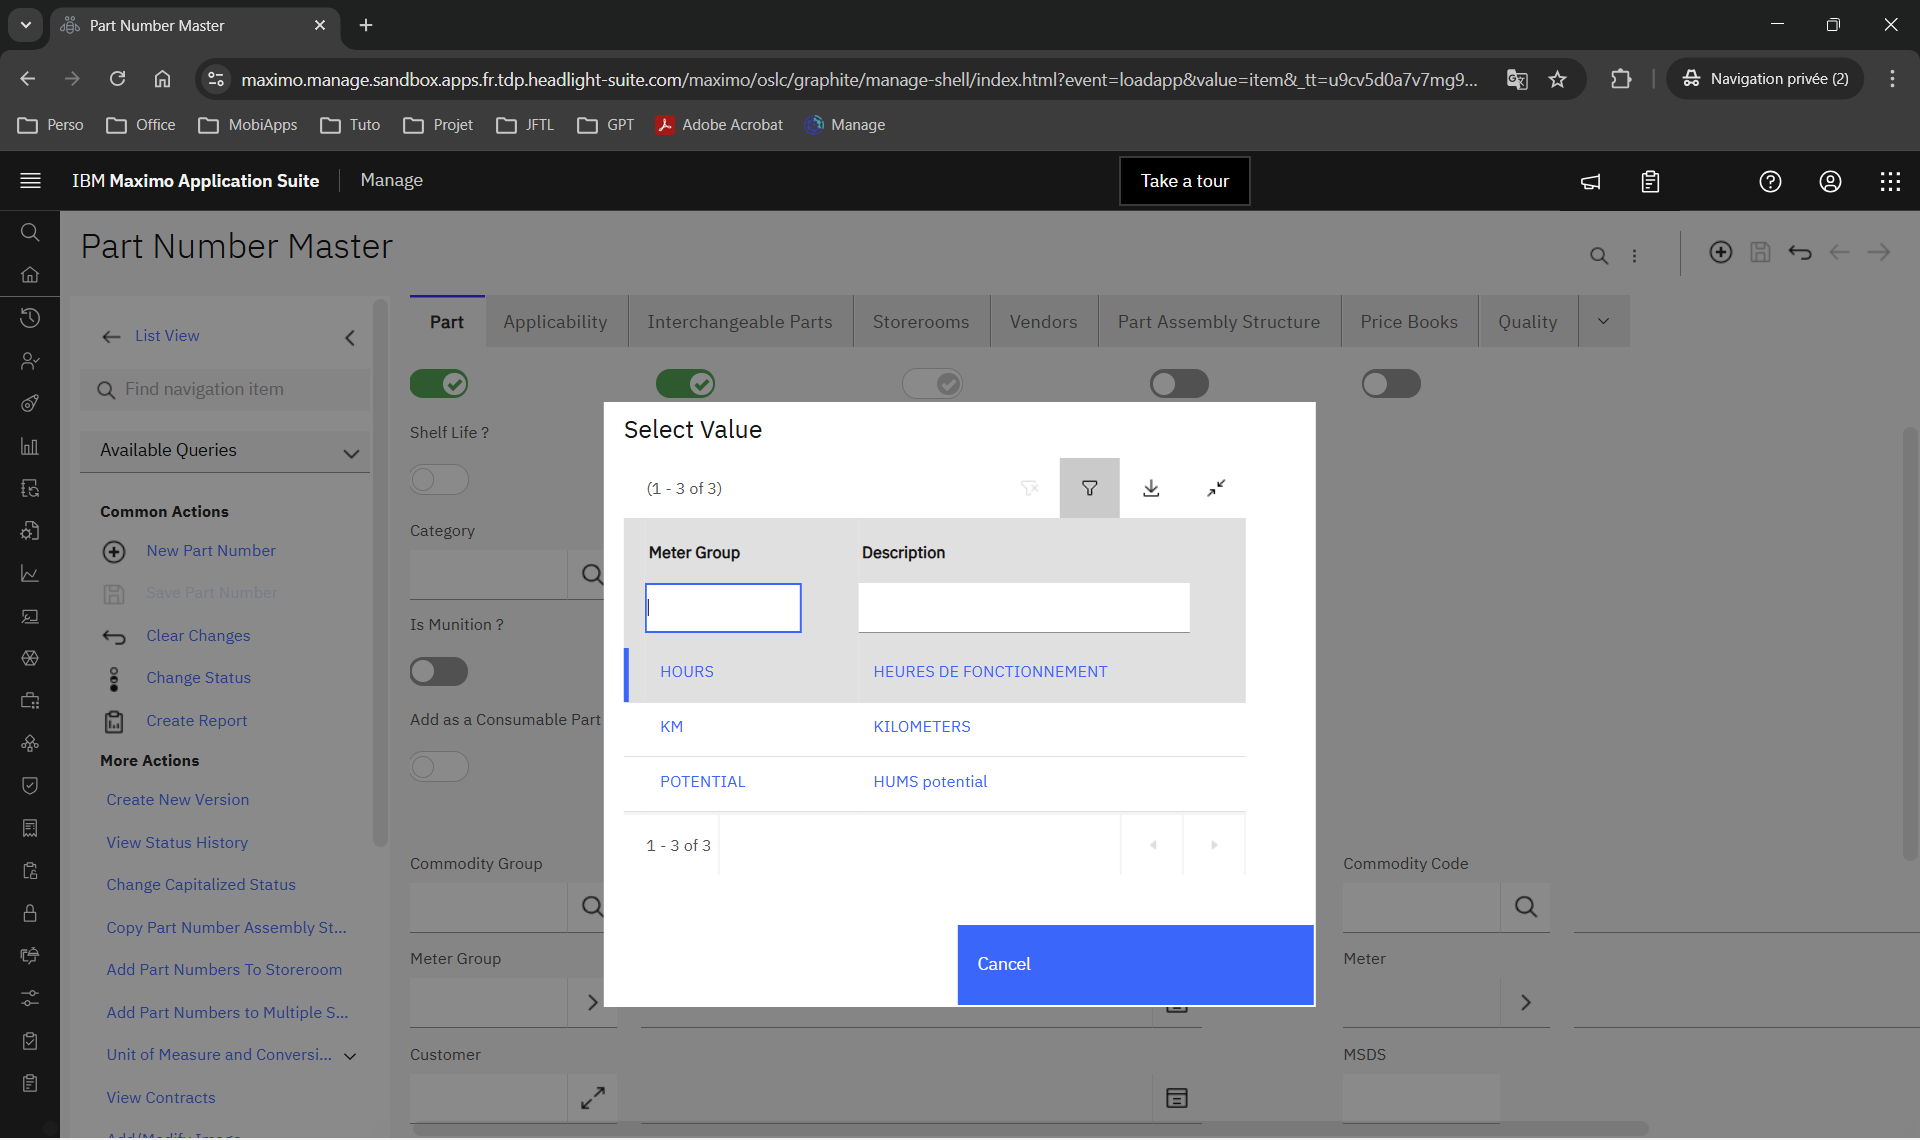
Maximo / Module - Inventory / Application - Part Number Master / Record - Part Number / Tab - Part / Field - Meter Group / Meter Group selection window
Add a Meter Group to Individualized Equipment
Video of demonstration
A Meter Group is added in Maximo from an Individualized Equipment record, in the Meters tab.
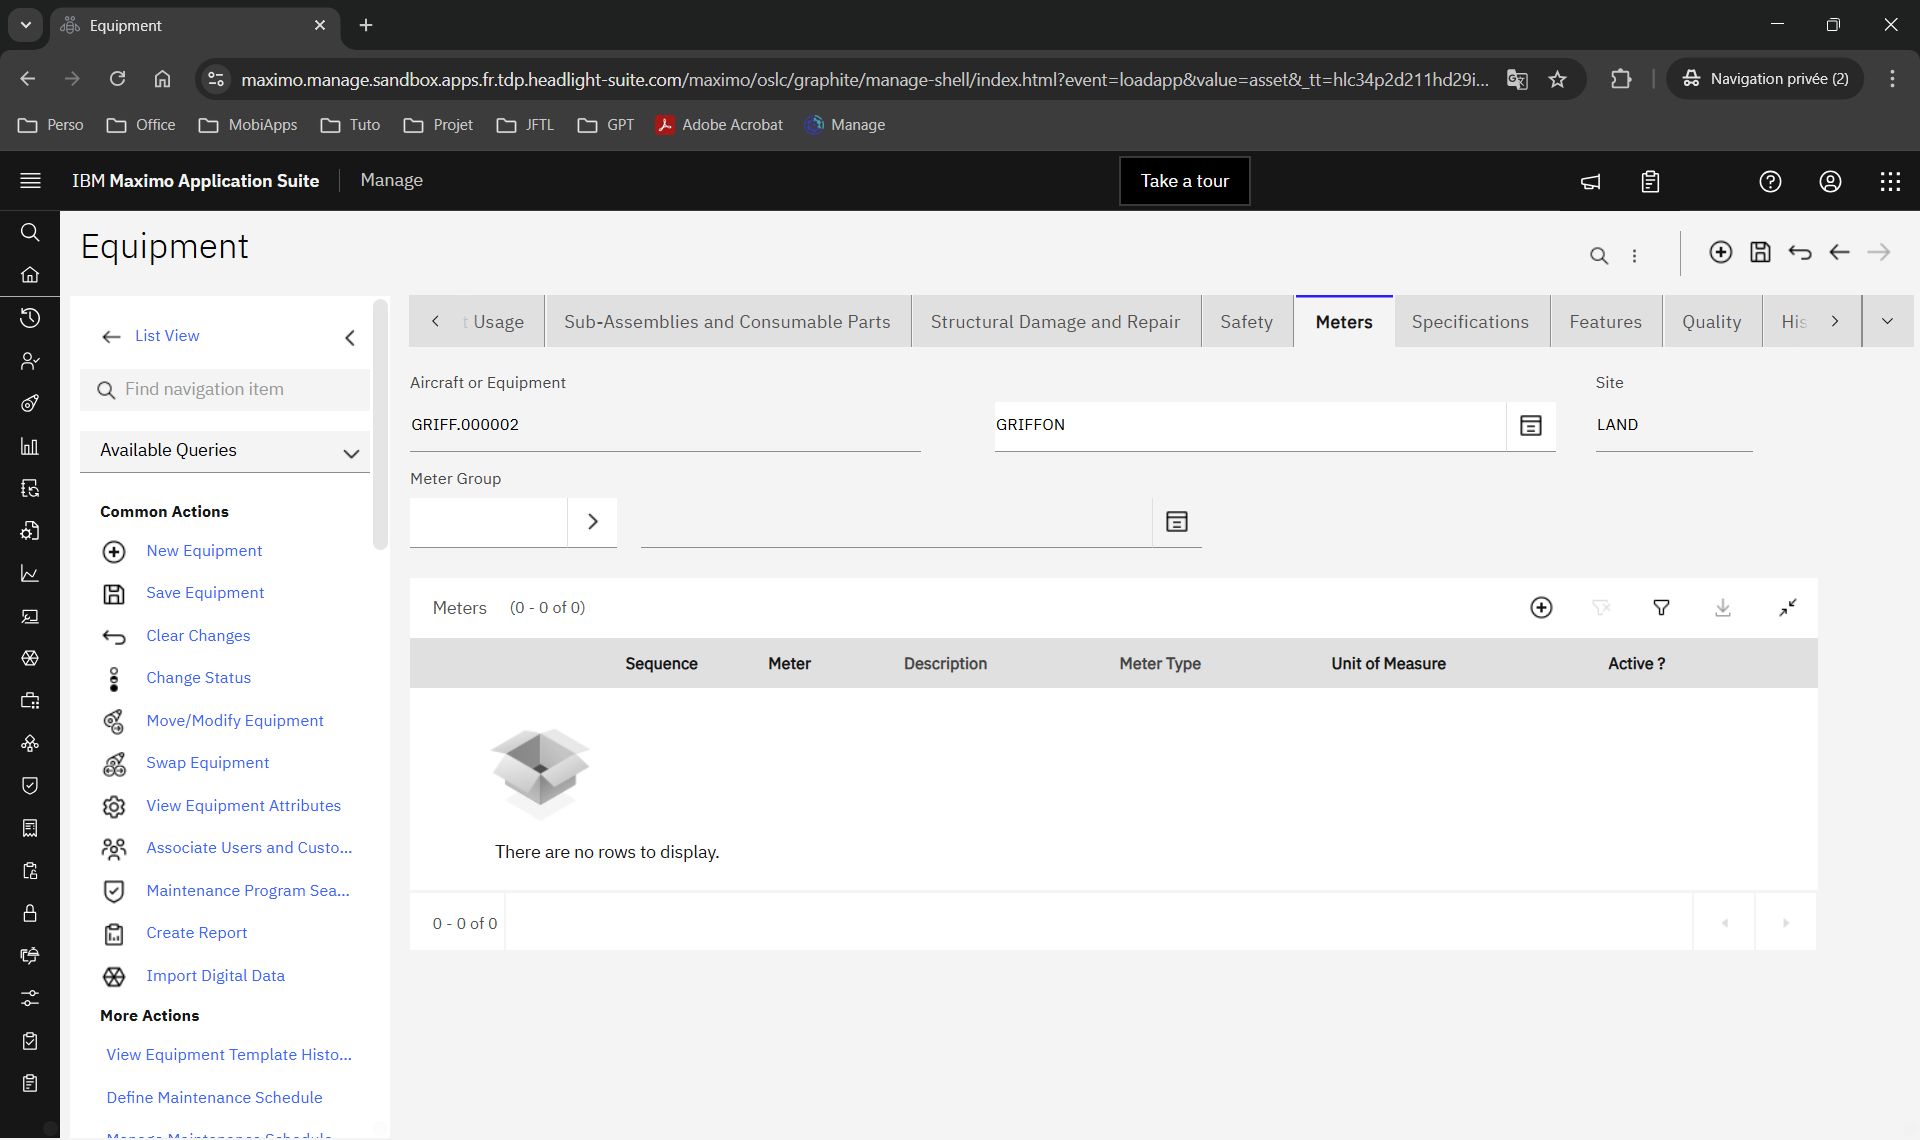
Maximo / Module - Aircraft and Equipment / Application - Equipment / Record - Equipment / Tab - Meters
From the Meters tab, click the > button in the Meter Group field to open the list of Meter Groups, then select the required Group.
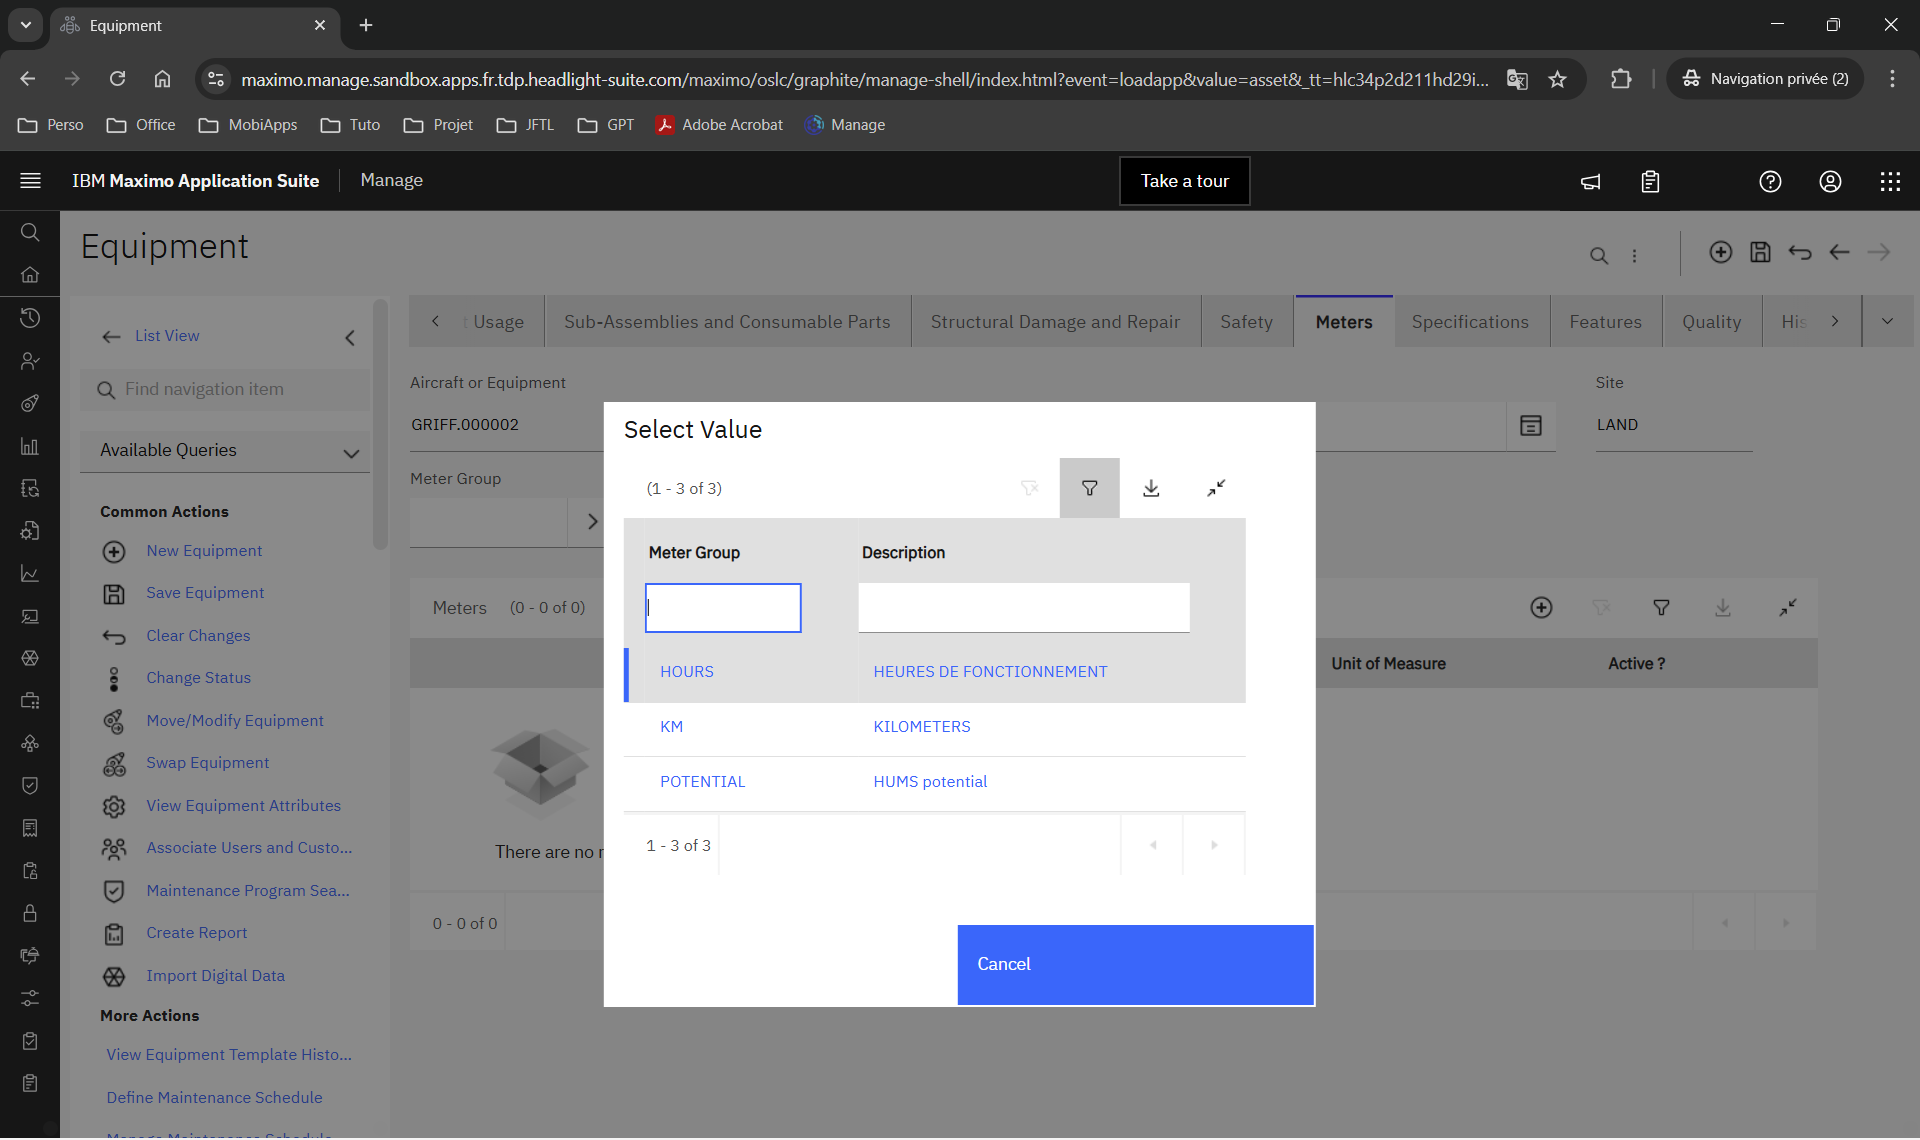
Maximo / Module - Aircraft and Equipment / Application - Equipment / Record - Equipment / Tab - Meters / Field - Meter Group / Meter Group selection window
Continuous Meters appear in the Equipment Hierarchy tab.
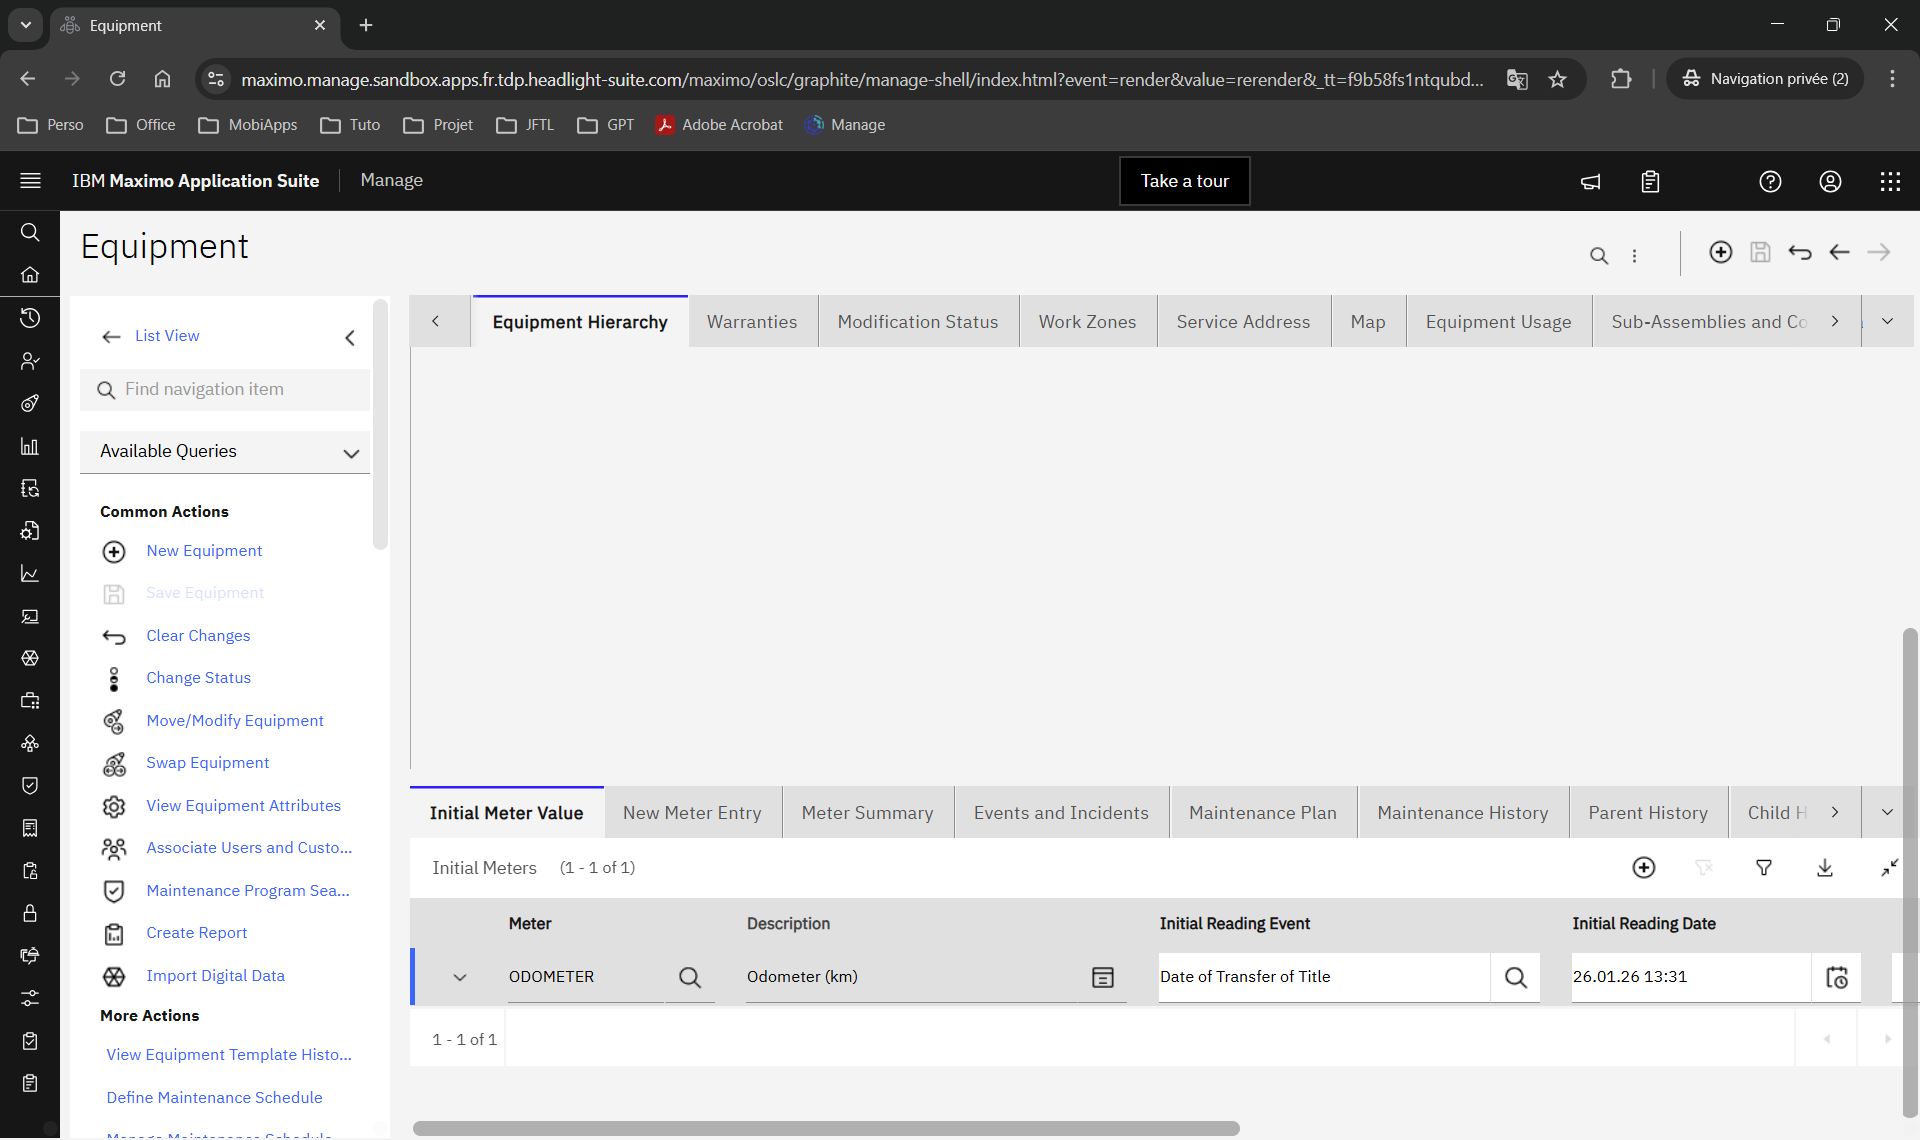
Maximo / Module - Aircraft and Equipment / Application - Equipment / Record - Equipment / Tab - Equipment Hierarchy / Sub-tab - Initial Meter Value / Continuous Meter list
Characteristic and Gauge Meters appear in the Meters tab.
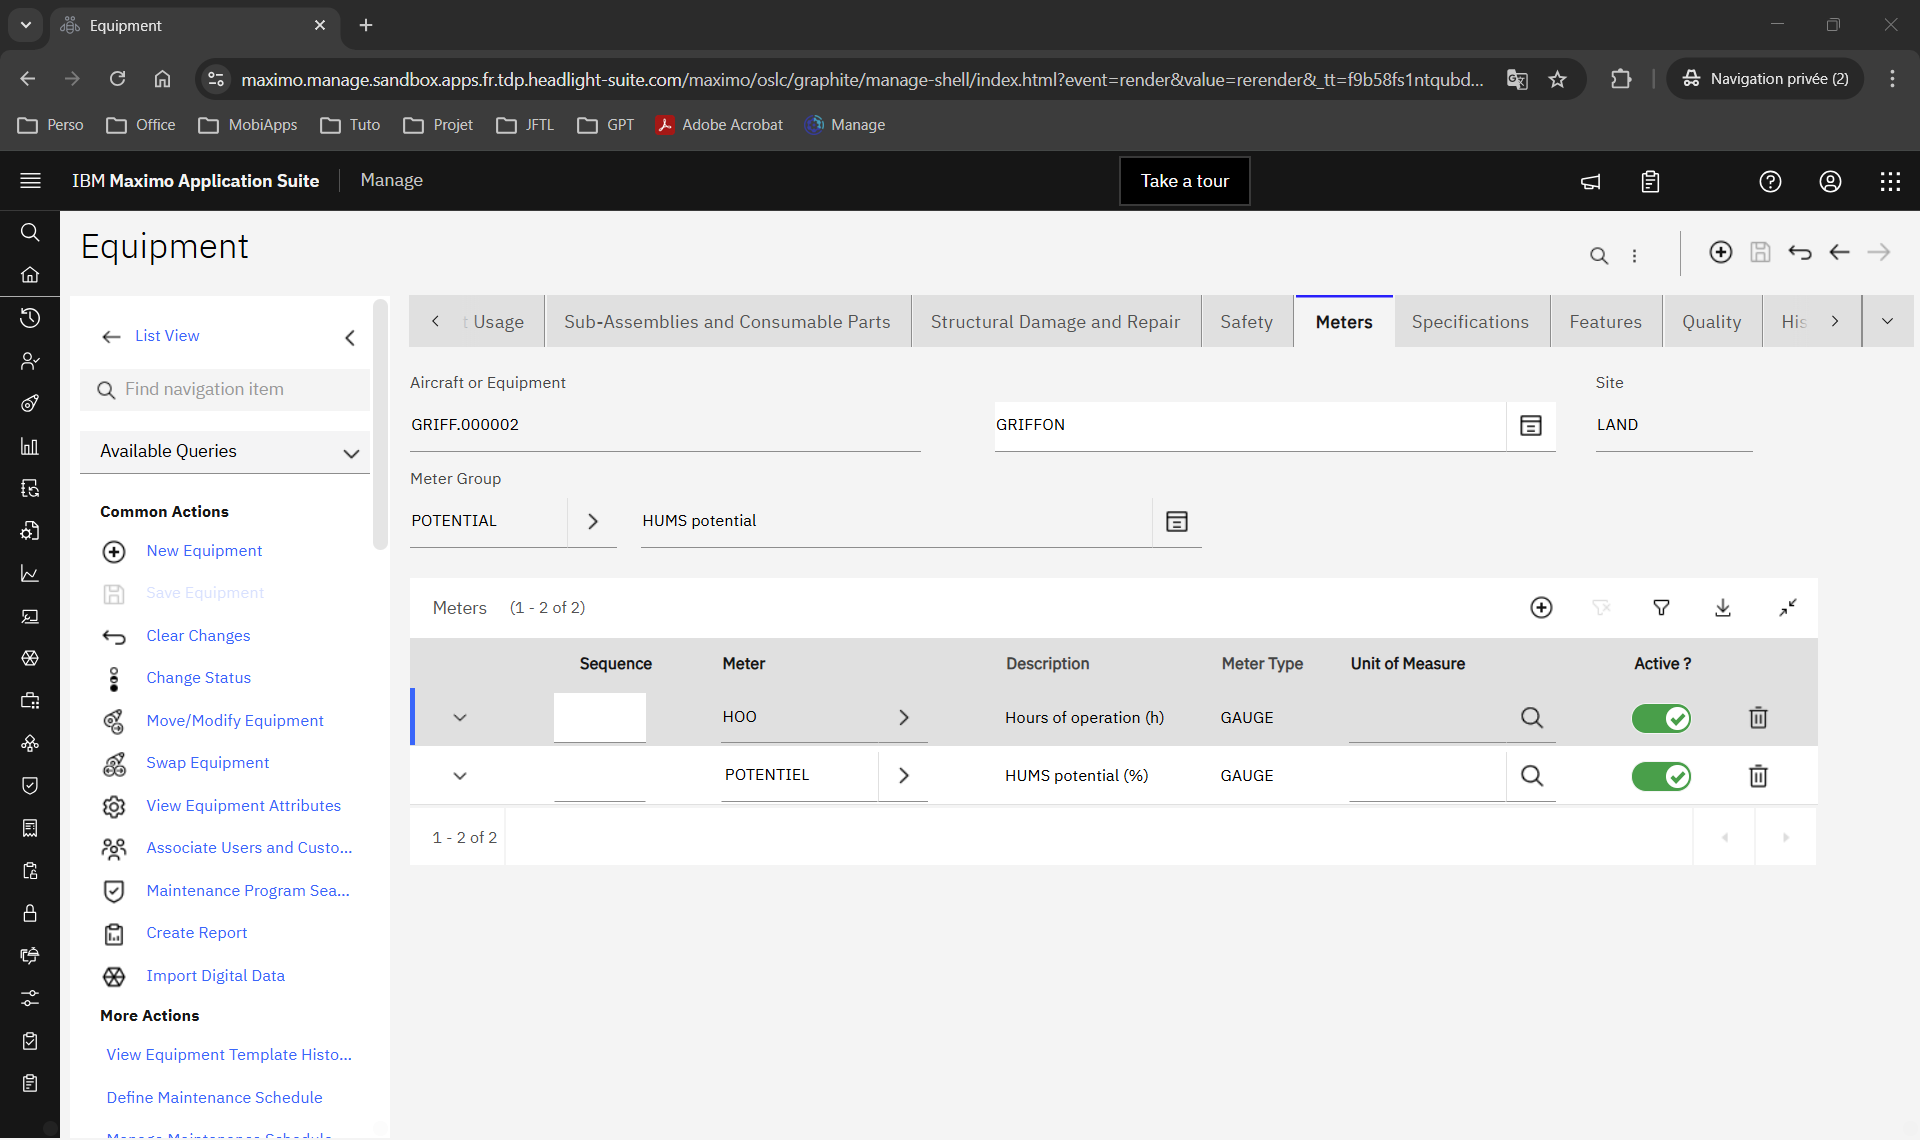
Maximo / Module - Aircraft and Equipment / Application - Equipment / Record - Equipment / Tab - Meters / Characteristic and Gauge Meter list
Display in HL MCoach
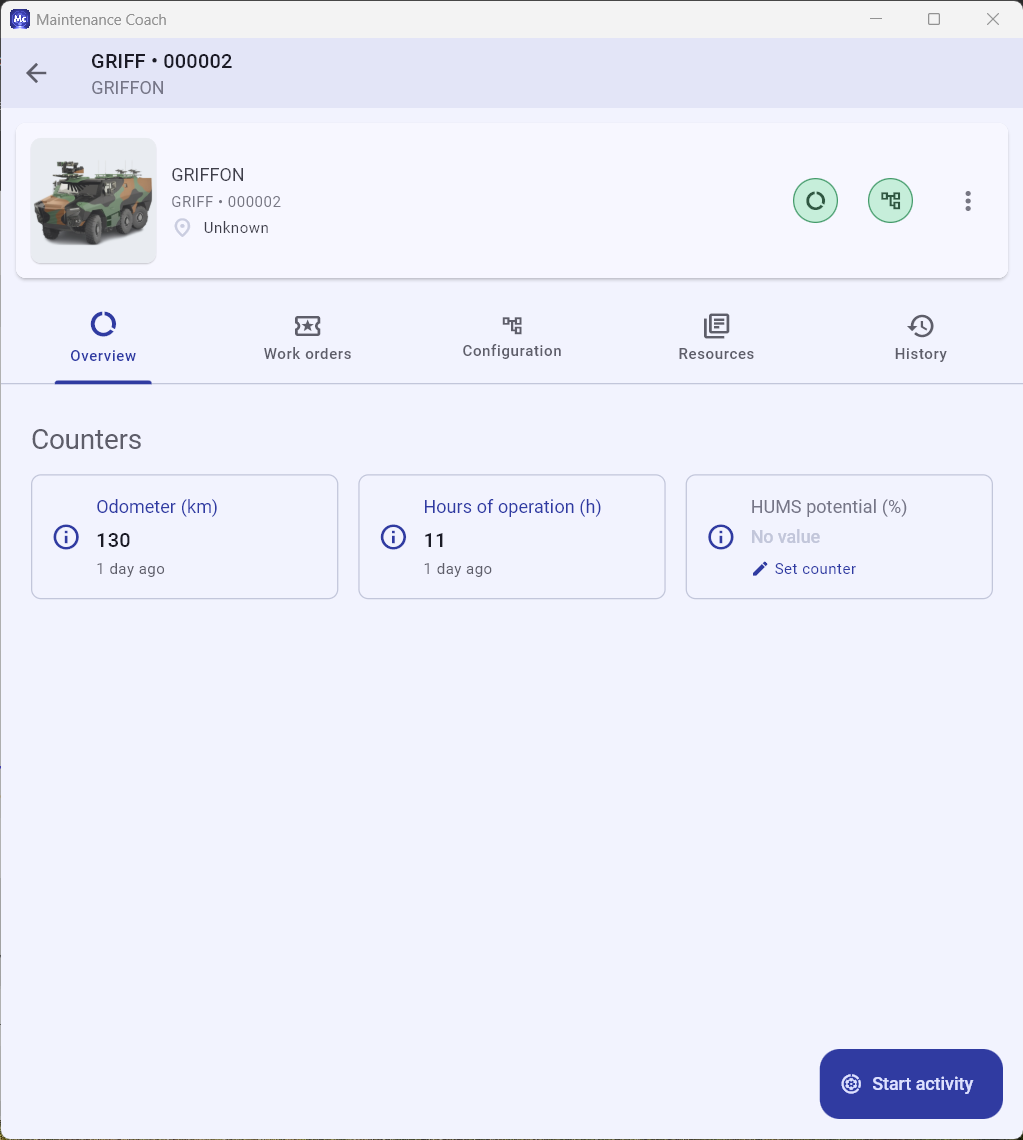
HL MCoach / Record - Equipment / Tab - Overview
Note - Continuous Meters are displayed first if no Sequence is defined.
Create an applicable Configuration (TO DO)
Maximo allows you to define applicable configurations. These configurations can be associated with equipment, a bay, a vehicle, or any complex system.
Models are defined through the Models application, located in the Configuration Management module.
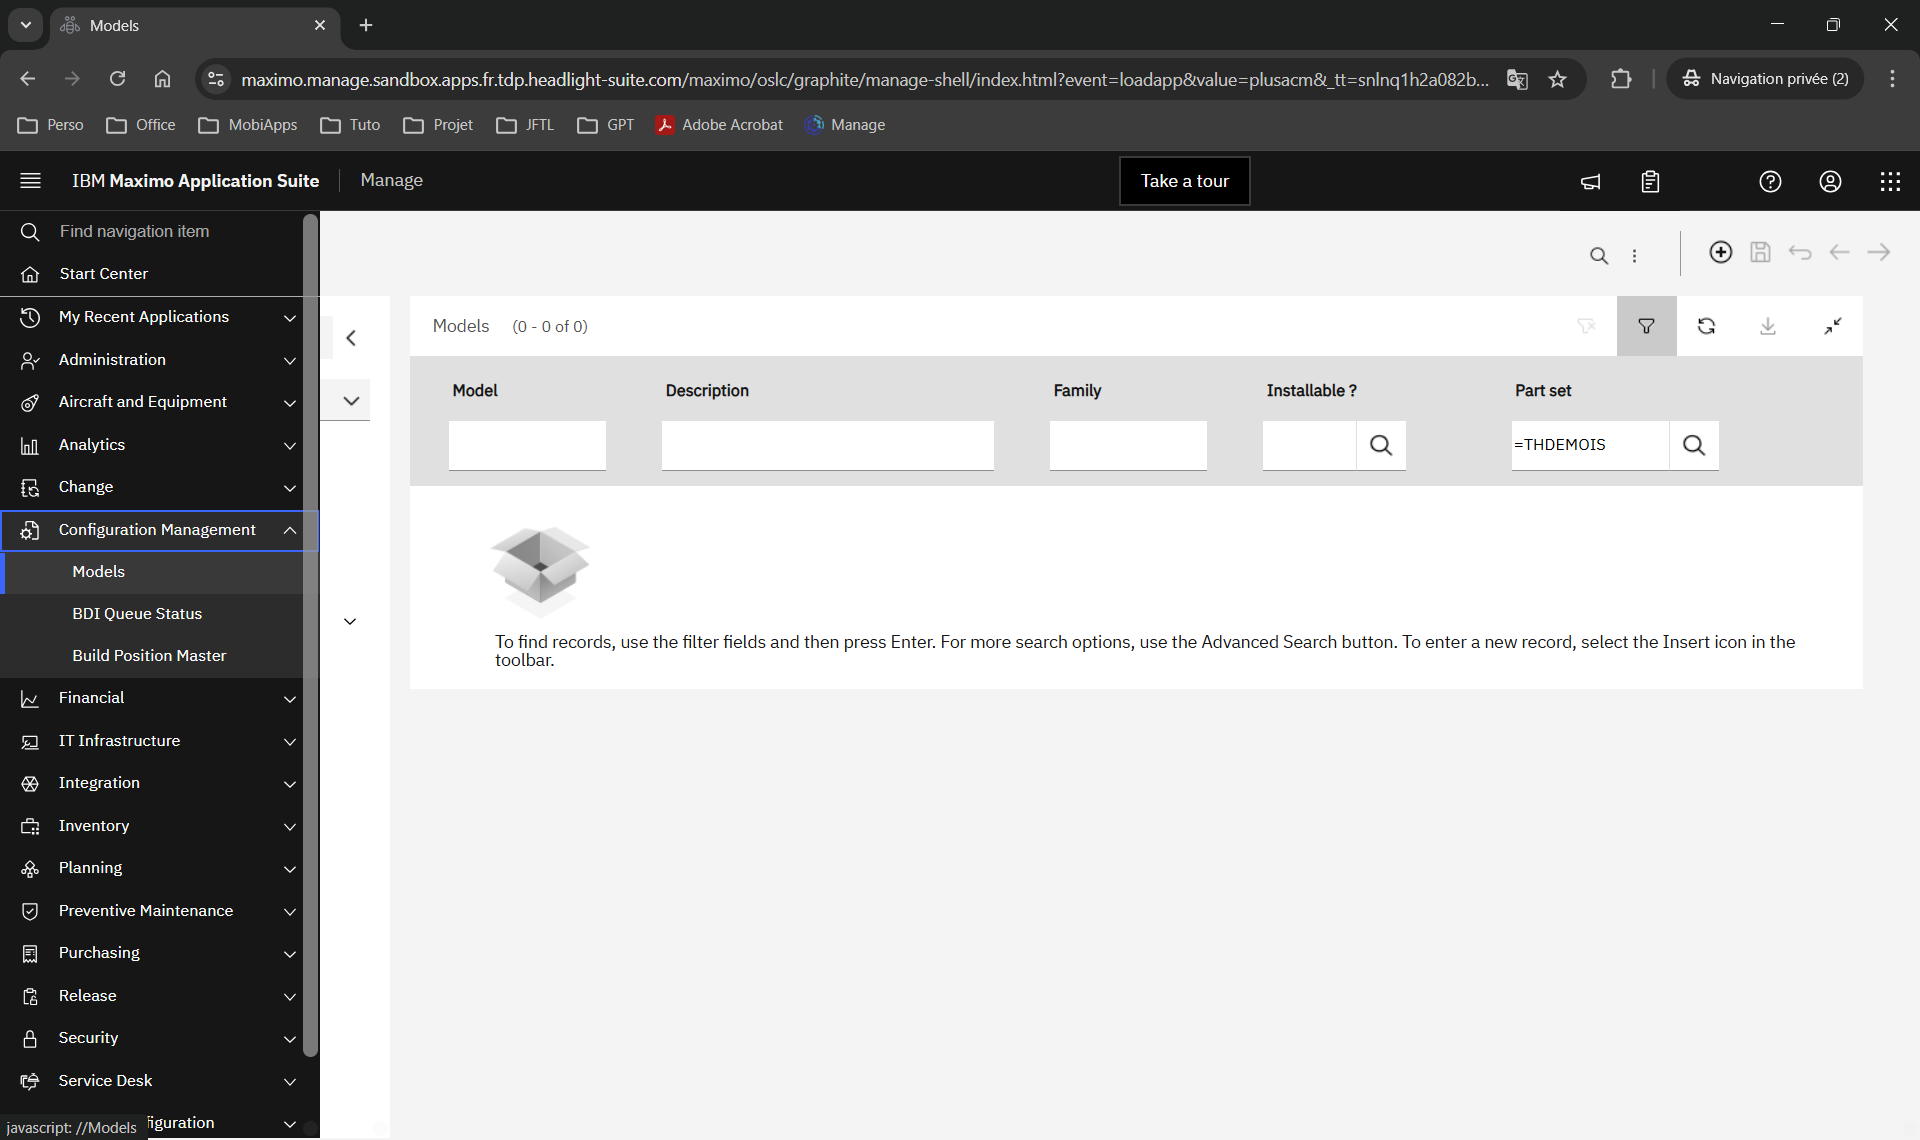
Maximo / Module - Configuration Management / Application - Models
Click the + button to create a new applicable configuration model.
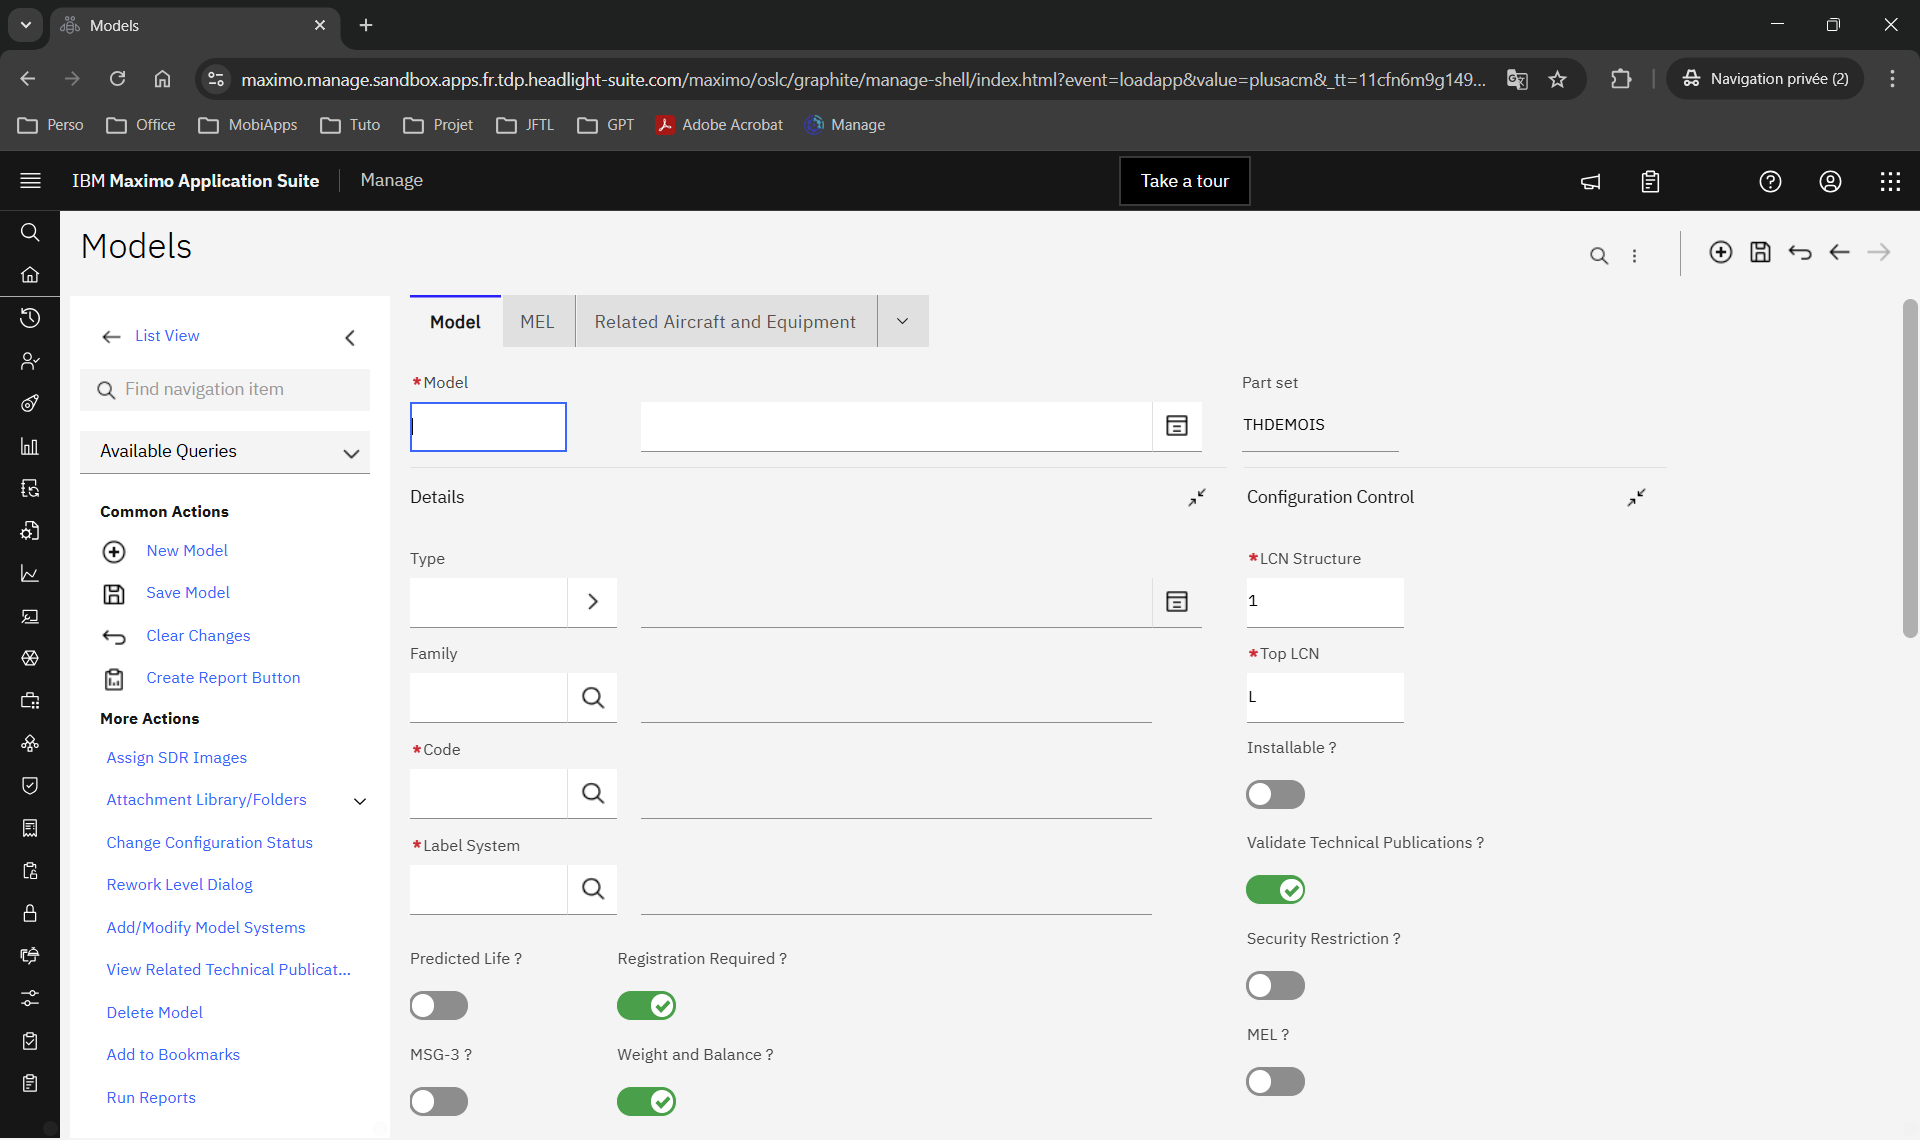
Maximo / Module - Configuration Management / Application - Models / Model creation page
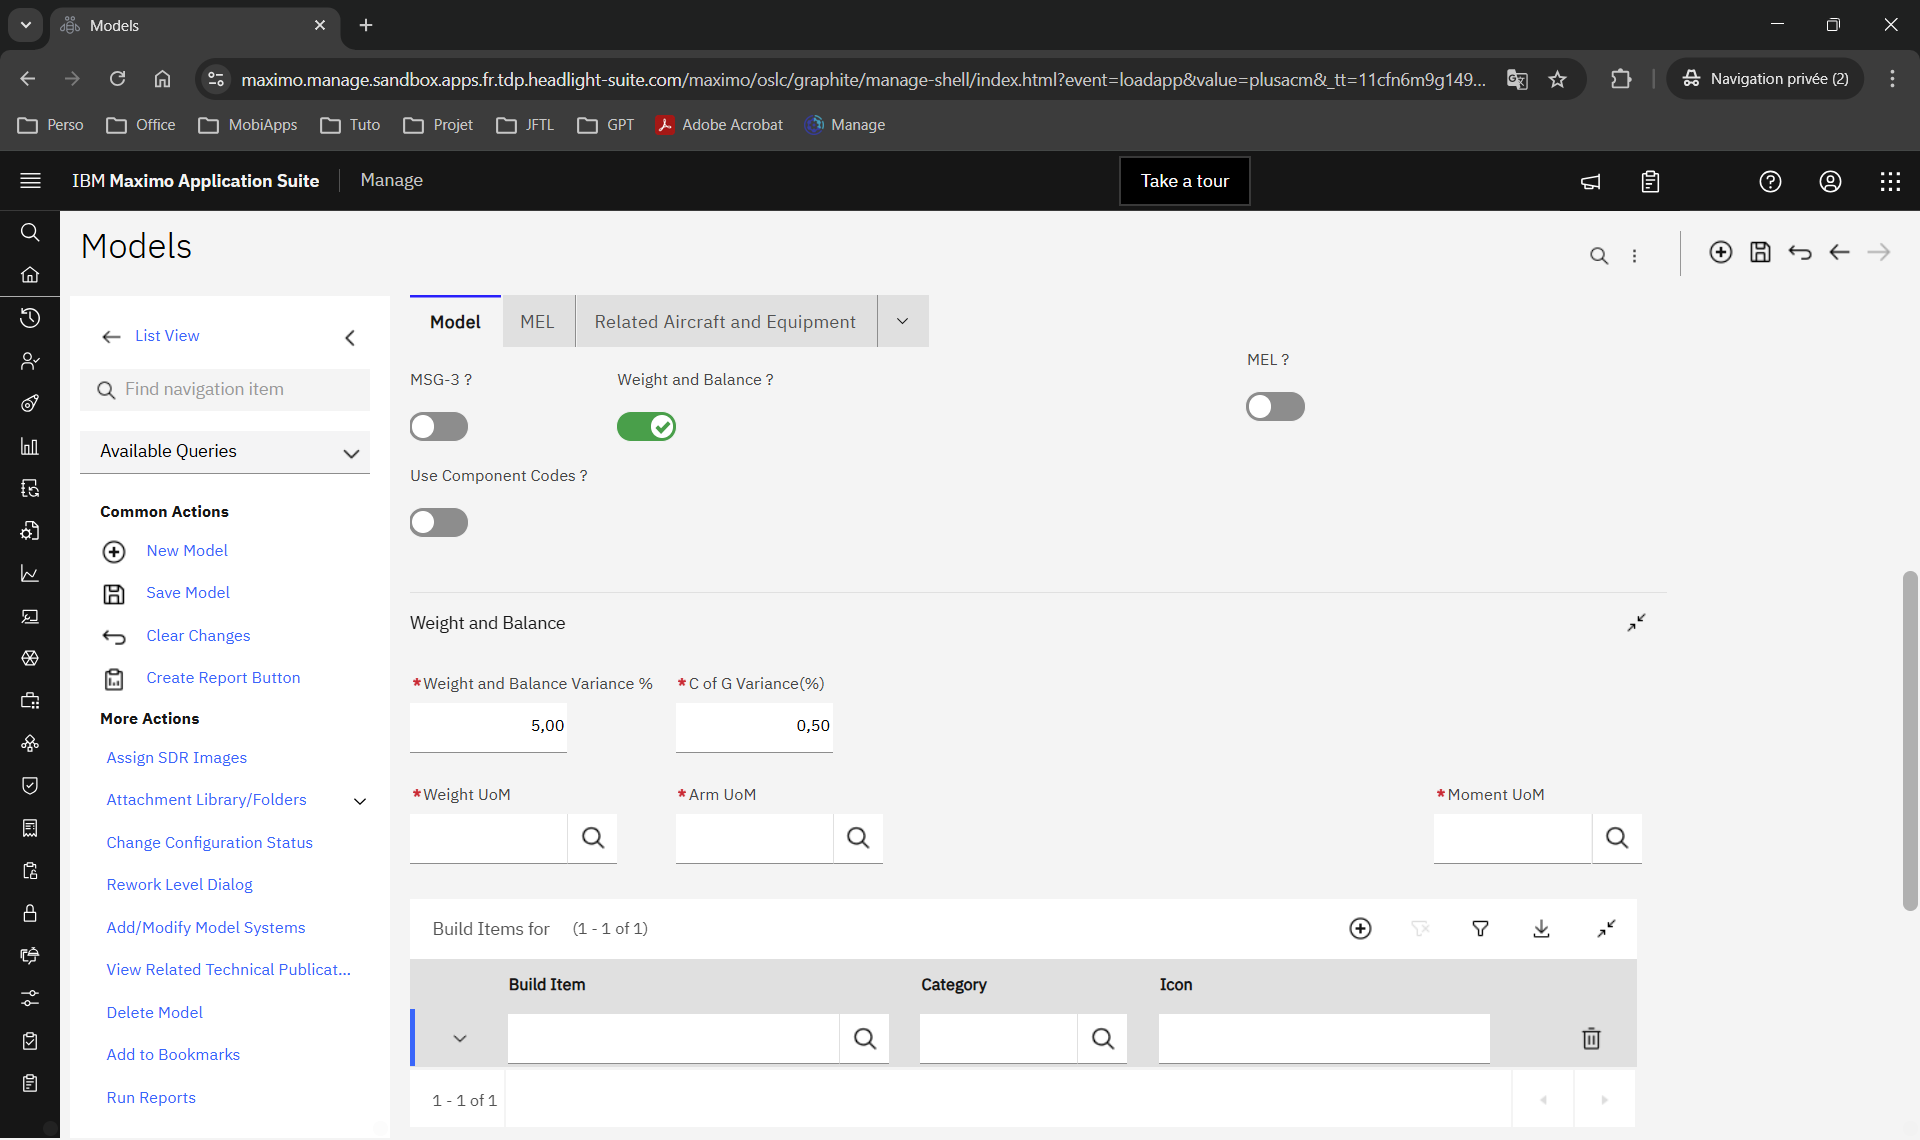
Maximo / Module - Configuration Management / Application - Models / Model creation page
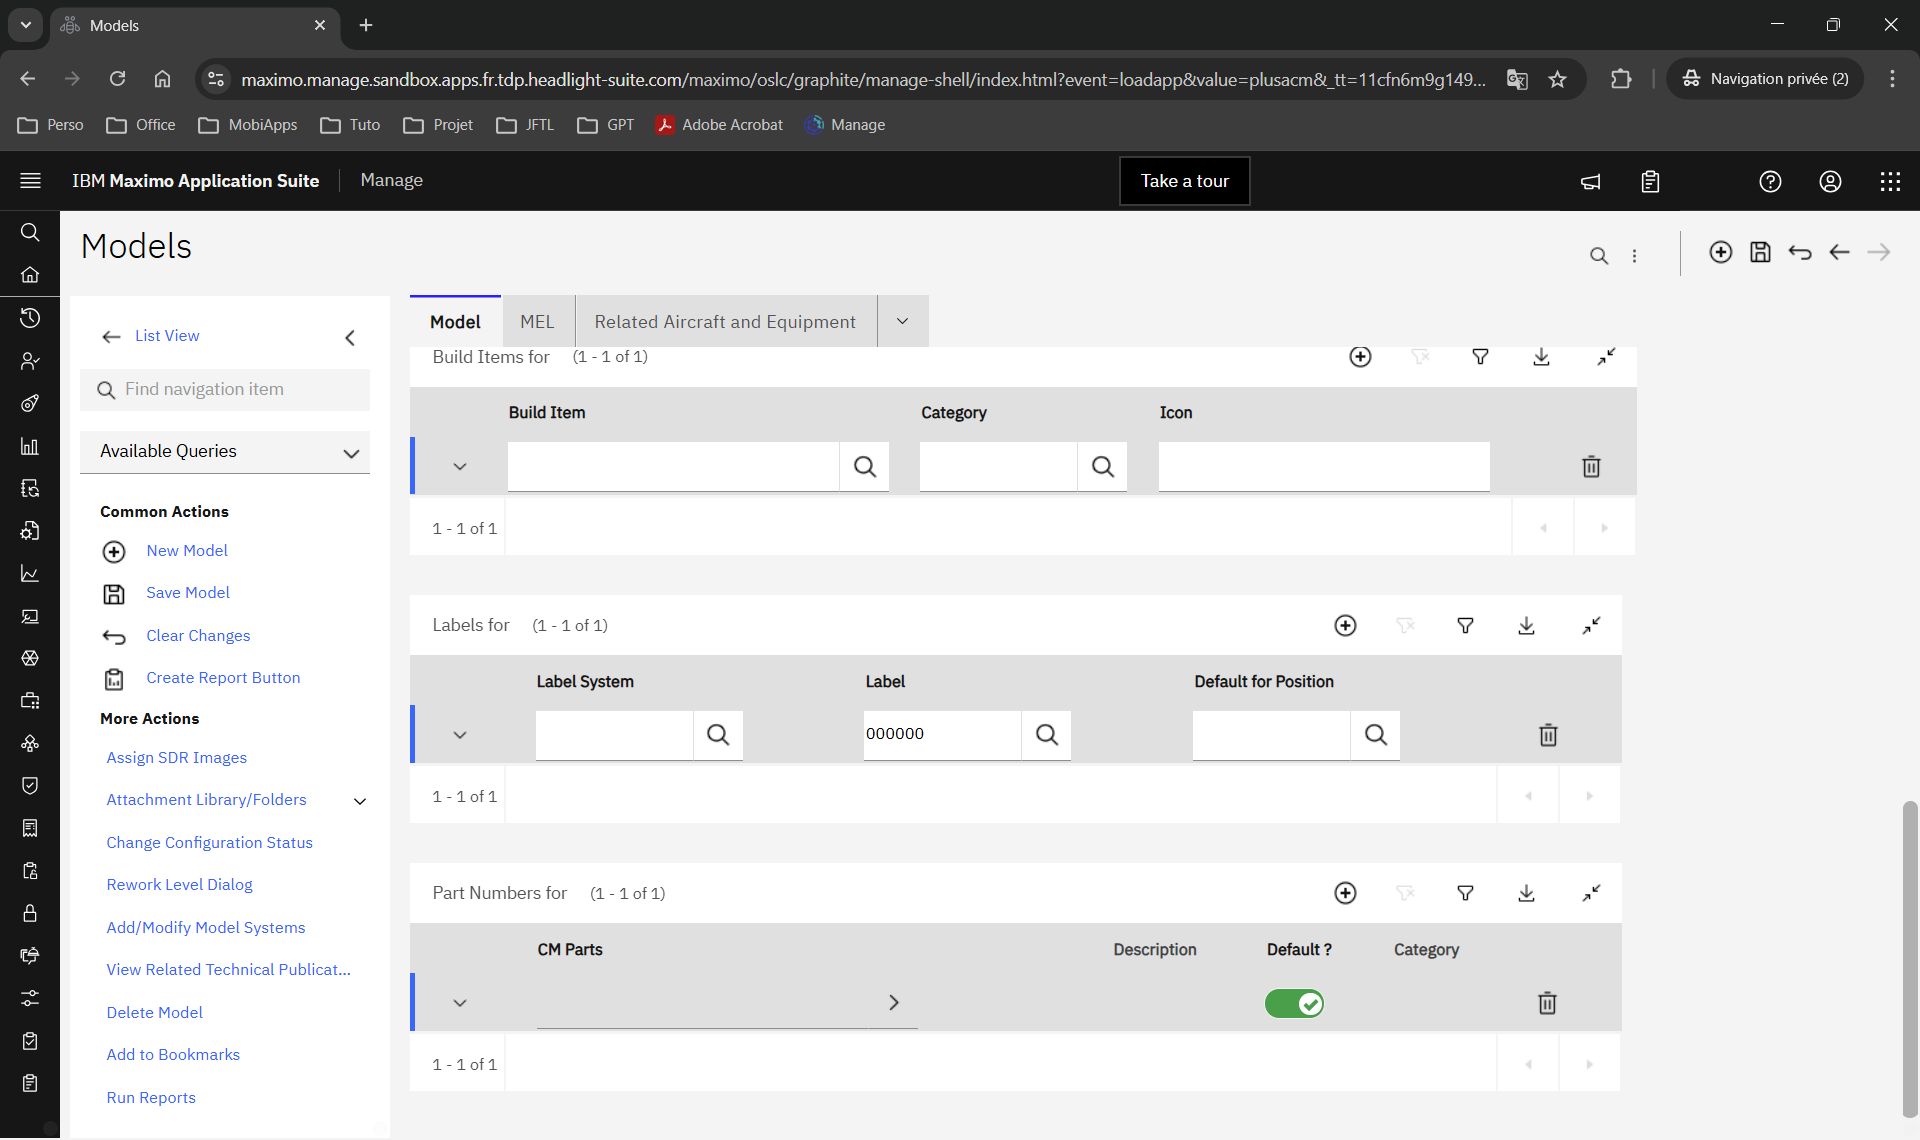
Maximo / Module - Configuration Management / Application - Models / Model creation page
Fill in the following fields:
- Model* - Model name
- Description - Describe the model, including its purpose, scope, and variant, to make identification and search easier
- Type (Details) - [TO BE CONFIRMED]
- Family (Details) - High-level model category used for search, filtering, and reporting
- Code (Details)* - Choose one of the following categories. This field indicates the nature of the model:
- Aircraft
- Engine
- Equipment
- Ship
- Station
- Transceiver
- Vehicle
- Label System (Details)* - Choose one of the following values. This field indicates the labeling system used to identify positions in the model physical hierarchy:
- ATA
- UIN
- Predicted Life? (Details) - [TO BE CONFIRMED]
- Registration Required? (Details)
- Enabled by default
- MSG-3? (Details) - [TO BE CONFIRMED]
- Weight and Balance? (Details)
- Enabled by default
- Use Component Codes? (Details) - [TO BE CONFIRMED]
- LCN Structure (Configuration Control)* - Indicates the position of a node in the build hierarchy
- Pre-filled with the value
1
- Pre-filled with the value
- Top LCN (Configuration Control)*
- Pre-filled with the value
L
- Pre-filled with the value
- Installable? (Configuration Control) - Indicates that the model can be installed in another model
- Validate Technical Publications? (Configuration Control) - BDI validates applicable Technical Publications / Technical Records during its processing
- Enable this option if Technical Publications / Technical Records are used to manage compliance and/or automatically trigger actions such as PM or WO through BDI
- Disable this option if these objects are not used for this model, or if you do not want BDI to validate them automatically
- Security Restriction? (Configuration Control) - Indicates whether the model is subject to access restrictions
- MEL? (Configuration Control) - [TO BE CONFIRMED]
- Weight and Balance Variance % (Weight and Balance)*
- C of G Variance (%) (Weight and Balance)*
- Weight UoM (Weight and Balance)*
- Arm UoM (Weight and Balance)*
- Moment UoM (Weight and Balance)*
Import Data with MXLoader (TO DO)
Handle first:
- Part Number
- Serial Number
- Location
- Classifications
- Meters
- Work Orders
In a second phase, after Nautonier:
- applicable configurations
- applied configurations